
This article has a slightly different objective than the last ones I published, it is not about an analysis of specific malware.
Today’s article is about a case study of the Latrodectus string decryption algorithm (analyzed in the previous research). The objective is to study how to identify a string decryption algorithm when reverse engineering a malware, and how we can implement it in Python to statically decrypt them. Specifically, we will cover how to identify whether malware is using a custom decryption algorithm to obfuscate strings.
So, let’s go!
Why Do Adversaries Encrypt Strings?
It may seem obvious, but it’s good to clarify why adversaries encrypt strings to use in their Malware.
The short and thick answer is, to achieve the technical objective of Obfuscation! The implementation of encryption to obfuscate strings allows adversaries to hide strings that reveal the objective of the actions that the malware will perform. This technique is registered with MITRE ATT&CK as Obfuscated Files or Information: Encrypted/Encoded File [T1027.013].
Let’s use the example of WannaCry, which does not implement the string encryption technique. Below, we can see the simple use of the strings command, present in every Linux system.
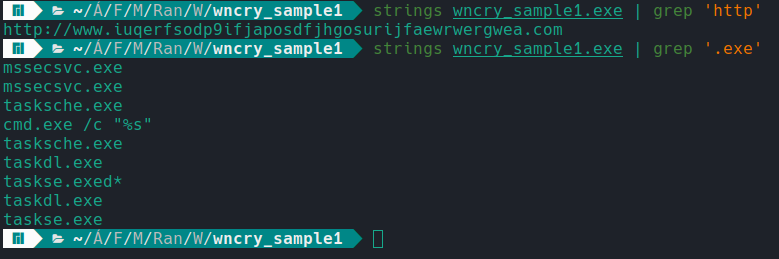
As you can see in the image above, without implementing this obfuscation technique, the malware is more vulnerable to detections by security products, and our analysis is simpler :,) .
Now let’s do the same test on a Latrodectus sample.
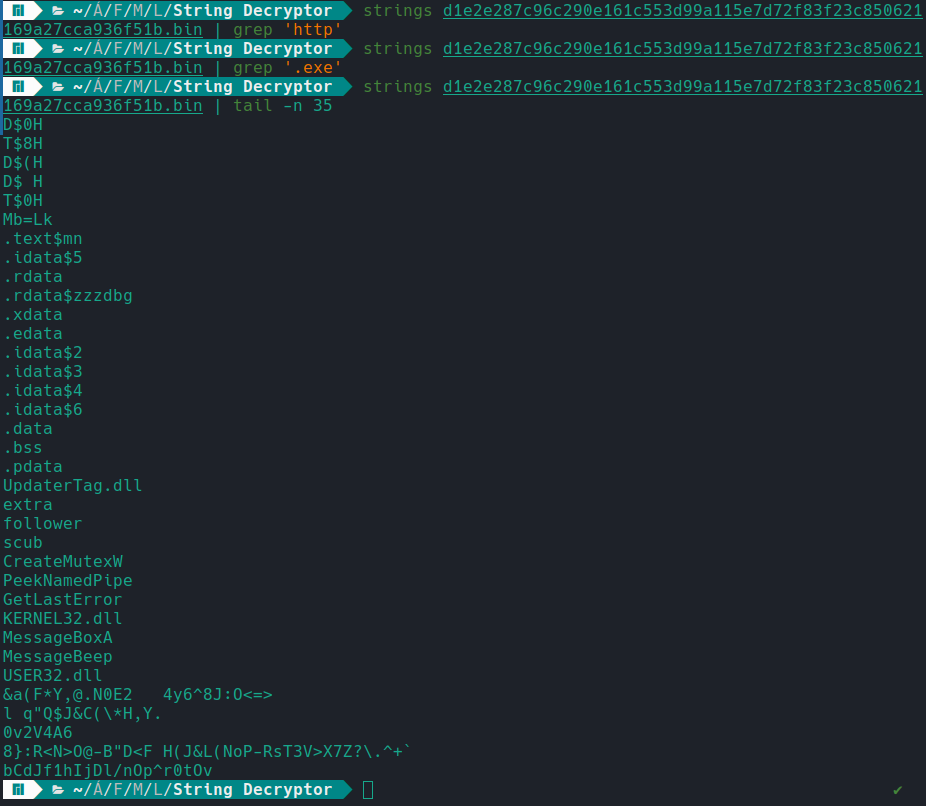
And as we can see above, it was not possible to detect with the strings command any inconsistencies in URLs or binaries, as we analyzed Latrodectus previously, we know that it communicates with two C2 servers, so this means one thing, Latrodectus implements a encryption to obfuscate strings, and decrypts at runtime!
Now that we understand why adversaries implement this obfuscation technique, let’s understand how we can identify the use of a decryption algorithm in malware.
How to Identify the Implementation of a Decryption Algorithm?
Firstly, there is no single correct answer to this question, secondly, here comes the famous ‘it depends’!
Adversaries will always seek to implement custom encryption algorithms to obfuscate strings and some payloads. This is because using known algorithms, whether through Windows APIs or by manually implementing a known algorithm, can reduce the adversary’s chances of passing through detections and slowing down our rate of analysis of their sample. This is because the algorithm is already known to us, therefore, it is easier to identify constants or the flow of a given algorithm.
But when the adversary goes down the path of implementing its own algorithm, it runs the risk of implementing something simpler than what already exists. This is because the adversary certainly does not want to disrupt the functioning of the malware. Another risk that the adversary may run is that, once identified by a researcher, detections to monitor the presence of a particular malware family will come into existence, in addition to automated extractors using scripts. Therefore, these custom algorithms are short-lived.
But how can we identify that a malware has a string decryption routine? Let’s go.
As I said earlier, there is no single method of identification. So here are some tips, and then we will analyze how the behavior is observed in Latrodectus.
- A single function is called dozens or hundreds of times during code execution (the amount will depend on the malware);
- The function will probably be receiving as an argument an offset that points to a block of data, probably encrypted.
- When looking at the function execution flow graph, you will probably find one or more loops that perform operations on the data. The likely operation you will encounter will be the XOR operation, which will have the encrypted data and the XOR key as protagonists of this operation.
- Another tip I can give is to identify in your favorite Disassembler if there are several blocks of data that are called by the same function during code execution.
Below we can see that in Latrodecuts it is possible to identify some of these patterns that I mentioned above.
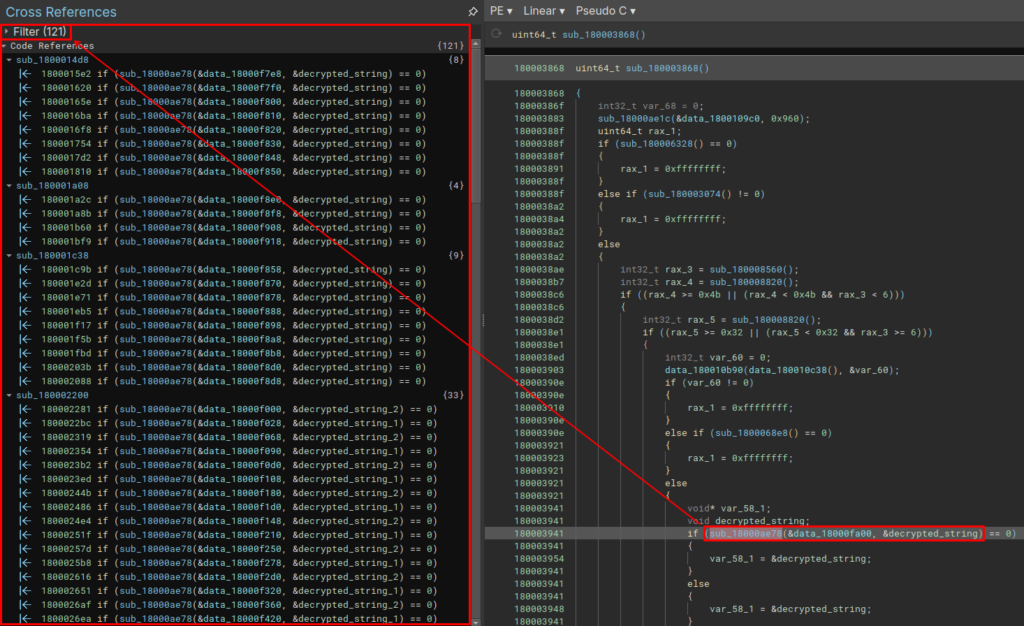
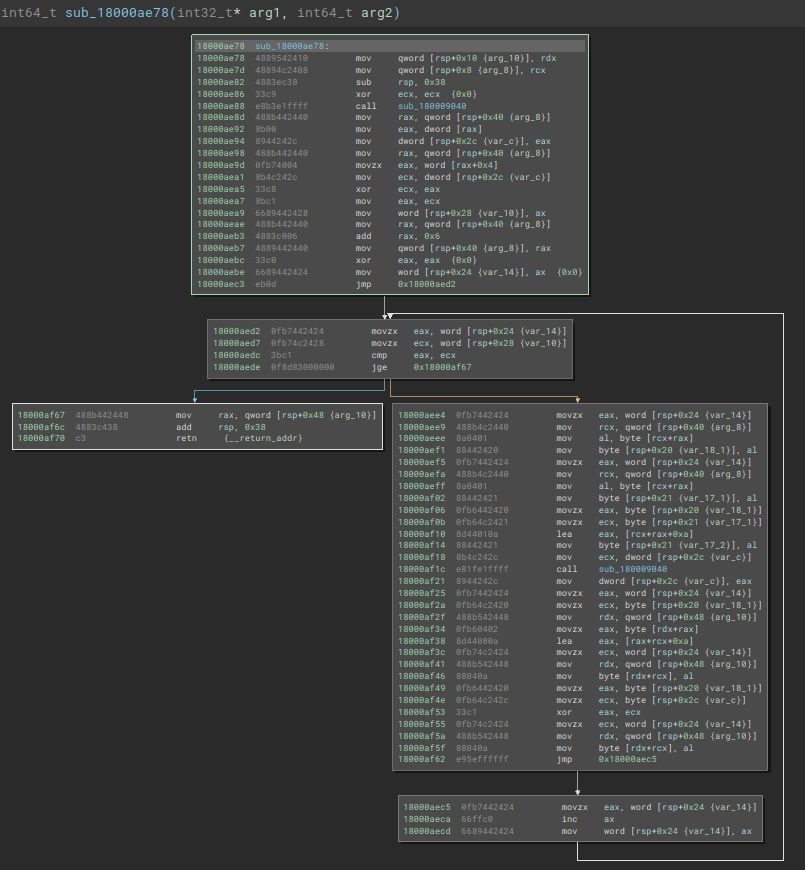
Function sub_18000ae78 is called 121 times during Latrodectus execution. Another pattern that we can detect is that this function receives a set of data as an argument, and stores the result of the function’s manipulation in a buffer.
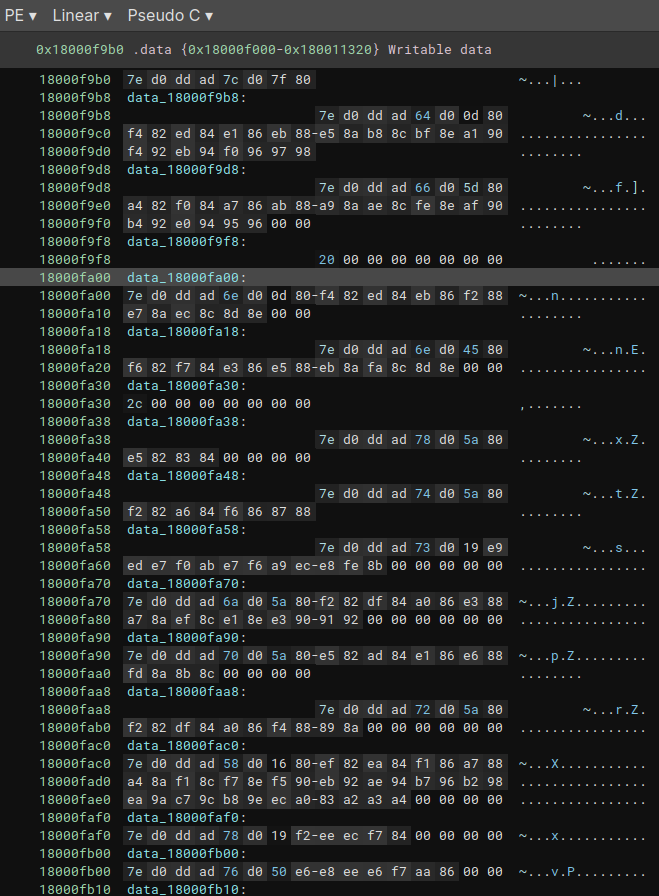
Below we can observe the encrypted data block that is passed as an argument (data_18000fa00), in addition to being able to observe the other encrypted data blocks.
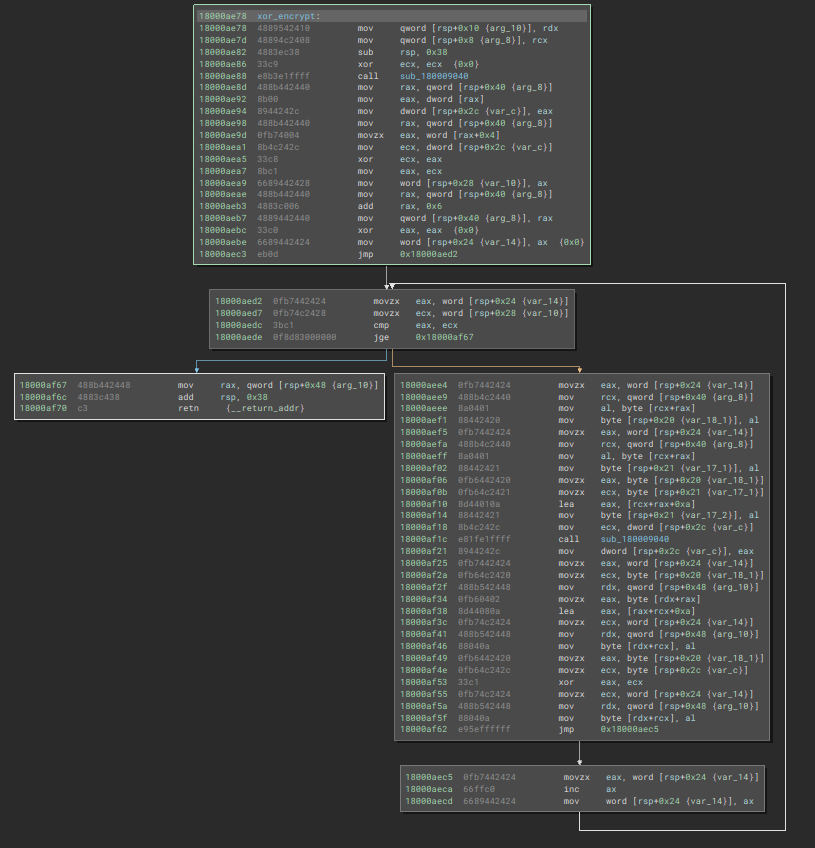
If we look at the execution flow in graphical mode, we will also detect another pattern, a loop that manipulates data through XOR operations.
Now that we have been able to identify the string decryption function, let’s analyze how it works statically and dynamically.
Analyzing Latrodectus Decryption Algorithm
Here, we begin our hands-on adventure. First, when we are going to do our dynamic analysis as a complement to the static one, we need to locate the exact decryption function in the debugger, so as not to get lost. In the debugger we do not have the Decompiler crutch, so it is important that during dynamic analysis using a debugger, you have the disassembler/decompiler open.
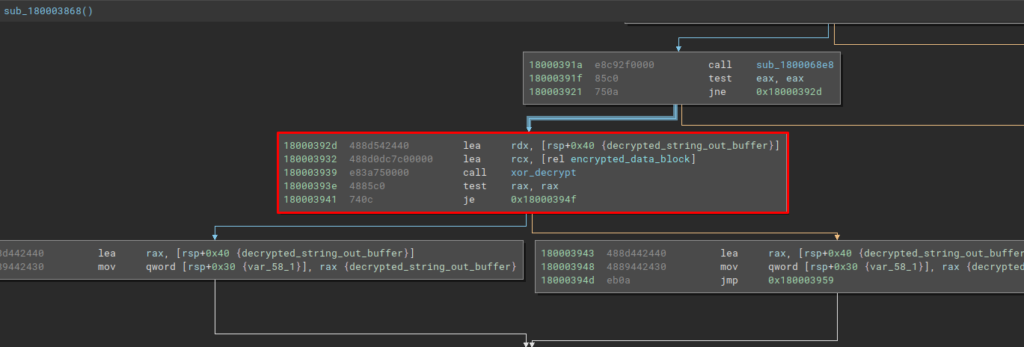
In the decompiler, we can see below the exact moment when our decryption function is called for the first time in the code.
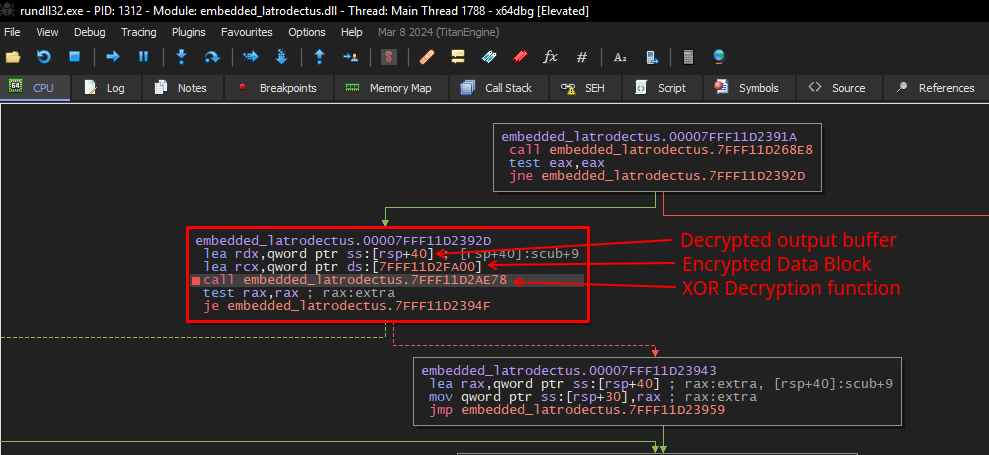
And below, we can observe the same moment. As our notes will not be present in the debugger, it is recommended that you set seven breakpoints and write comments, to remember where each action is done.
To validate where we are, below we can see the content of the encrypted data block that the xor_decrypt function (renamed by me, for documentation purposes) receives as an argument.
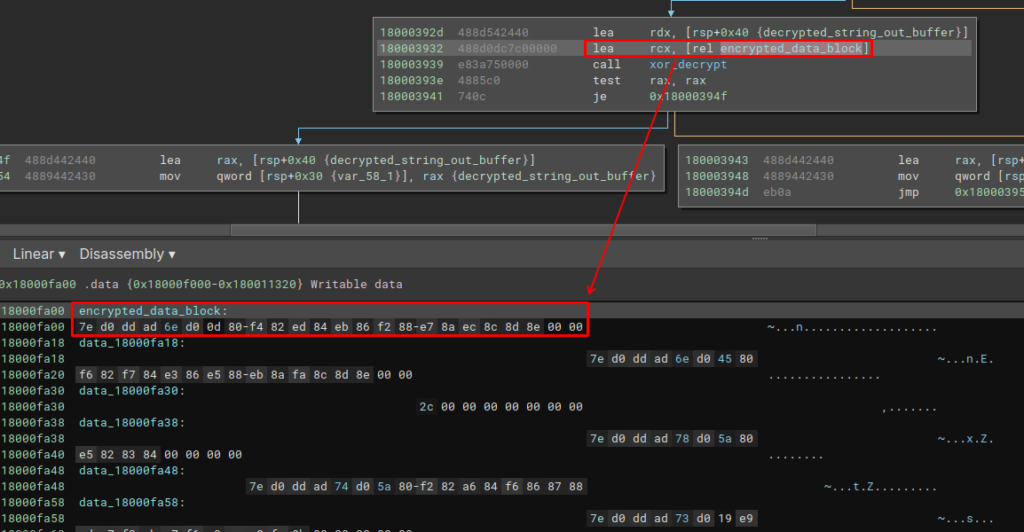
If we do the same thing with address 7FFF11D2FA00, we will observe the same data.

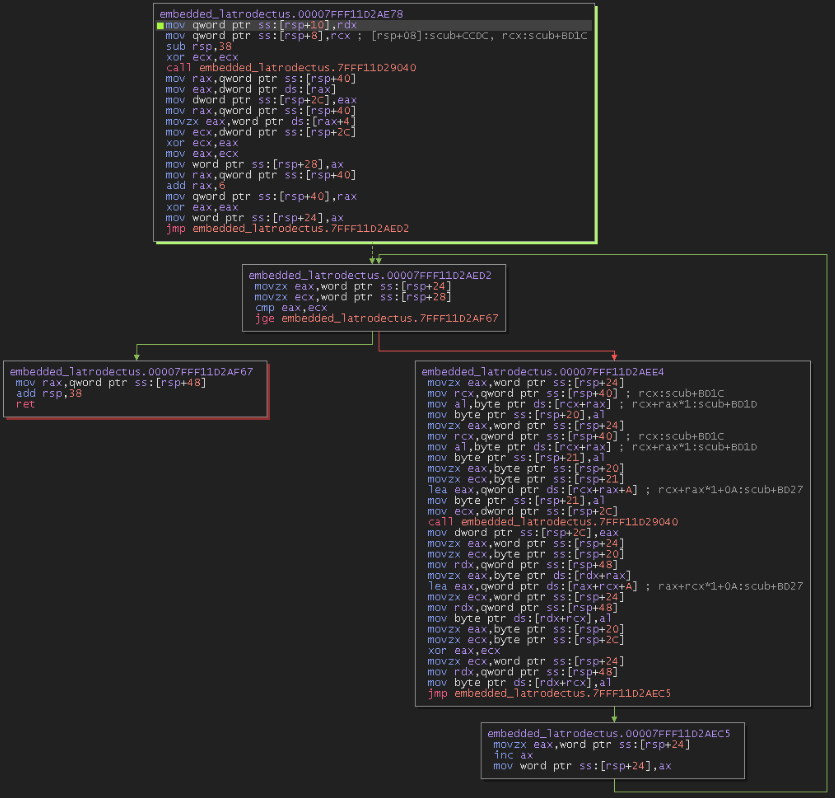
When we enter the function (Step-In in the debugger), we can also validate that the execution flow through graphical mode is the same. You can observe the comparison in the sequence of images, and see that we are in fact in the correct function.
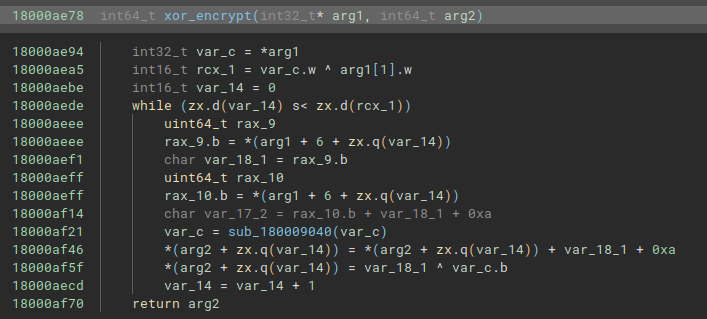
We can also use Decompiler to give us a hand in analyzing this algorithm. In our pseudo-code, we can see that first there is an XOR operation between some bytes within the data block itself. Then, rcx_1 is used as a conditional for the while loop to continue executing, as long as var_14 (set to 0) is less than rcx_1. This is where we can assume from experience that right now the algorithm is calculating the value of the block of data that will be decrypted. After all, the block needs to have an end.
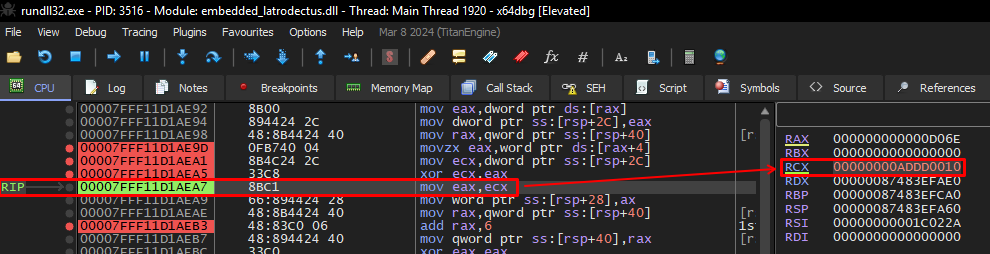
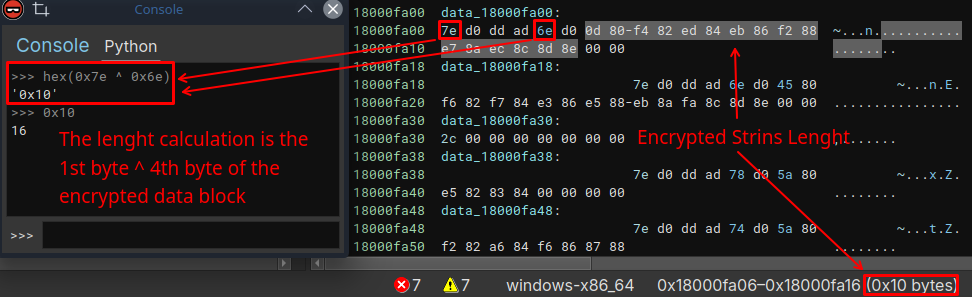
To validate, we can check in the debugger. Below, we can see the suspicions of what we saw in the pseudo-code above. The algorithm selected two bytes present in the data block, 0x7e and 0x6e, and performed an XOR operation between these two values.

The value of this XOR operation was 0x10, as we can see in the RCX register.
If we check in our Disassembler, byte 0x7e is the first byte of the every data block, and 0x6e is the fifth byte of this specific data block. In the image below, we can also redo the operation through the Binary Ninja Python console, where the value will also give 0x10, which in decimal is 16. And if we further analyze the block of data in question, we will also be able to observe that 0x10 is the exact size of this specific data block, before null values. In other words, in fact, the algorithm sets the size of the current data block that will be decrypted, and uses the value of its size as a conditional for the while loop.
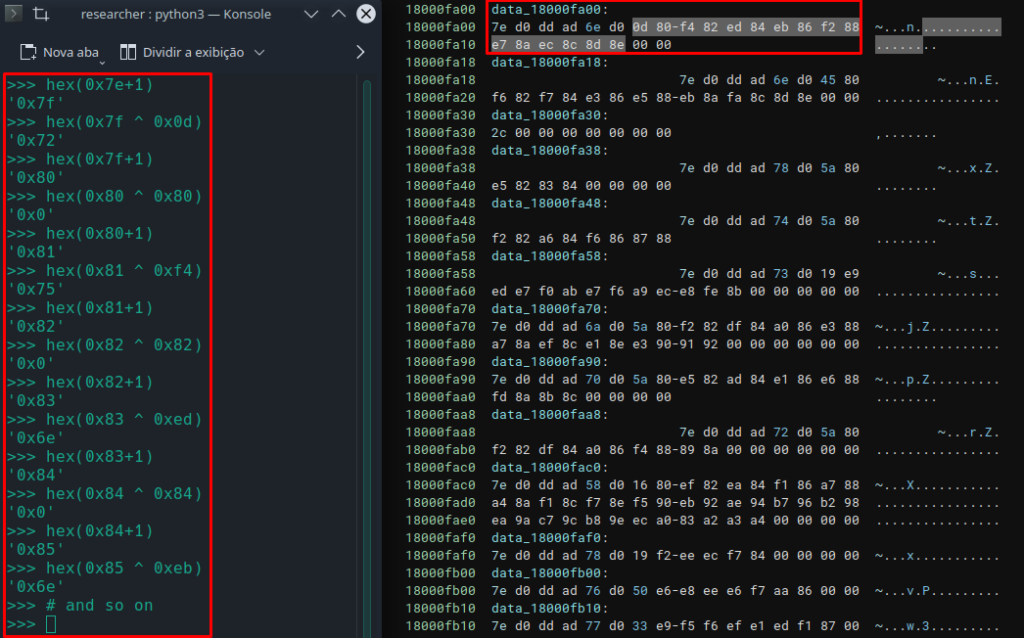
As we proceed, the decryption algorithm calls a function that we can also observe in the pseudo-code. This function simply adds 1 byte (going from 0x7e to 0x7f) to the first byte of the encrypted data block.

Next, the algorithm will perform an XOR operation with the byte appended to 1 (0x7f) and with byte 0x0d, which is the seventh byte of the encrypted data block.

We can validate this information in our Disassembler, where it is possible to observe that the algorithm skips the initial 6 bytes of the encrypted data block.

When we perform the XOR operation between the values 0x7f and 0x0d, the result (stored in RAX) will be a string identified as ‘r‘.

Having analyzed this behavior, we reached the following conclusion:
- The first byte of all blocks to be decrypted is the initial byte, which will always have its value increased by 1 for each subsequent byte (starting from the seventh byte of the encrypted data block) in which the XOR operation will be performed. That is, each byte will have a different XOR key.
- The fifth byte of each encrypted data block will be used together with the first byte of the block to calculate the size of the block that must be decrypted
- In other words, the first six bytes of each encrypted data block are not decrypted, they are what we can call the control header.
Below, we can validate our assumption. Below, I manually made the algorithm execution flow.
Upon obtaining a certain set of bytes, I went to CyberChef to transform the hex data into readable output, and… Voilà!
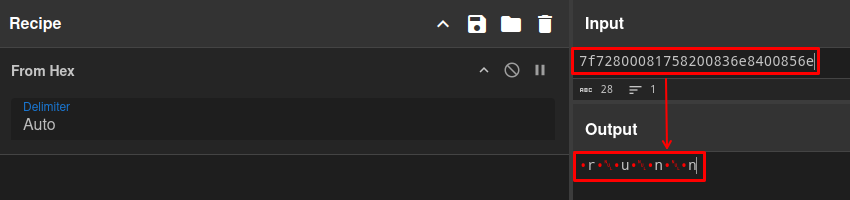
As we know from the Latrodectus analysis in my previous post, the string above is part (I just streamed it in a few bytes, out of laziness) of the runnung string, which is used to create the Mutex on the infected system.
Latrodectus Decryption Algorithm Flowchart
In order to improve understanding of the algorithm, below is a flowchart I made just to illustrate the flow of executing the Latrodectus string decryption algorithm.
Once you understand the algorithm, you can implement this algorithm in a script, with the aim of extracting the strings from the sample you are analyzing.
Python Script for String Decryption and Extraction
I created a Python script that will run the Latrodectus decryption algorithm, print the entire flow of its execution for debugging and study.
Below is the video of the execution of the script.
Python-Only – Latrodectus String Extractor
The source code of the script can be found on my github, at the link below:
- Python Only Script
- Binary Ninja Script -> from Leandro, that helps a lot to do my own, and this research.
Conclusion
Well, I hope this type of article pleased you, the reader, and that you learned something new!! See you around!