
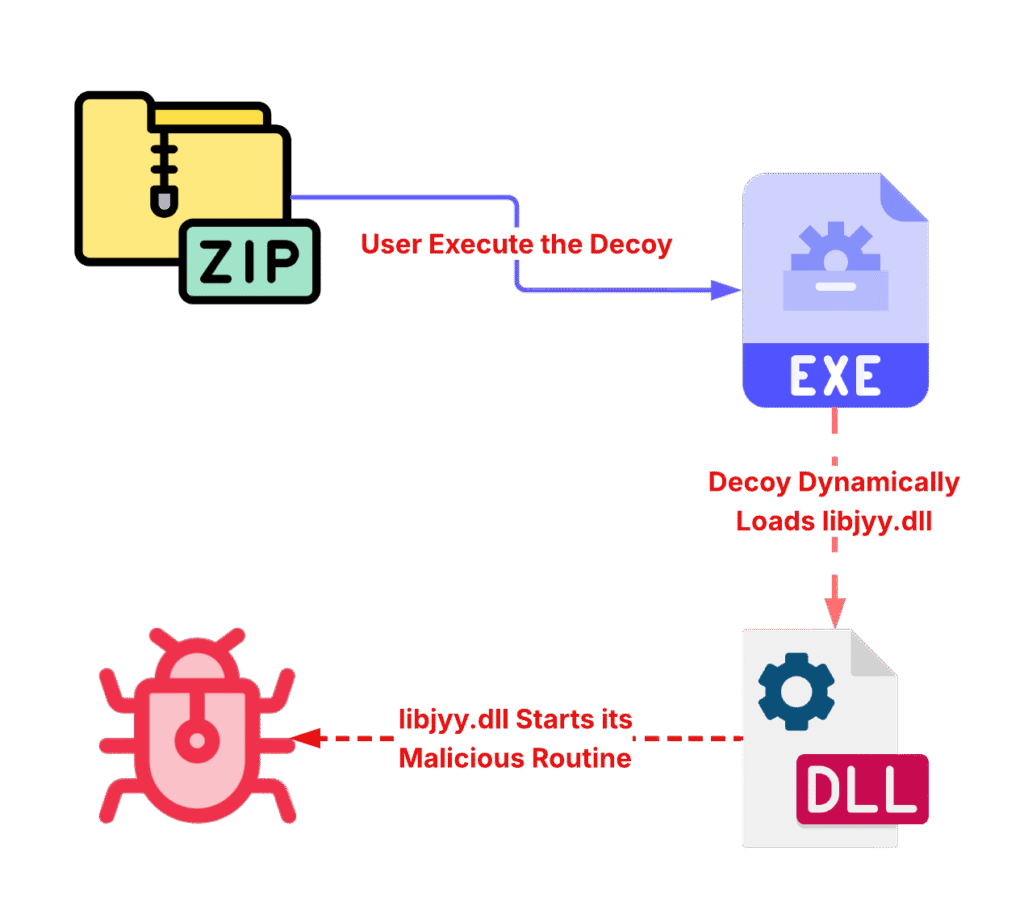
In this new post I will analyze, once again, an execution chain of payloads delivered via Phishing from another Threat Actor China-Nexus, however, implementing the same TTP, yes, DLL Side-Loading!
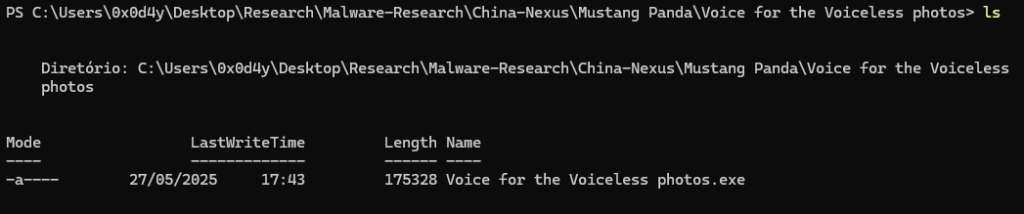
In this research, I will explore a campaign by Threat Actor Mustang Panda, identified in June 2025 by IBM’s X-Force, which targets the Tibetan community for obviously political reasons. The initial loader is delivered via a .ZIP file containing a decoy named ‘Voice for the Voiceless Photos.exe‘, a clear reference to the Dalai Lama’s book, and a DLL that doesn’t appear in Windows Explorer through the dir and ls commands.
But when we use the ls -force command, we are able to observe the DLL libjyy.dll, containing the -arhs- modes that allow it to be hidden.
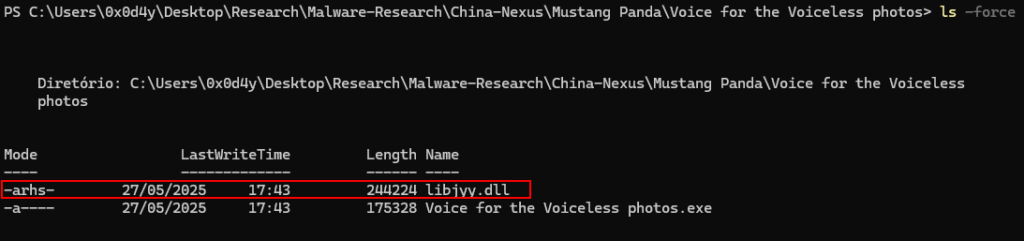
I think it’s worth breaking down this payload obfuscation technique, as it’s part of weaponizing the .ZIP file, preventing the victim from seeing the DLL and consequently not finding its presence strange. This DLL has four active attributes:
- a → File marked for backup (Windows default flag)
- r → Read-only
- h → Hidden, that’s why it doesn’t show up in Explorer
- s → System File. Explorer tends to hide this type too, even if “Show hidden files” is enabled
In other words, Explorer doesn’t show libiyv.dll because it’s marked as both hidden and system. By default, Explorer ignores files with both of these attributes unless you go to Folder Options → View → Uncheck “Hide protected operating system files.” This prevents the user from suspecting the presence of an unexpected file when opening the directory and clicking on the initial payload.
That said, let’s analyze this campaign. For the entire analysis workflow, I’ll be using Malcat <3.
Analyzing Voice for the Voiceless Photos.exe
Triage
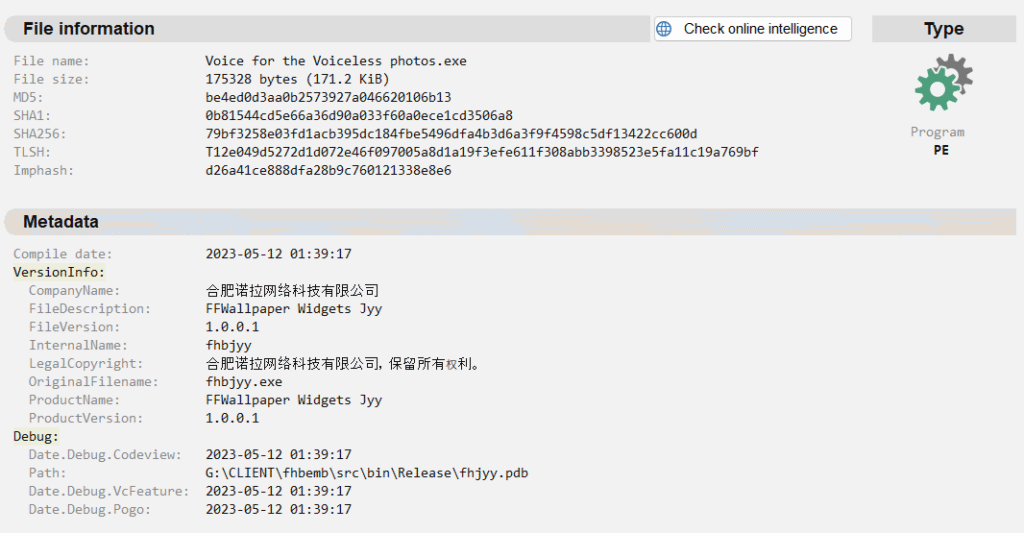
When we open the decoy present in the .ZIP, we can observe some information that has already been seen and identified in previous Threat Actors China-Nexus campaigns, in addition to a pseudo product name among other information unique to this sample.
- Company Name: Hefei Nora Network Technology Co., Ltd. -> No company with this name was identified, but it has been used in other Threat Actors China-Nexus campaigns.
- Legal Copyright: Hefei Nora Network Technology Co., Ltd. All rights reserved.
- Product Name: FFWallpaper Widgets Jyy
- PdbPath: G:\CLIENT\fhbemb\src\bin\Release\fhjyy.pdb
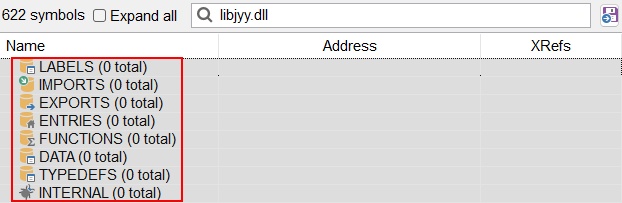
Since we know there’s a hidden DLL in the directory, we can search for static import references to this DLL and its functions, but this search yielded no results. This suggests that this DLL will likely be loaded during decoy execution.
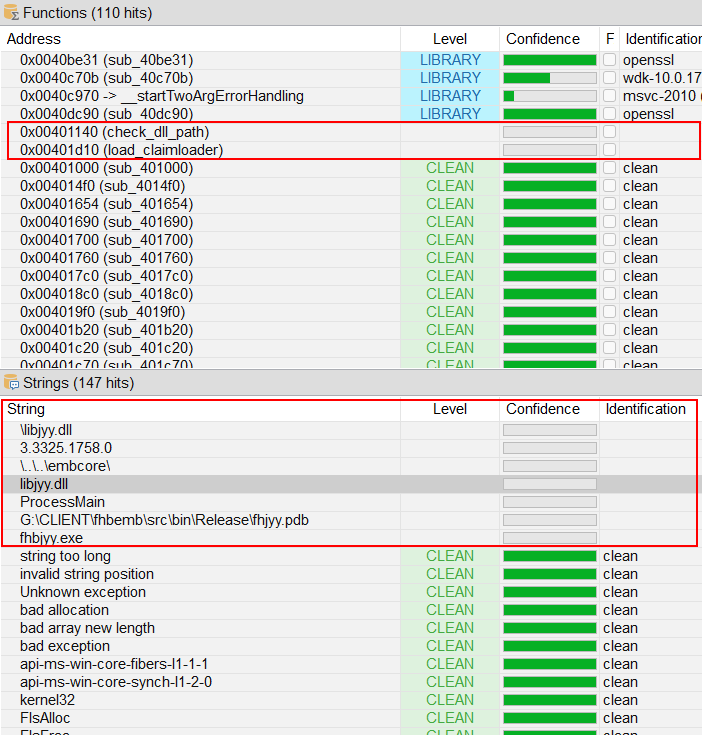
To triage this decoy, I used Malcat’s Kesakode feature, which aims to identify patterns of known functions/strings from malware families, and functions/strings that are identified as benign. However, it’s also possible to identify unknown functions and strings, which could be indicators of maliciousness, as they haven’t been identified in known malware, and especially not in benign software. This can give us a direction on where to begin our more in-depth analysis.
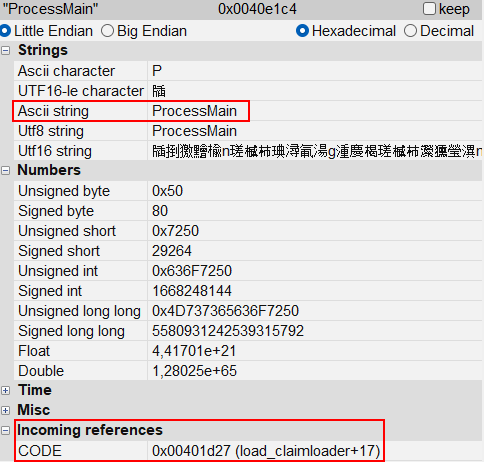
Below you can see two unknown functions (which I renamed) and unknown strings, one of which even allows us to assume it is the name of a function (ProcessMain).
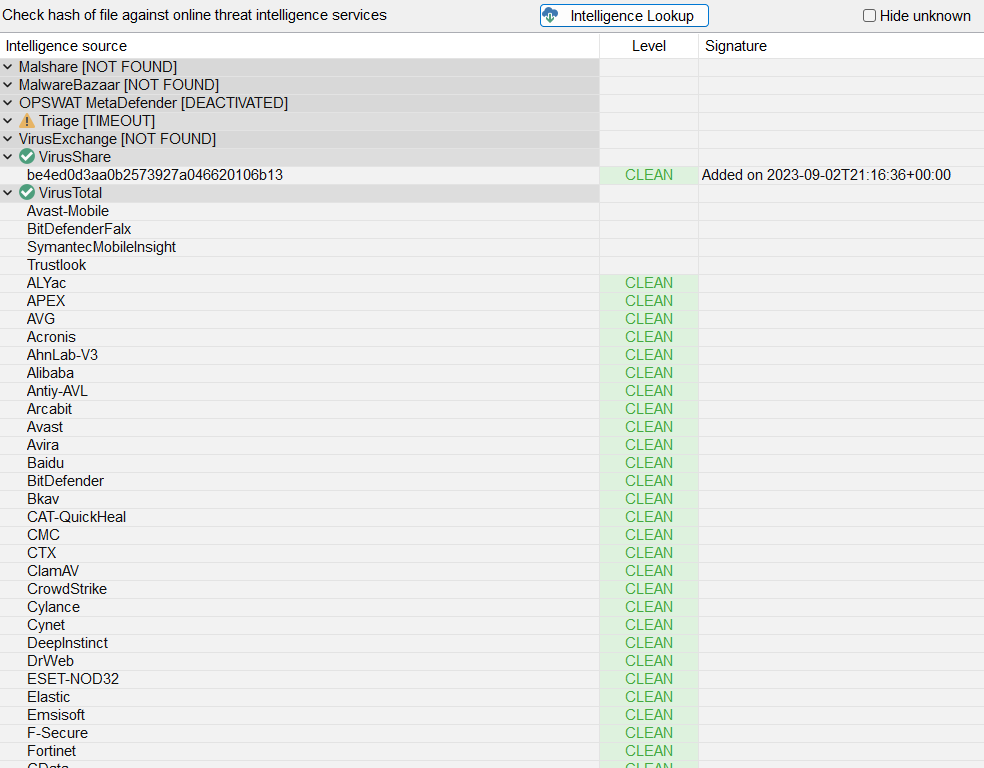
To complete this initial screening, I also used the built-in Intelligence Lookup feature, which, through a pre-configuration of API keys, allows us to check the existence and verdict of this sample in widely known services, such as VirusTotal, VirusShare, Triage, Malshare, MalwareBazaar, etc.
And as we can see in the image below, the lookup allowed us to identify that this binary is Clean based on the samples in which it exists.
Reverse Engineering the Decoy
When analyzing the String reference identified as unknown in the previous section, we can see that it is referenced in a function, which Kesakode also identified as unknown. Therefore, let’s start with this function identified at offset 0x00401d27.
The function is quite small, divided into just four blocks of assembly code, but it focuses on its main functionality: loading the hidden DLL present in the .ZIP file delivered to the victim. And if we look closely, the decoy loads the hidden DLL dynamically, through LoadLibraryW, and specifically the ProcessMain function. This allows us to clearly identify where to begin analyzing the hidden DLL.
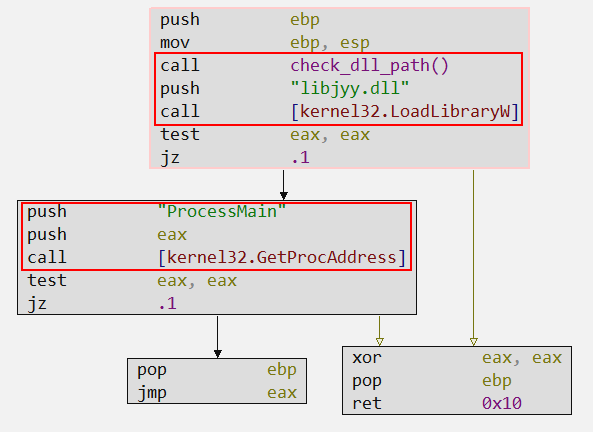
And this is the only function of this decoy, to load the real malicious payload which consists of the hidden DLL named libjyy.dll.
Analyzing libjyy.dll
Triage
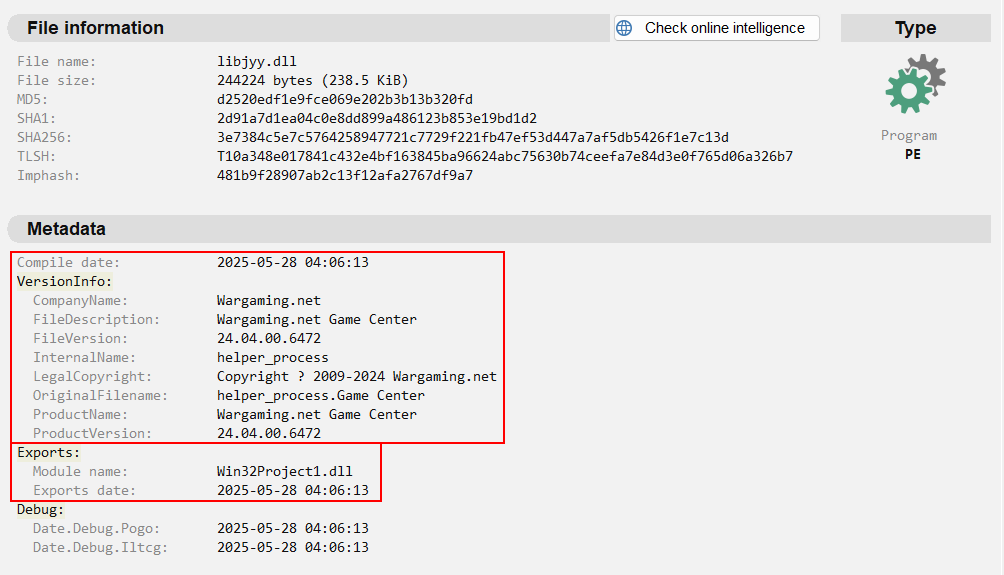
Following the same screening flow, we open libjyy.dll, we can observe some interesting information.
- Company Name: Wargaming.net. Name of a real Chinese game development company.
- Legal Copyright: Copyright 2009-2024 Wargaming.net
- Product Name: Wargaming.net Game Center
- Module Name: Win32Project1.dll
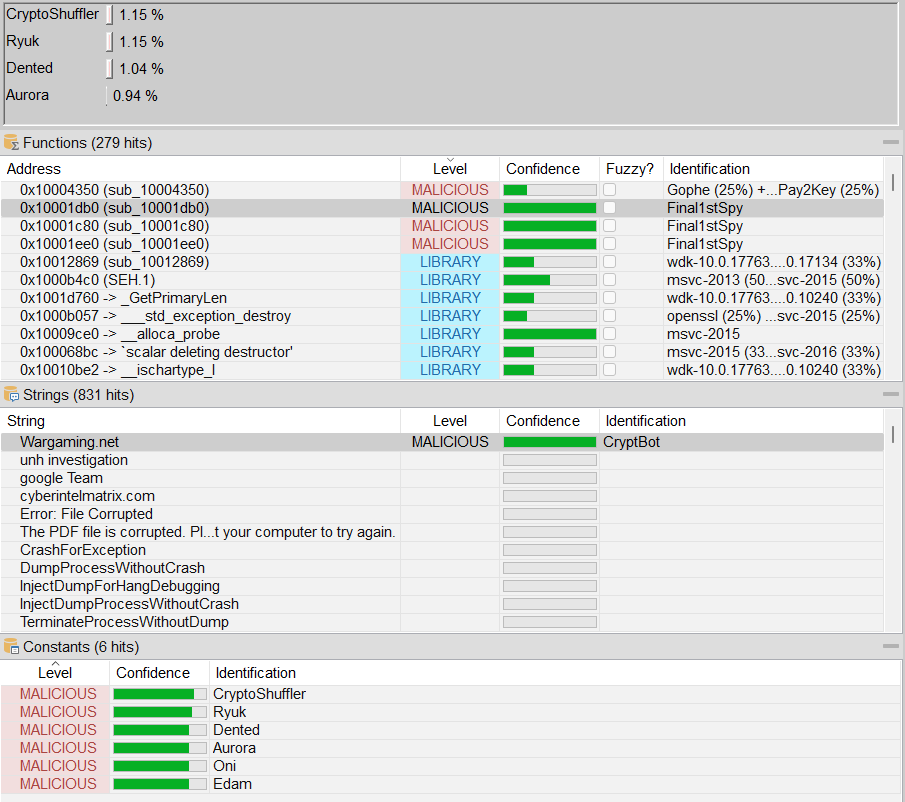
By submitting this sample to Kesakode, we can observe some functions identified as malicious, and further identify the malware family in which the function is related. We can also observe unknown strings identified as malicious, as well as malicious constants identified in this sample that are known to have been observed in other malware families listed in the image below.
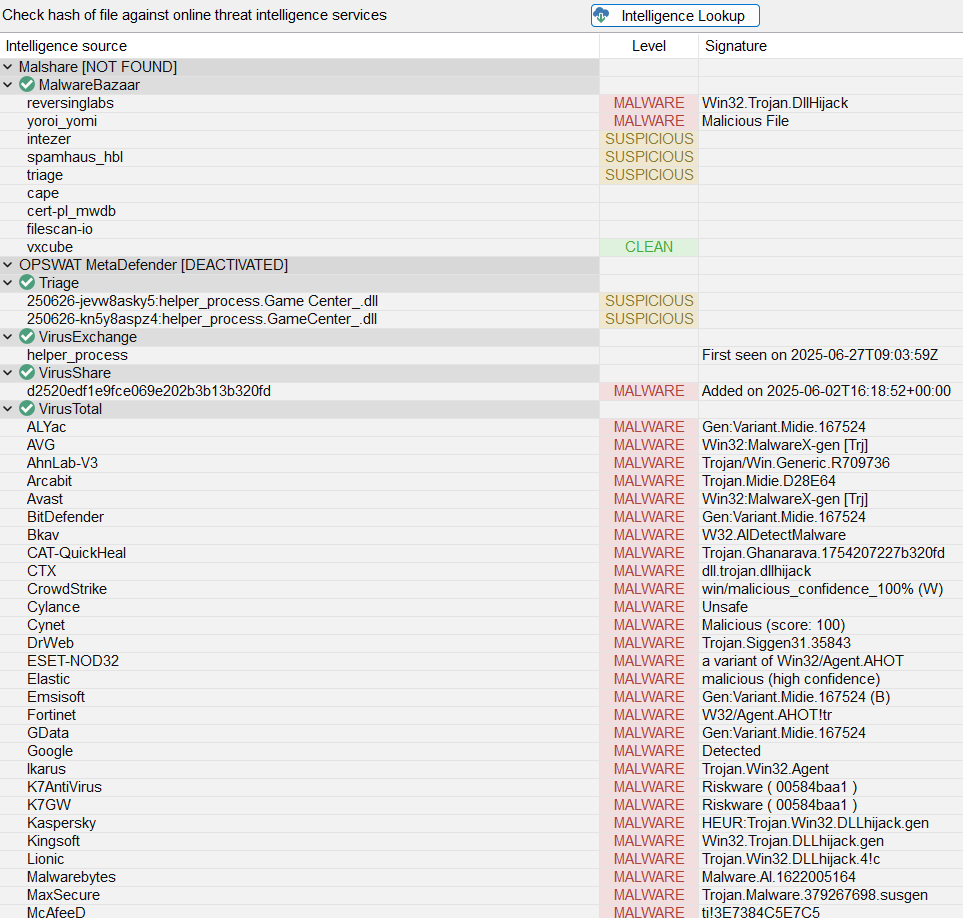
I also submitted this sample to the native Intelligence Lookup engine, which allows us to identify the presence of this sample in the Malware Bazaar, Triage, VirusShare and VirusTotal services, bringing the verdict and the name of the signatures identified in these malware databases.
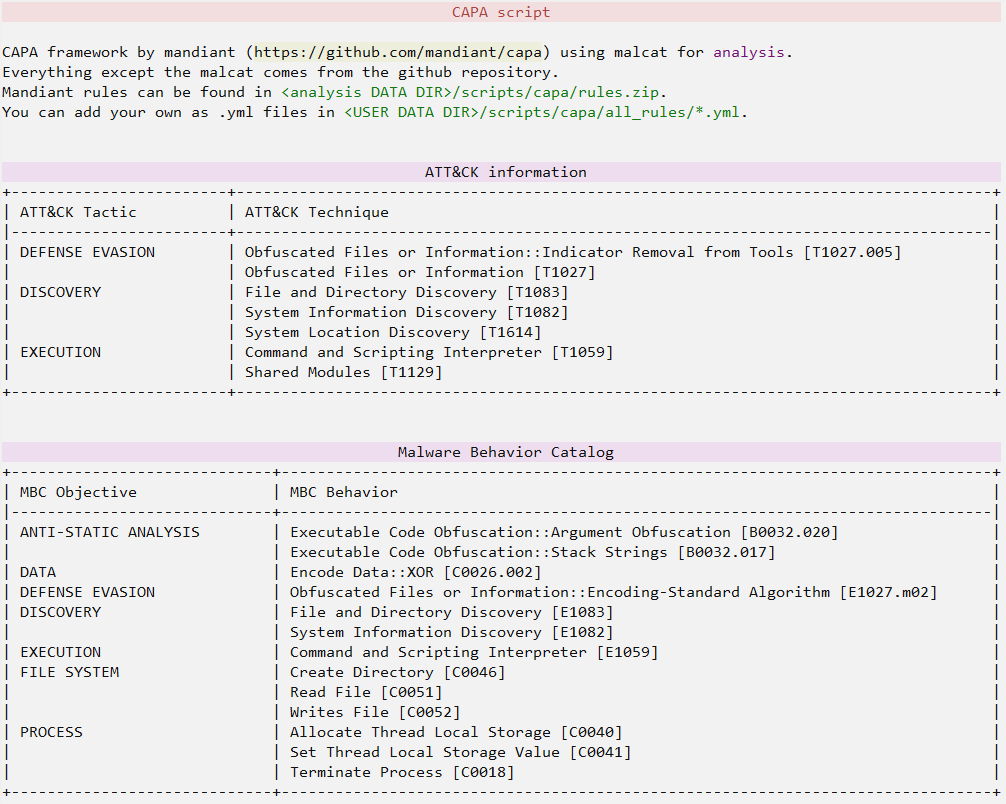
In addition to the screening features already explored above, Malcat also allows us to use CAPA to expand screening by identifying potential capabilities implemented in the sample. Below is the output of the capabilities identified by CAPA integrated with Malcat.
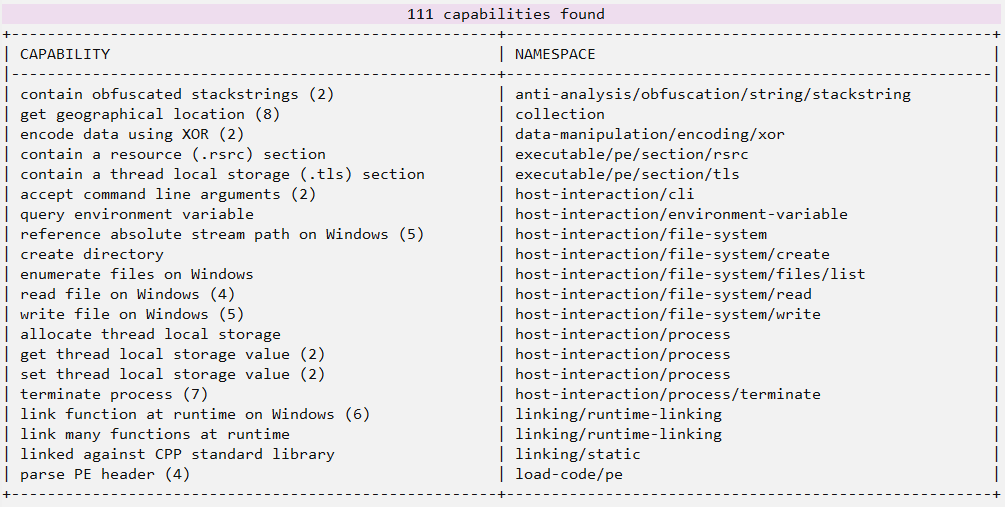
With this screening complete, we’ll move on to the functions we’ve identified as suspicious based on the information we’ve collected so far. Below, we can see the macro flow of the infection chain identified so far.
Reverse Engineering libjyy.dll
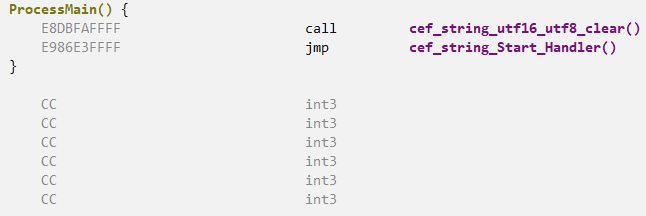
Now that we have enough information, let’s start our in-depth analysis through the function in which the decoy loads and calls libjyy.dll, ProgramMain.
Basically ProcessMain is a wrapper for two functions:
- cef_string_utf16_utf8_clear;
cef_string_Start_Handler.
Let’s start with the first function, named cef_string_utf16_utf8_clear by the sample itself. Below, we can observe its execution flow in a macro view.
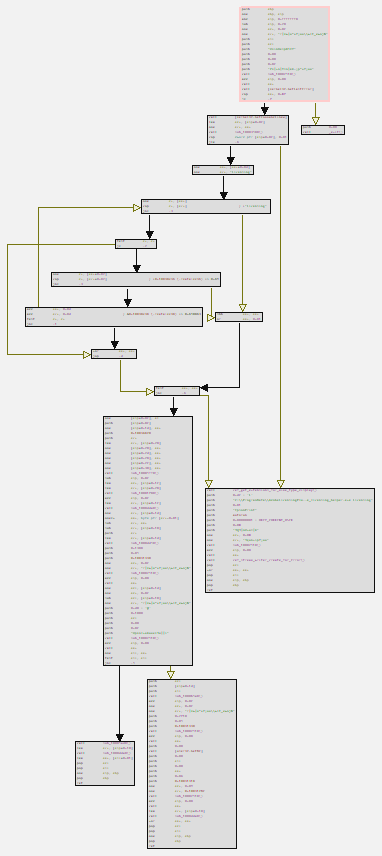
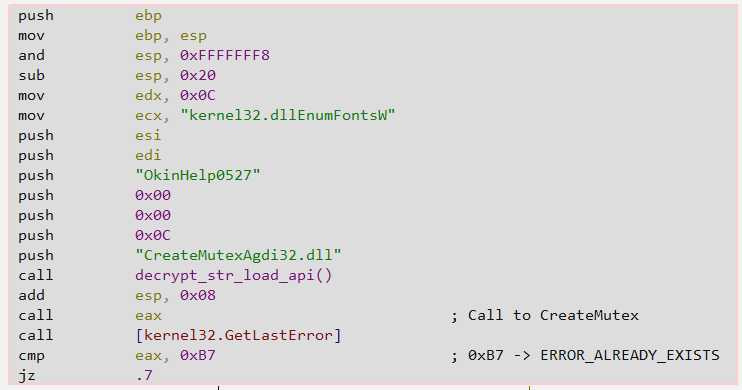
This is the malware’s main function, which, according to the IBM X-Force report, is the Claimloader. Basically, this function performs the following actions:
- Decrypts Strings;
- Checks the Passed Argument;
- Creates a Mutex;
- Creates Persistence on the Infected System;
- Executes the Decryption Routine;
- And one of the subroutines called through this main function appears to execute code through a Thread.
We will analyze each aspect in detail below, to better understand the implementations carried out by adversaries, and consequently their purposes.
String Decryption
The string decryption routine is quite simple, essentially an XOR operation on a single-byte key. It’s called whenever the Claimloader needs to dynamically load an API. Therefore, all strings encrypted by this algorithm refer to APIs that will be dynamically loaded to implement specific capabilities, primarily allocation, injection, and execution of the next stage (Publoader).
Below, we can see two encrypted strings being moved to the Stack, with the aim of being decrypted and finally, dynamically loaded through the function (renamed by me) decrypt_str_load_api.
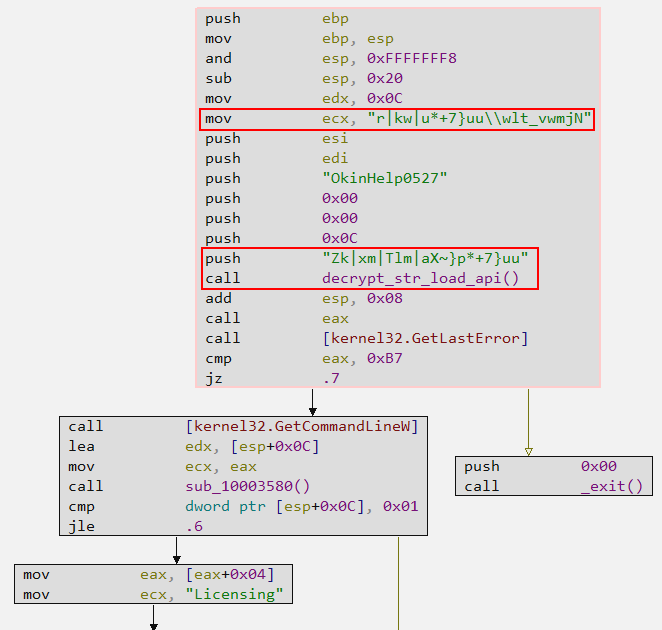
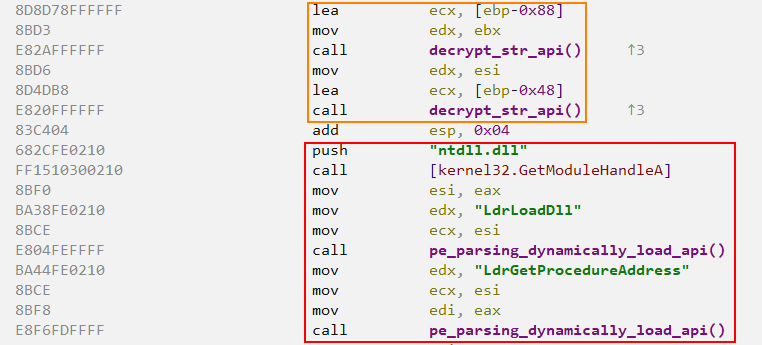
Within the decrypt_str_load_api function, we can observe its two main functionalities, implemented through the functions:
- decrypt_str_api;
- pe_parsing_dynamically_load_api.
Below, we can see both functions executing in the expected order. First, the strings will be decrypted, then the pe_parsing_dynamically_load_api function will parse the ntdll.dll module to load the LdrLoadDll API. Finally, the DLL whose name was decrypted will be loaded, followed by the decrypted API being loaded via the LdrGetProcedureAddress API.
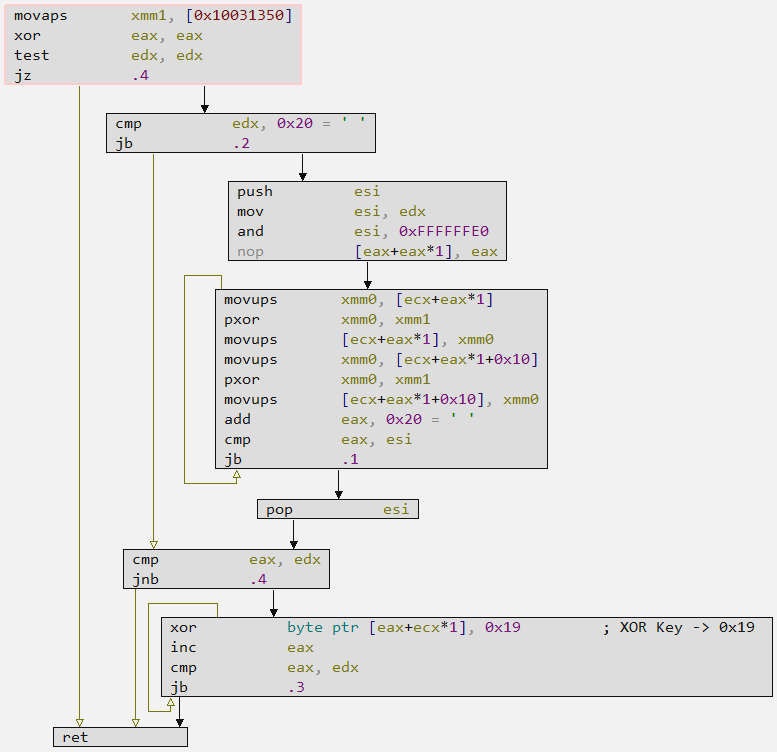
By analyzing the code for the decrypt_str_api function, we are able to identify the single-byte key 0x19, used to decrypt the strings.
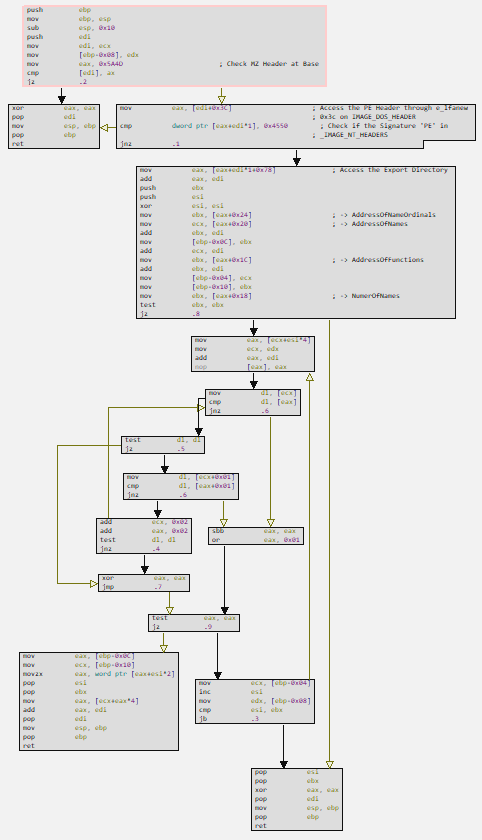
Also when analyzing the pe_parsing_dynamically_load_api function, we validate our hypothesis, which establishes that this function is responsible for parsing the DLL that will have a certain API called dynamically.
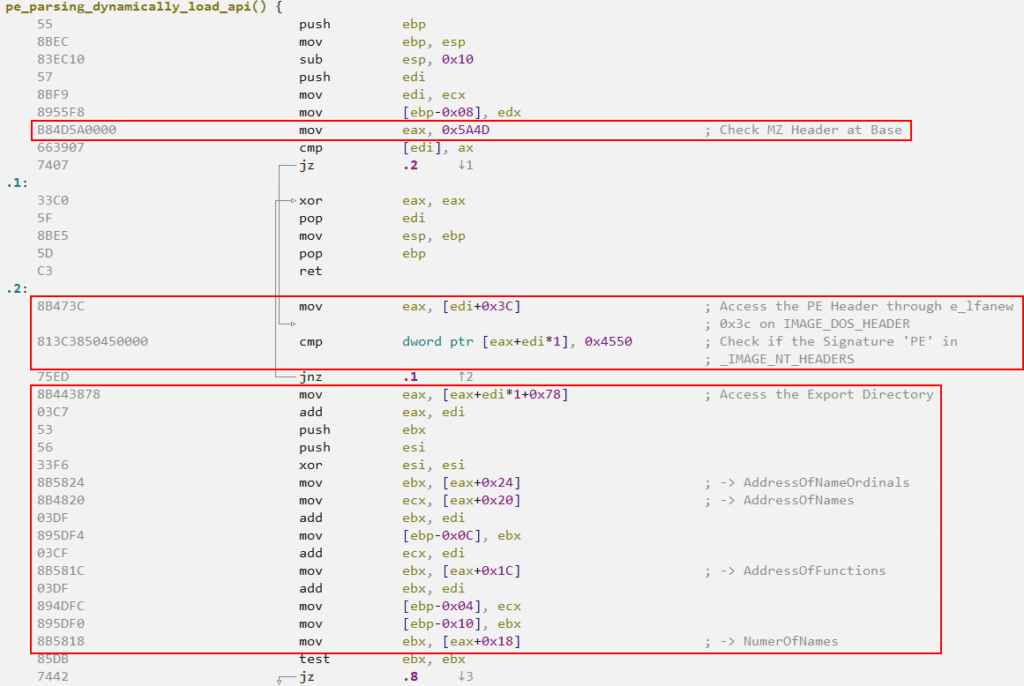
In the image below, you can observe the entire flow of the pe_parsing_dynamically_load_api function.
Malcat allows us to analyze the binary from several aspects, through Disassembly, Decompiler, Hexadecimal Editor, and also the way in which the data is structured in such a way that it allows us to identify code, sections, data, etc. Below, we are able to observe that the offset of the selected encrypted string is found together with all other encrypted strings.
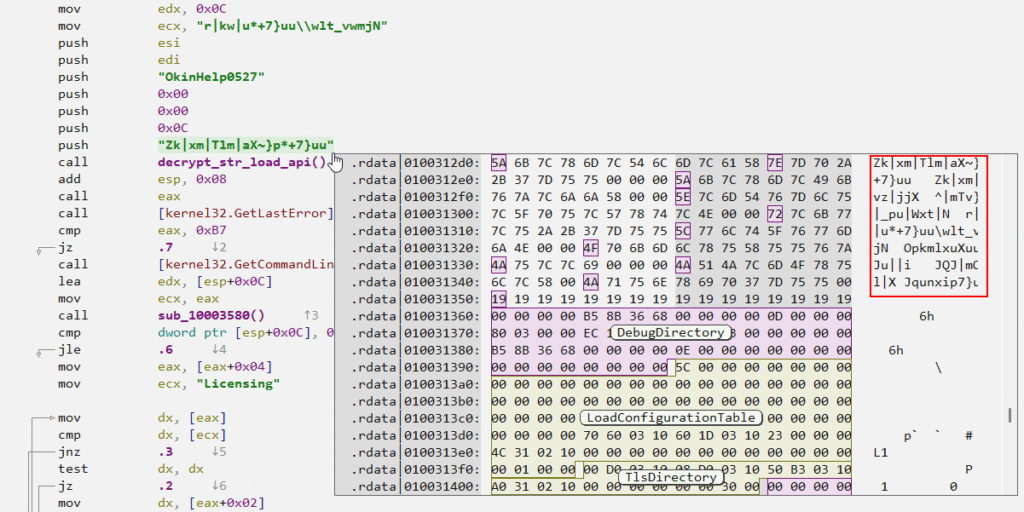
In the following image, we can validate this hypothesis by observing all the encrypted strings in an orderly fashion. Malcat has a feature called Transform, which allows us to transform selected data. Knowing that these strings are encrypted using a simple XOR algorithm, with byte 0x19 as the key, we can decrypt them within the Malcat instance itself.
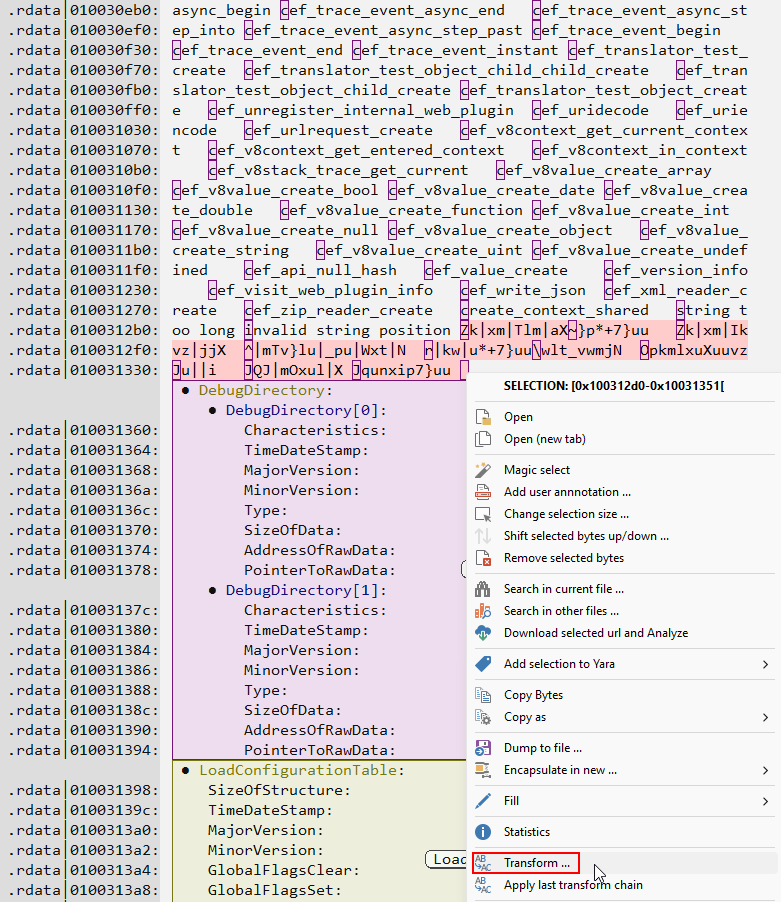
As you can see below, the visuals are reminiscent of CyberChef, with the transformation algorithms on the left, the algorithm currently being used with your current configuration in the middle, the original data on the top right, and the transformed data on the bottom. In our case, you can see the names of the APIs/DLLs that will be loaded by the functions described above.
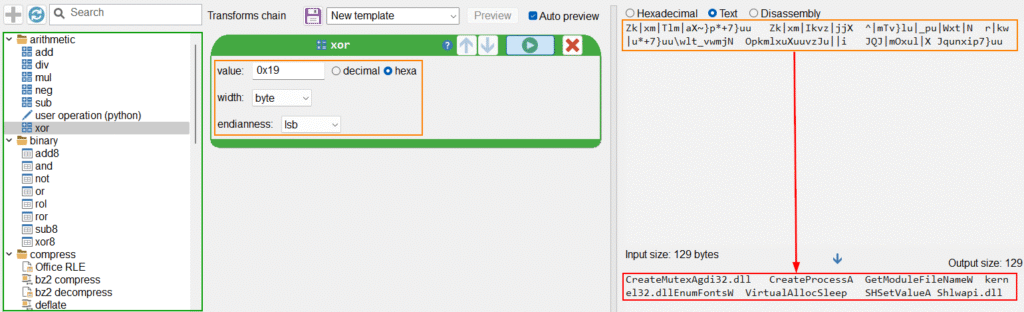
When we perform encryption in Malcat’s Transformer, we can apply the decrypted data, which will be available in the Disassembly/Decompiler, as we can see below.
Argument Checking
Claimloader expects to receive an argument, which will be identified and parsed in the code block below by collecting the command line using GetCommandLineW, followed by parsing the collected string, which refers to the current process’s command line. Depending on whether the current process’s command line is identified as having an argument (cmp dword ptr [esp+0x0C], 0x01) or not, Claimloader’s code will take two completely opposite directions.
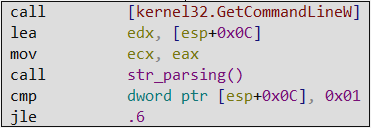
In the following image, we can see that Claimloader expects that, if an argument is identified, it will be “Licensing“.
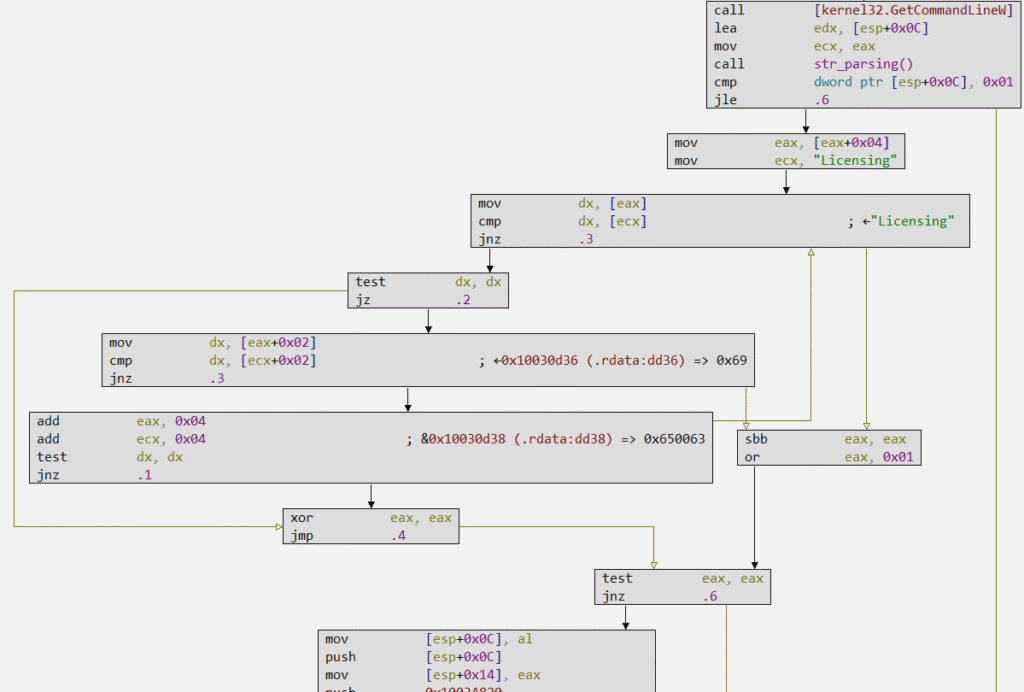
If the correct argument is detected, Claimloader will follow its code flow for decryption, injection, and Publoader execution. If the argument is not detected, Claimloader will create two types of persistence, one of which is through registry keys. This is the flow we will analyze next.
Creating Multiple Persistencies in the Infected System
If no argument (or an incorrect argument) is identified when executing the decoy executable, Claimloader will execute the code block below.
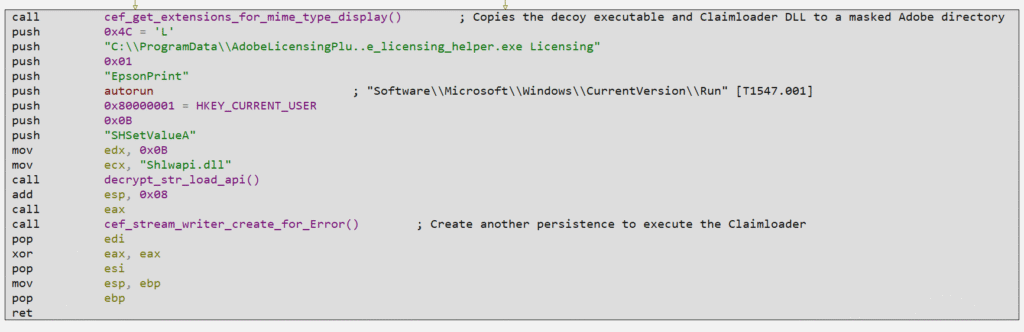
As you can see in the macro view, Claimloader will copy the decoy and Claimloader to a fake Adobe directory, followed by implementing the T1547.001 persistence technique, which consists of adding a program to the Software\Microsoft\Windows\CurrentVersion\Run registry key, allowing the decoy to run correctly (with the ‘Licensing‘ argument) whenever the system restarts, followed by creating another persistence, which we will analyze in detail later.
First, let’s look at how Claimloader implements the copy of Decoy and Claimloader, in the cef_get_extensions_for_mime_type_display function.
In the image below, we can see the creation of the C:\ProgramData\AdobeLicensingPlugin directory through the CreateDirectoryW API.
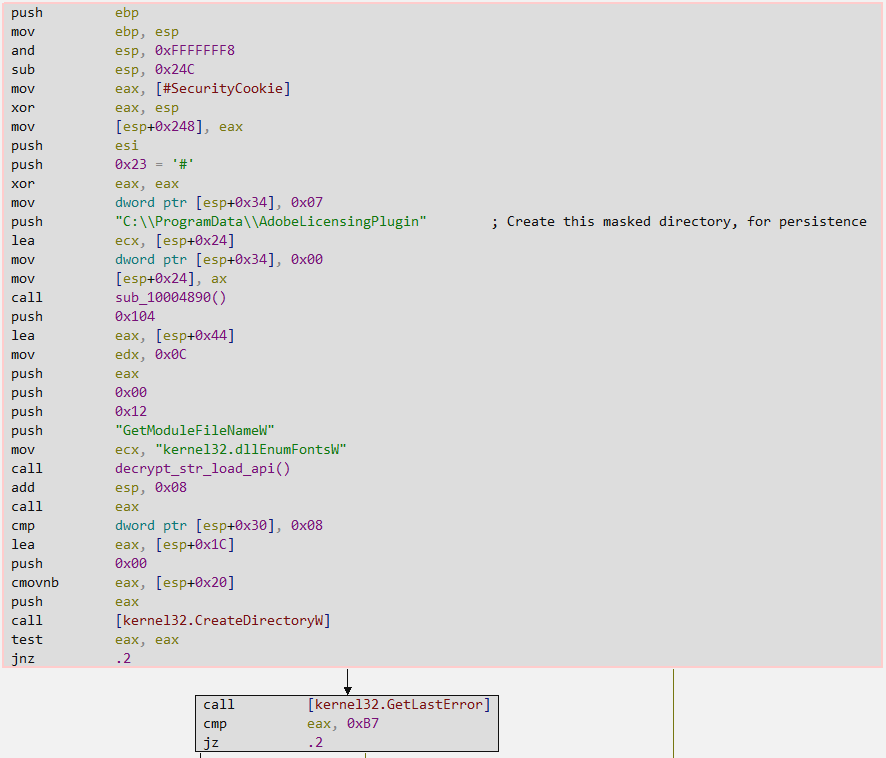
Next, the Claimloader dynamically loads the MoveFileW API using stack strings, which will be moved to the ECX register to be used as the argument (lpProcName) of the GetProcAddress API. After loading, the API is called indirectly through the offset pointer stored in the EAX register. At the end of this block, the decoy will be moved and renamed to the full path “C:\ProgramData\AdobeLicensingPlugin\WF_Adobe_licensing_helper.exe“.
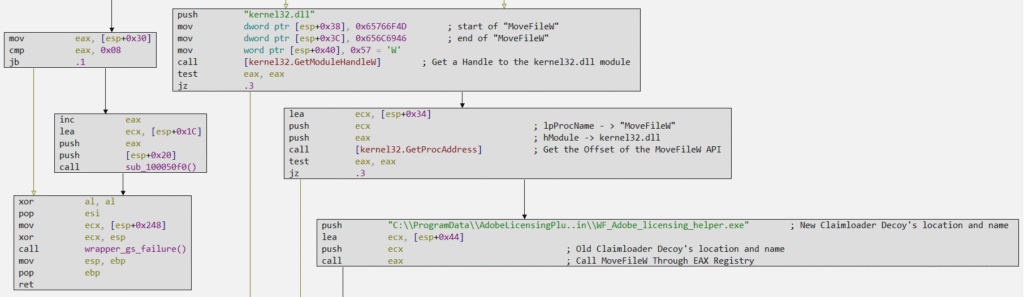
The same technique is implemented to move the Claimloader to the same directory, with its full path as “C:\ProgramData\AdobeLicensingPlugin\NewUI.dll“.
After these code blocks are executed correctly, the function will return to the main function, where Claimloader will create the persistence for the \Run registry key, explained previously, with the following command as an argument:
- C:\ProgramData\AdobeLicensingPlugin\WF_Adobe_licensing_helper.exe Licensing
Therefore, upon device restart, Claimloader will execute correctly with the expected argument.
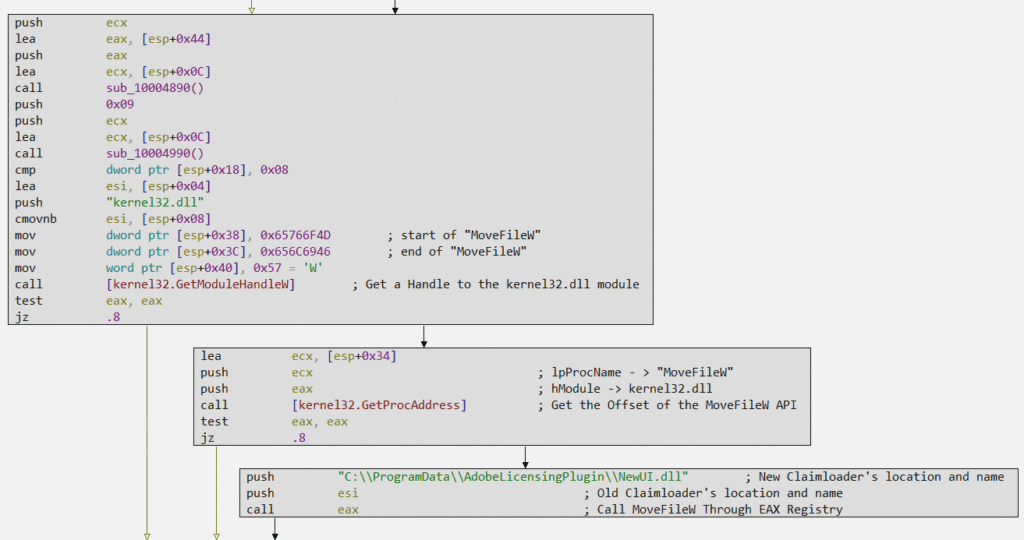
Now let’s analyze the cef_stream_writer_create_for_Error function, which runs after the T1547.001 persistence implementation. This function creates another persistence so that Claimloader can run effectively. It also increases the level of investigation for DFIR analysts, who can stop looking for possible persistence techniques if they find just one implemented by Claimloader.
Below, we can see a simple and direct code flow in this function, in which the decryption of a large string will be performed, using a different algorithm than the one we analyzed previously, followed by the creation of a process at the end of this function.
First, let’s analyze another custom string decryption algorithm. As you can see in the image below, the string is much longer than the other strings we identified previously. Furthermore, the decryption key is not explicit and is not a single-byte XOR key, as we identified in the previous algorithm.
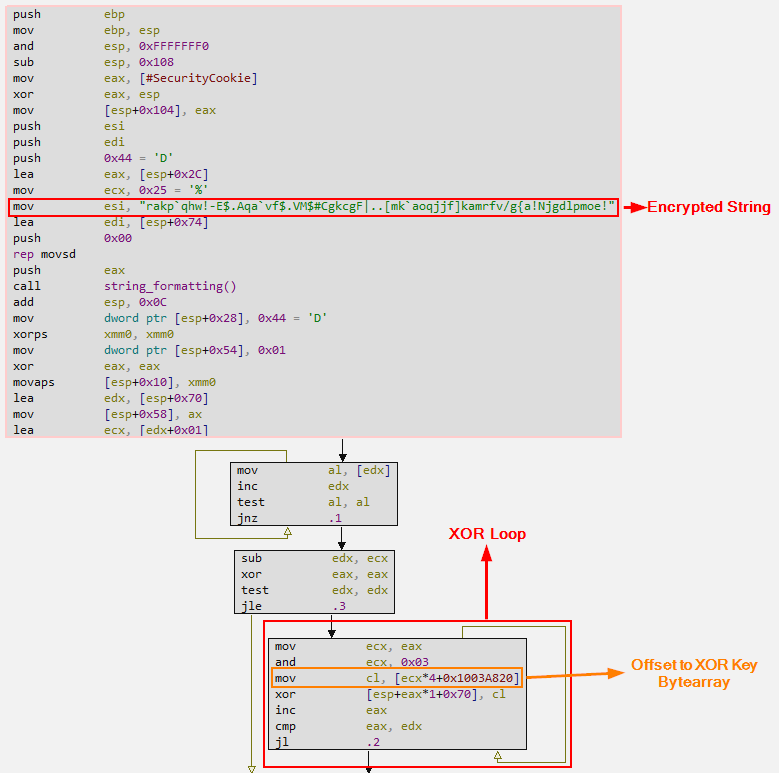
If we take a closer look at the algorithm in the image below, we’ll notice that the instruction and ECX, 0x03 is equivalent to ECX & 3, meaning it keeps only the two least significant bits of ECX, which contain the contents of EAX. In the following instruction, the Claimloader finds the exact address of the XOR key, which is different for each XORed byte in each loop.
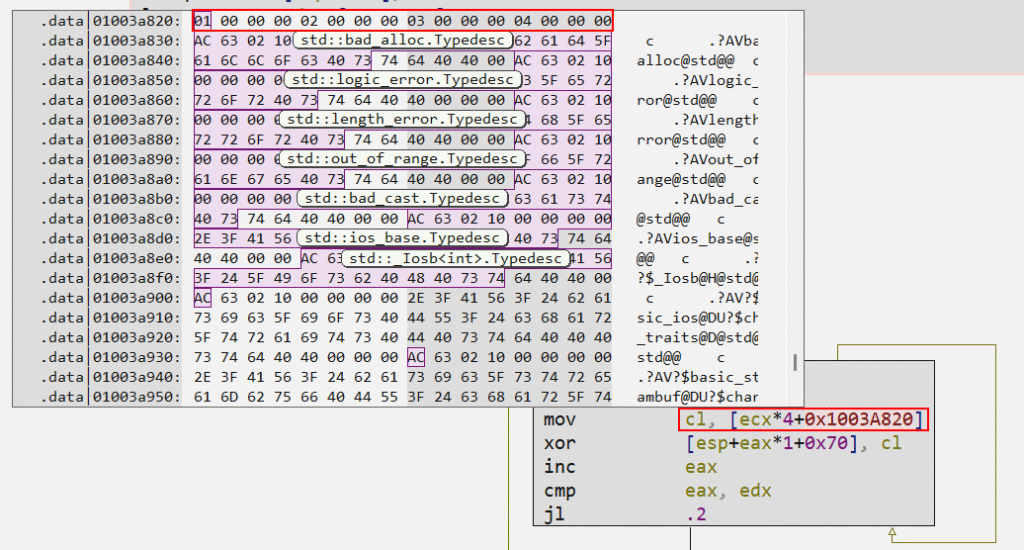
The XOR key is composed of a 4-byte array, respectively 0x01, 0x02, 0x03, 0x04, as we can see in the image below. Therefore, the loop goes through each encrypted byte of this array, returning to the beginning of the array when it reaches byte 0x04.
I developed a Python script to demonstrate what I explained above in a practical way. As you can see in the sequence of images below, each encrypted byte has a key that corresponds to a byte in the 4-byte array illustrated in the image above.
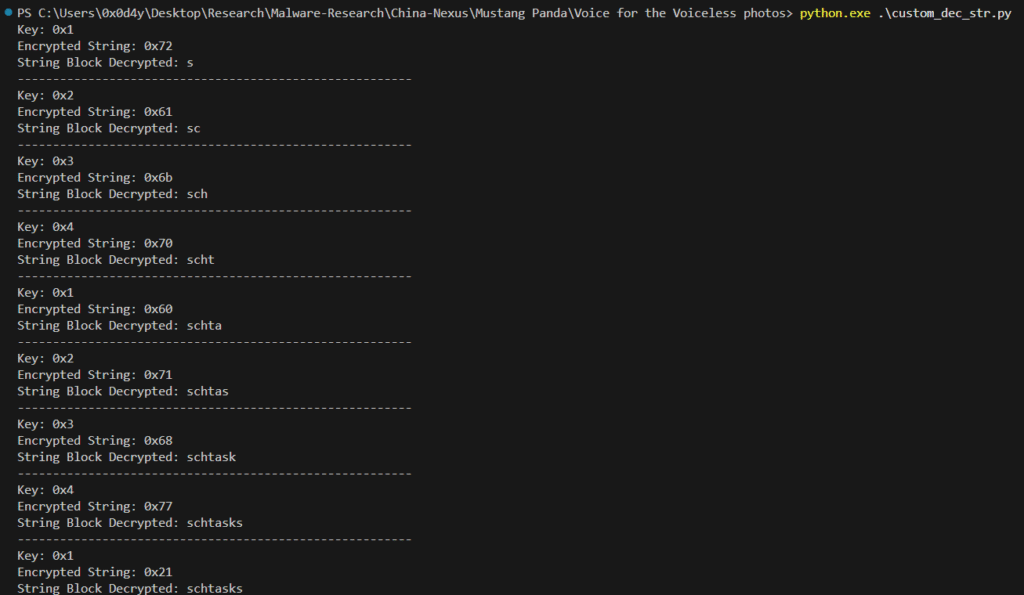
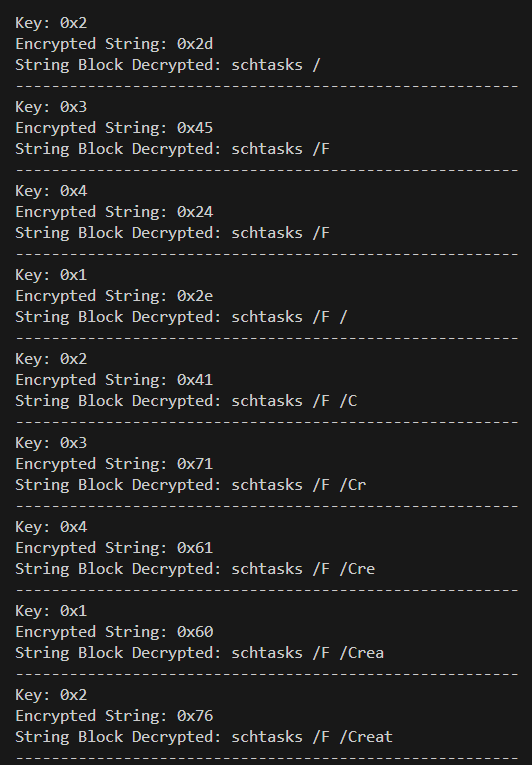
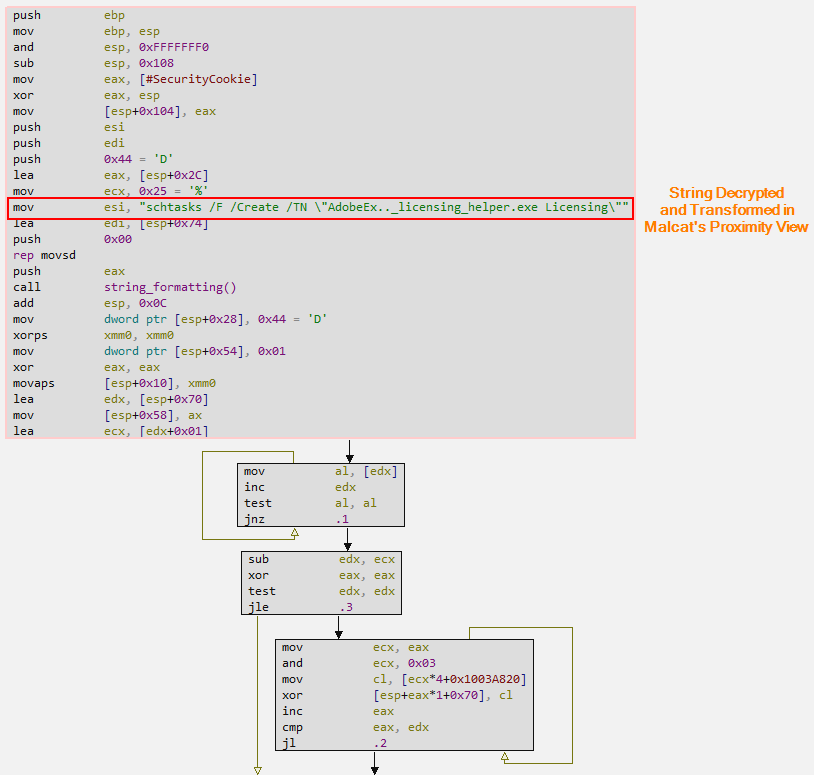
At the end of the loop, we have our decrypted string, revealing itself as a command to be executed, implementing another persistence technique described by MITRE ATT&CK as T1053.005, through the Schtasks.exe binary.

Below is the structural explanation of the persistence configuration.
schtasks → Windows binary to create, delete or manage scheduled tasks.
/F → Forces the creation of the task, overwriting if it already exists.
/Create → Indicates that a new task will be created.
/TN “AdobeExperienceManager” → Name of the scheduled task (in this case, “AdobeExperienceManager“).
/SC minute → Sets the execution frequency: every minute.
/MO 2 → Schedule modifier: Run every 2 minutes.
/TR “C:\ProgramData\AdobeLicensingPlugin\WF_Adobe_licensing_helper.exe Licensing” → Path to the executable that will be triggered by the task, with the “Licensing” argument.
As we saw in the analysis of the first string decryption algorithm earlier, Malcat allows us to perform such actions through the built-in Transform, with many similarities to CyberChef. However, the XOR algorithm described above is an algorithm with custom logic, despite being just a simple XOR.
Despite this customization of the XOR algorithm for the persistence implementation command encryption, Malcat allows us to implement a custom Transformer in Python. This custom Transformer allows us to perform the same actions as the built-in Transformers, such as modifying the encrypted string in the code for better analysis.
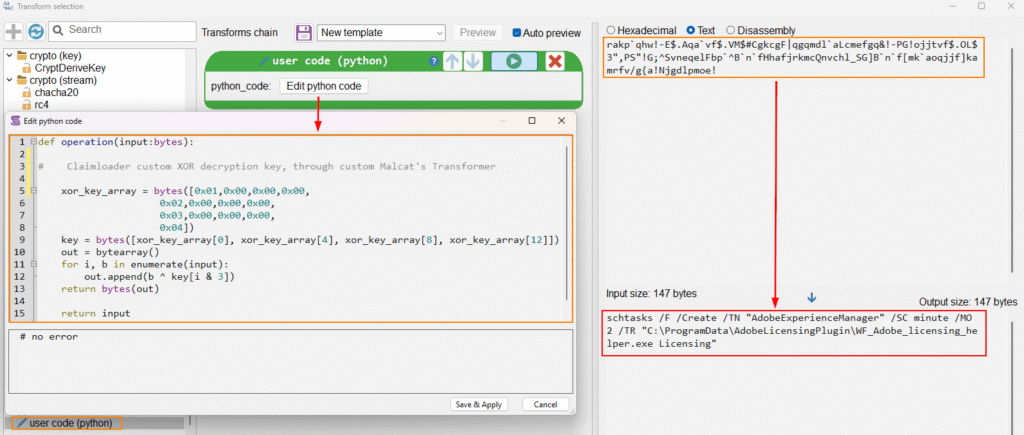
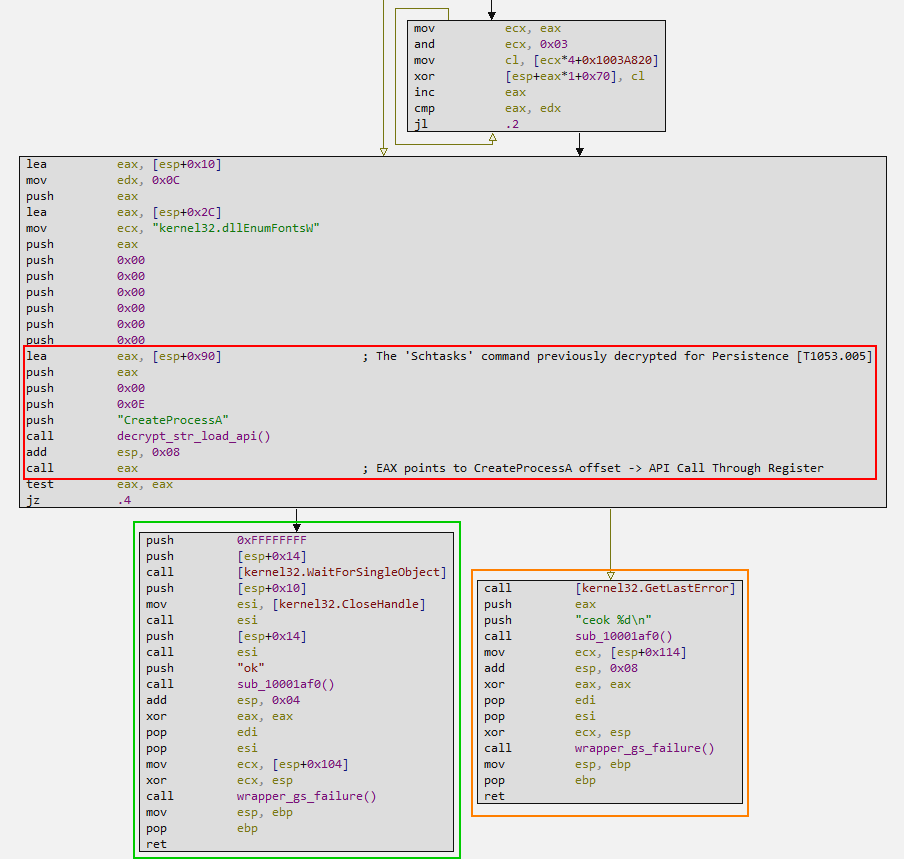
In the following image, we can see the command in plain text and decrypted, making the final functionality of this function clearer.
When decrypting the command to be executed, for the implementation of another persistence, the command is passed as an argument to the CreateProcessA API, which will be responsible for finally executing the command.
Therefore, we can see that this entire Claimloader execution flow is the victim’s first execution, and the victim clearly doesn’t know they’re running malware, much less that an argument is required for it to function properly. Thus, when the user executes the decoy normally, Claimloader will execute this entire flow, aiming to allow Claimloader to execute correctly within the next two minutes.
Shellcode Extraction
To extract the Shellcode that will be decrypted, we can use the dynamic analysis methodology through x32dbg, by understanding where we should be to extract it correctly.
Below, we can see the other flow that will only be executed if the decoy is executed containing the ‘Licensing‘ argument.
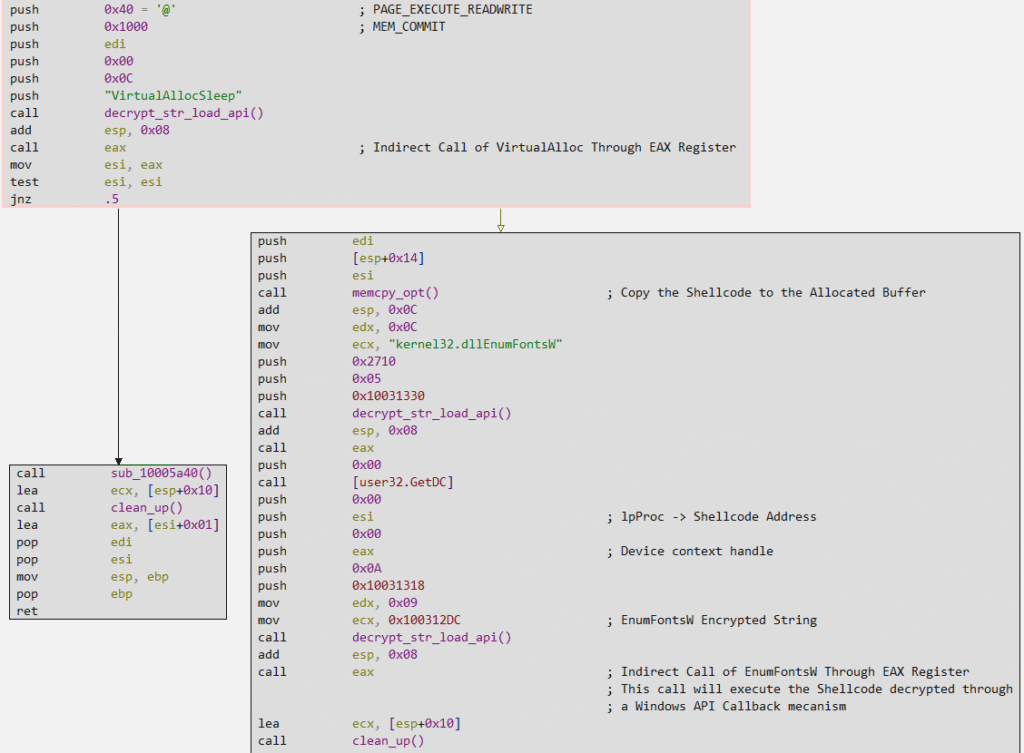
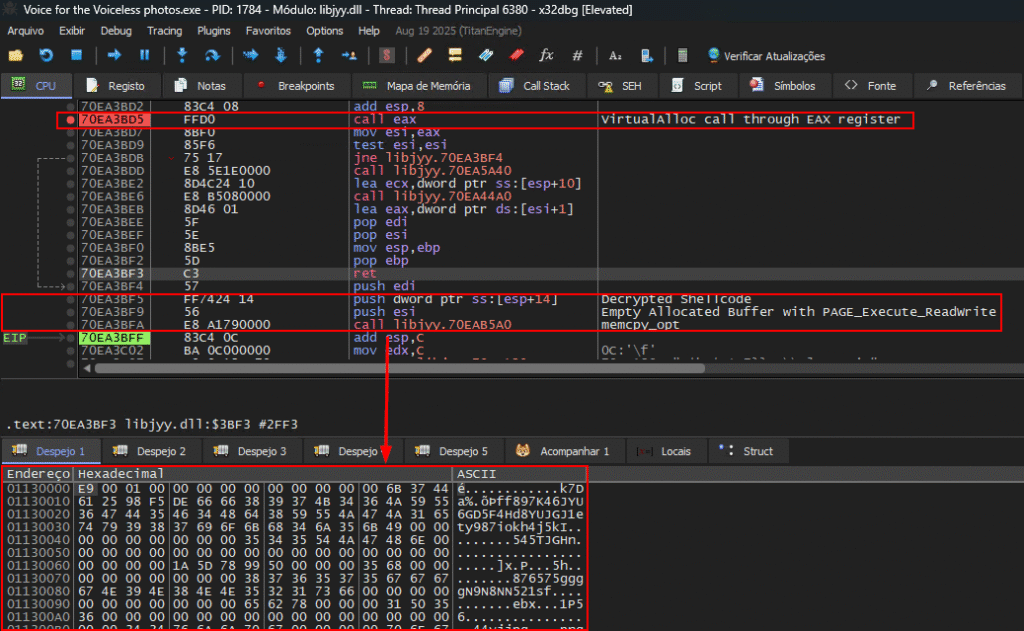
In the code block above, we can see that two strings referring to APIs are decrypted and dynamically loaded by the previously analyzed function (decrypt_str_load_api). VirtualAlloc is an extremely common function for allocating buffers for shellcode, and as can be seen in the flow above, the offset of the buffer allocated with execution permission (PAGE_EXECUTE_READWRITE) is copied to the ESI register, which is used as an argument to a custom function that replicates memcpy in an optimized way, also having as an argument the offset to the buffer with the already decrypted shellcode, but in a memory space without execution permission.
After copying the shellcode to the previously allocated buffer, in the image above we can also see that the offset of this buffer will be used as an argument for the EnumFontsW function call, which, when called, will execute the shellcode by abusing the API’s Callback mechanism. The lpProc argument of EnumFontsW expects to receive a pointer to the application-defined callback function. Therefore, by passing the offset of a shellcode to this argument, EnumFontsW will execute the shellcode.
In the image below, we can see the shellcode being copied to the buffer with execution permission. This allows us to extract the complete shellcode code for static analysis.
Extracted Shellcode Functionality Identification
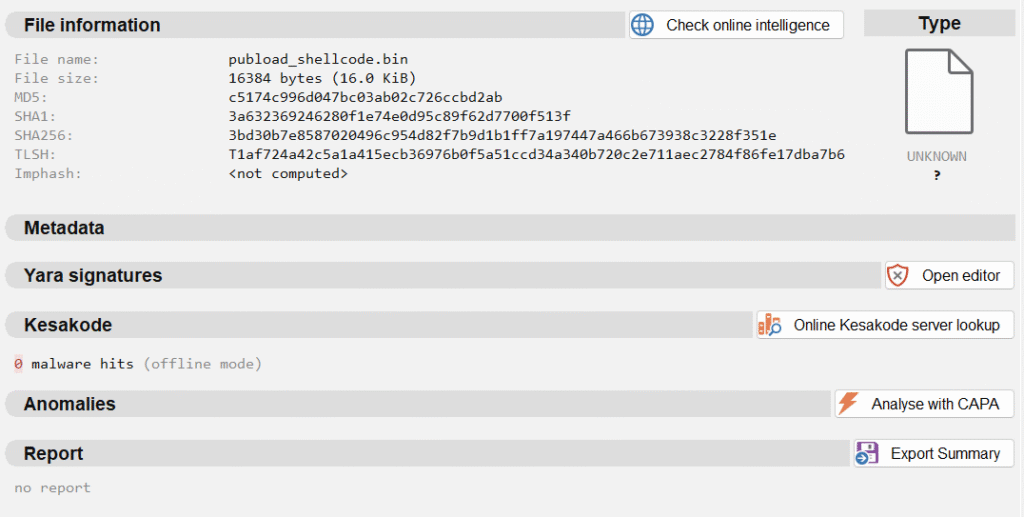
Once the shellcode has been correctly extracted from memory, we can use Malcat to perform further triage and analysis. When we first upload the shellcode, Malcat doesn’t know how to process it, just like other software (such as Binary Ninja, IDA Pro, etc.).
But, to force Malcat to structure it, we just need to go to the Hexadecimal editor tab, and force Malcat to start a function in the first byte of the file (0xE9 is a classic opcode for JMP).
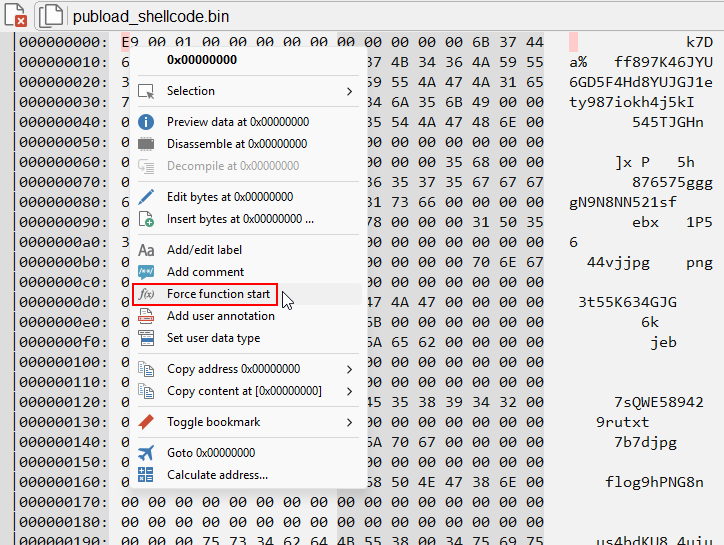
By doing this, we can notice the difference in the way Malcat understands the file, now in a fully structured way.

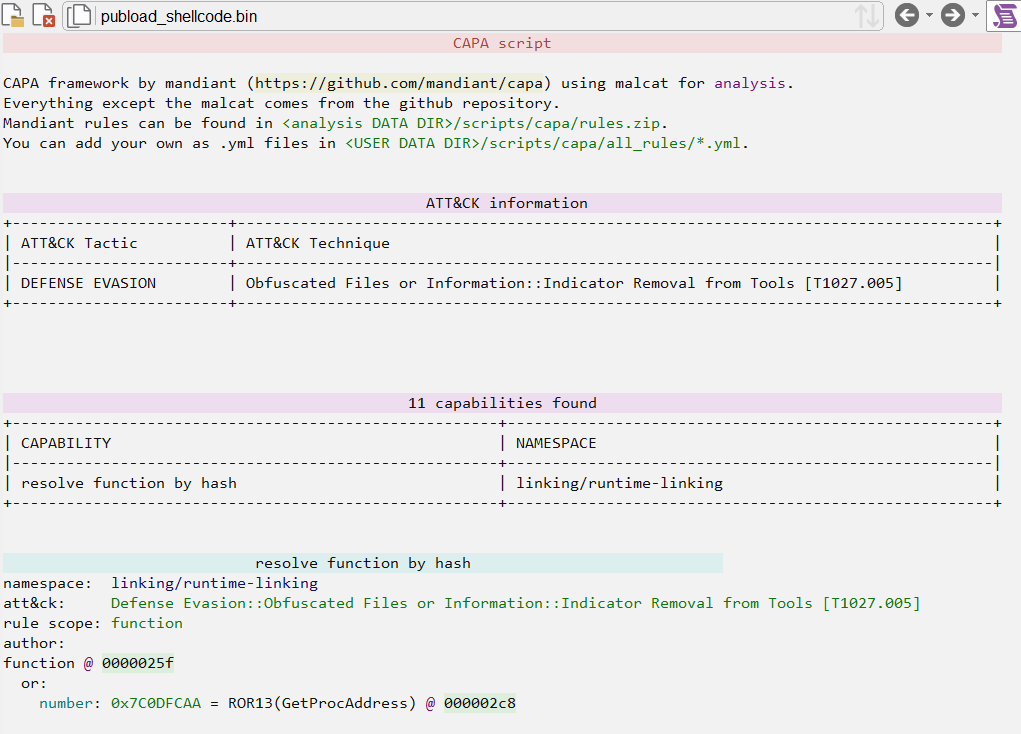
If we run CAPA to perform a Triage on the file, we’ll observe the detection of a function that resolves hashes. This is crucial because, since this is shellcode, the developers likely implemented API Hashing to dynamically load APIs in an obfuscated manner. Therefore, this finding makes perfect sense given what we have at hand.
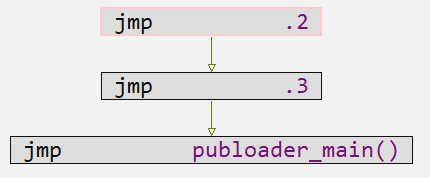
The first function consists of two sequences of JMPs followed by a last one that actually points to a function, which consists of the function with the main functionalities of the Publoader Shellcode.
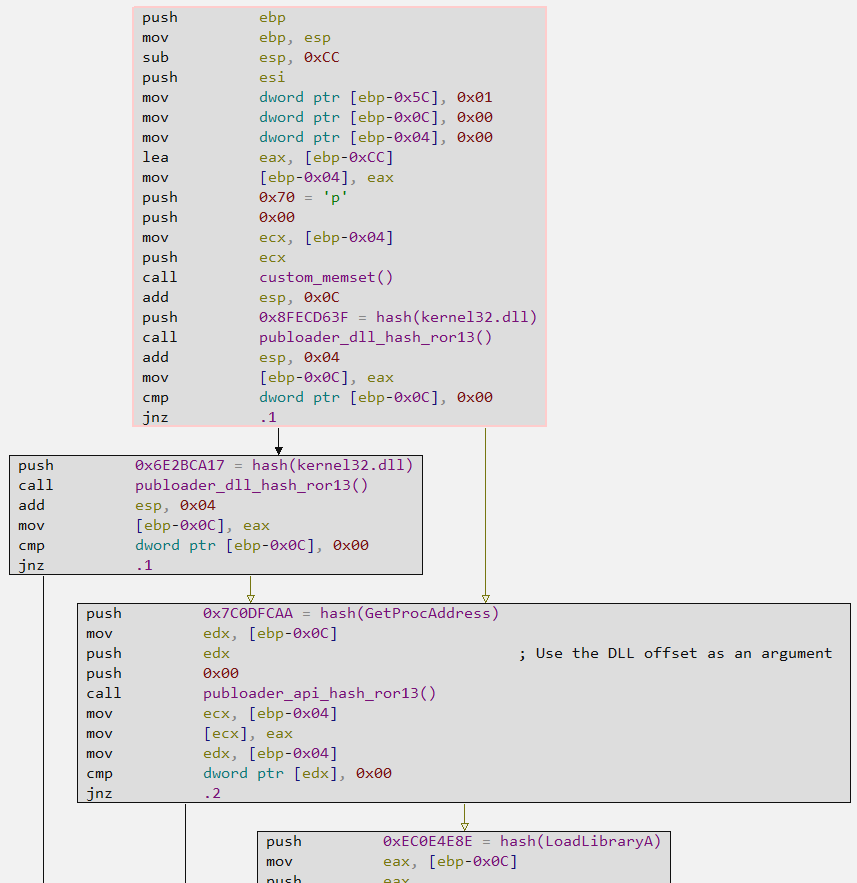
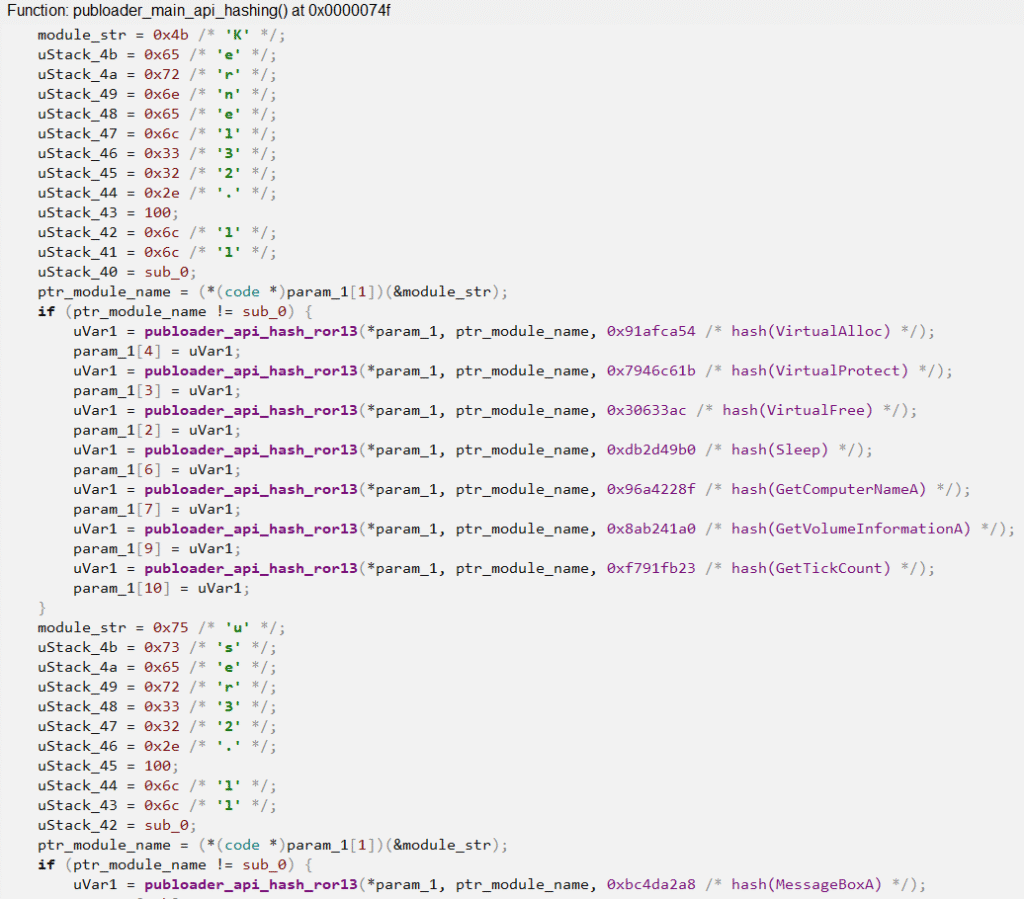
The first action of Publoader’s Main function is to resolve kernel32.dll in two ways. To ensure the DLL is resolved and finally loaded, it attempts to resolve it using two hashes (6E2BCA17 and 8FECD63F), a critical step for the rest of the code. When resolving kernel32.dll through the publoader_dll_hash_ror13 function, the GetProcAddress and LoadLibraryA APIs are also resolved through the publoader_api_hash_ror13 function.
When analyzing the publoader_dll_hash_ror13 function, we can observe that Publoader uses the PEB Walking technique, where the PEB structure is accessed in a loop to collect the name of each module, where each name will be submitted to the ROR13 hash algorithm, and finally compared if the Hash resulting from the function will match one of the hashes previously identified, which were placed as arguments for this function.
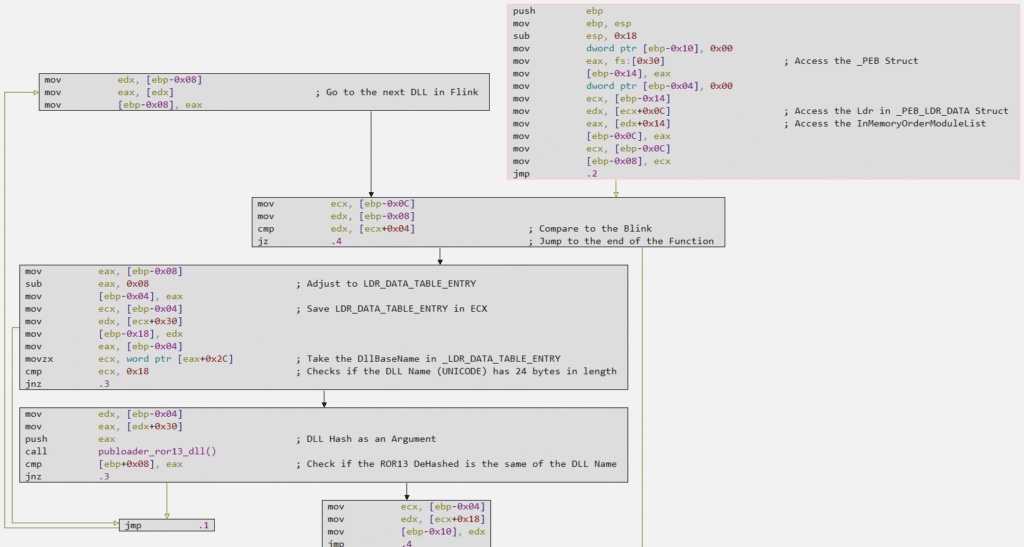
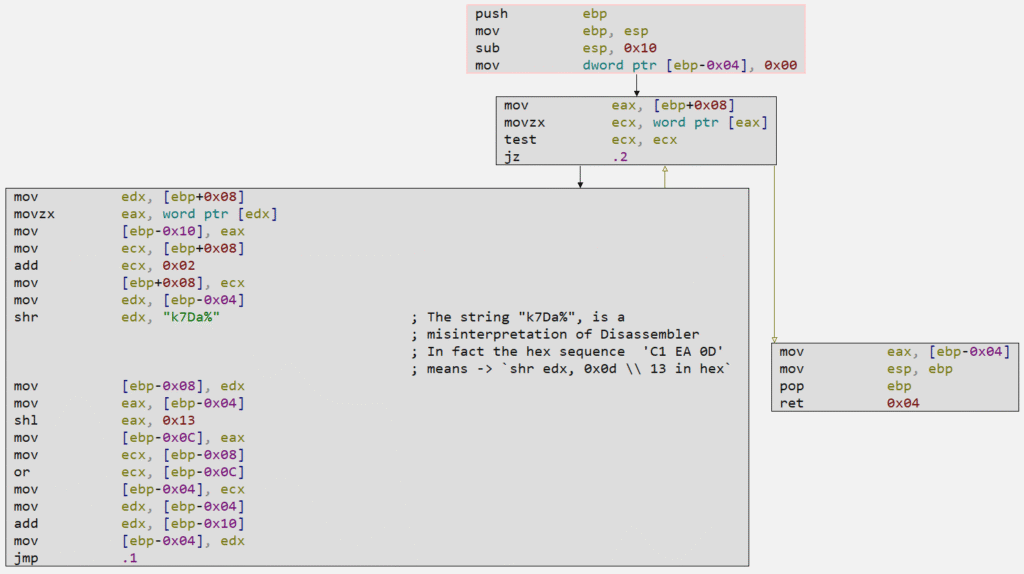
In the image below, we are able to validate that the algorithm used is in fact ROR13, through the identification of logical operations, mainly referring to shr edx, 0x0d.
Publoader also implements a long API loading function through API Hashing, as we can see in the image below.
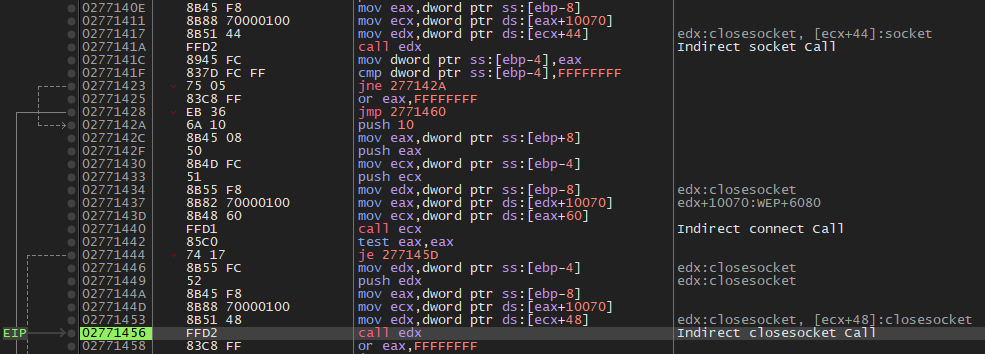
And finally, after loading all the necessary DLLs, the Shellcode executes them indirectly, with the aim of collecting information from the device and sending it to the command and control server, as we can see in the following sequence of images in x32dbg.

Conclusion
This research was a lot of fun to produce, as it’s very interesting to see that the China-Nexus APTs share the same TTPs, allowing us to identify operational and tactical similarities in their campaigns, as observed in the Veletrix Loader campaign I analyzed. I’m considering writing a post focused on forensics and threat hunting, regarding the execution of this campaign.
Below you can find Yara rules and Python script for String Decryption analyzed in this post, in my Github repository.
Until next time, I hope you, reader, enjoyed this long read!