
This analysis serves as a complementary study to my previous research on the reverse engineering of Veletrix Loader and the infrastructure analysis of the China-nexus threat actor operating this campaign. In this post, I’ll examine the Veletrix Loader infection from a digital forensics perspective, analyzing volatile memory captured from an infected system.
The rationale behind this approach lies in the additional detection capabilities that memory forensics can provide, particularly when malware employs sophisticated evasion techniques such as shellcode injection and execution through DLL Side-Loading of legitimate software – in this case, Wondershare software.
Our reverse engineering findings establish a foundation for what digital forensics analysts should investigate when examining systems exhibiting similar infection patterns. This cross-disciplinary approach ensures that our threat research delivers actionable intelligence for DFIR practitioners, ultimately strengthening the defensive capabilities across both malware analysis and incident response domains.
By bridging the gap between malware reverse engineering and digital forensics, we aim to provide comprehensive detection methodologies that enhance the overall security posture against advanced persistent threats employing such sophisticated techniques.
Below you can see the flow of my analysis.

Methodology and Evidence Collection
Our forensic evidence (Memory Dump) consists of a memory dump obtained from a Windows 10 Professional virtual machine environment. The infection scenario was replicated by executing the Wondershare DLL Side-Loading attack vector, followed by immediate capture of the system’s volatile memory to preserve the malware’s runtime artifacts.
The memory acquisition process was performed using VirtualBox management tools with the following sequence of commands:
# Pause the virtual machine to preserve memory state
& "C:\Program Files\Oracle\VirtualBox\VBoxManage.exe" controlvm "Windows10" pause

# Extract the complete memory dump
& "C:\Program Files\Oracle\VirtualBox\VBoxManage.exe" debugvm "Windows10" dumpvmcore --filename "C:\Users\0x0d4y\Desktop\Research\Malware-Research\China-Nexus\Veletrix\infection_veletrix.mem"
Below you can see the integrity of the evidence, through the SHA256 hash. This dump it will be in my Github, so you can validate the checksum.
# Generate cryptographic hash for evidence integrity
Get-FileHash "C:\Users\0x0d4y\Desktop\Research\Malware-Research\China-Nexus\Veletrix\infection_veletrix.mem" -Algorithm SHA256

Algorithm: SHA256
Hash: FAA50B87AEDB603CB2A3F8EE0D88DAB9ADF317E8D5A3A4534E108AADB993FA45
Path: C:\Users\0x0d4y\Desktop\Research\Malware-Research\China-Nexus\Veletrix\infection_veletrix.mem
With our forensic evidence properly collected and verified, we proceed to analyze the memory dump using the Volatility Framework to identify malicious artifacts and behavioral indicators consistent with our reverse engineering findings.
Below we can see the output of the verification of the memory dump collected.
Volatility 3 Framework 2.26.0
Progress:  100.00               PDB scanning finished
Variable        Value

Kernel Base     0xf80547e00000
DTB     0x1aa000
Symbols file:///C:/Users/0x0d4y/AppData/Local/Programs/Python/Python313/Lib/site-packages/volatility3/symbols/windows/ntkrnlmp.pdb/68A17FAF3012B7846079AEECDBE0A583-1.json.xz
Is64Bit True
IsPAE   False
layer_name      0 WindowsIntel32e
memory_layer    1 Elf64Layer
base_layer      2 FileLayer
KdVersionBlock  0xf80548a0f398
Major/Minor     15.19041
MachineType     34404
KeNumberProcessors      4
SystemTime      2025-08-12 16:09:22+00:00
NtSystemRoot    C:\Windows
NtProductType   NtProductWinNt
NtMajorVersion  10
NtMinorVersion  0
PE MajorOperatingSystemVersion  10
PE MinorOperatingSystemVersion  0
PE Machine      34404
With this, let’s start our analysis.
Identification of Malicious Process
The first step to begin a more in-depth analysis is to identify a target process for our analysis. Below, we can easily see this target, simply by the binary name, which completely deviates from the standards of the others with PID 1724.

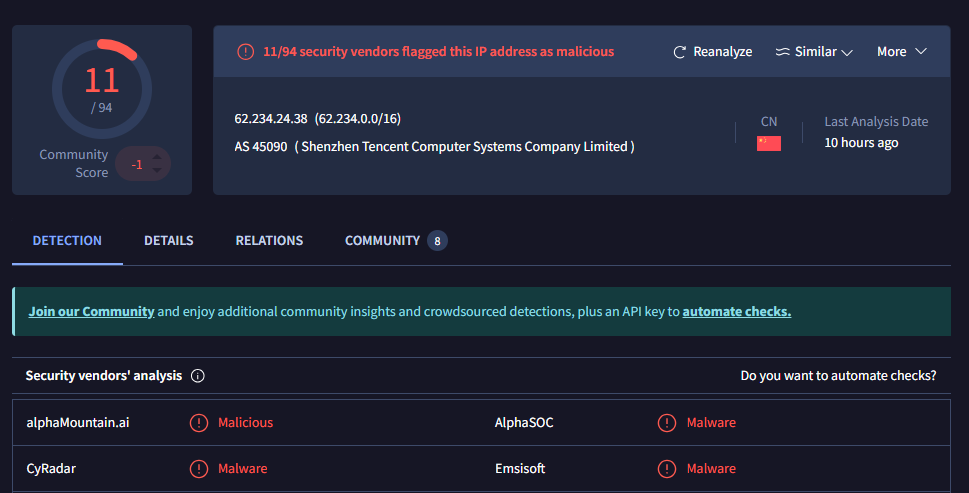
But of course, we can look for other indicators that this process is suspicious, to ensure we’ve chosen the correct process for our analysis. Fortunately, when we identified processes that were making connections, we observed the same process with PID 1724 making a connection to IPv4 address 62.234.24.38, on TCP port 9999.

Well, the high TCP port itself is suspicious, but if we go back to the research we did previously, or if we just throw this IPv4 address into VirusTotal, we will validate the indicator of compromise being the process with PID 1724.
Diving Deeper into Windows Memory
Now we’ll delve deeper into the Windows memory dump to identify the details of this infection, such as the detection, extraction, and analysis of malicious code directly from memory. Therefore, let’s start with the DLLs imported and used by the binary of the malicious process with PID 1724. Below, we can see that the process imports several standard libraries, but four are noteworthy because they are located within the same directory as the main binary (delivered via Phishing).
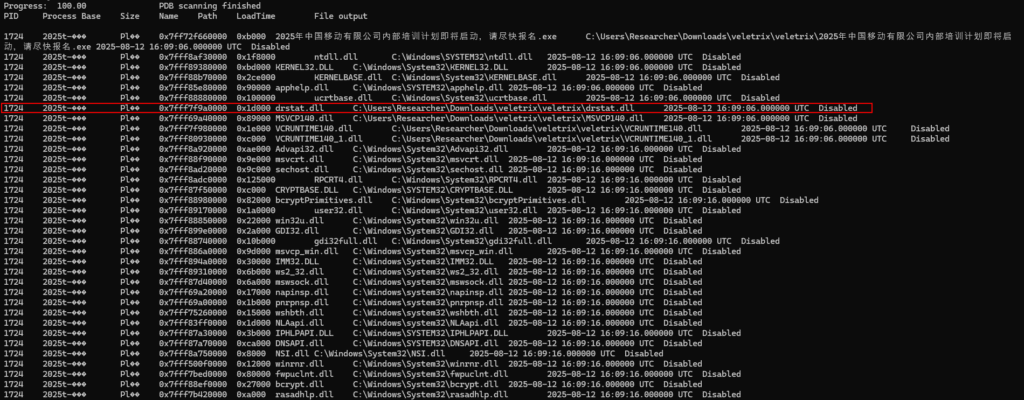
They’re noteworthy simply because they contain DLLs within the main binary directory, but the drstat.dll DLL is the prime suspect, as the others are known to be standard libraries for the Visual Studio C++ Runtime. To validate this information, we simply need to look at the APIs that process PID 1724 imported when it ran. All functions related to the MSVCP140 and VCRUNTIME140 DLLs are standard, but those in drstat.dll are noteworthy because they’re unusual.
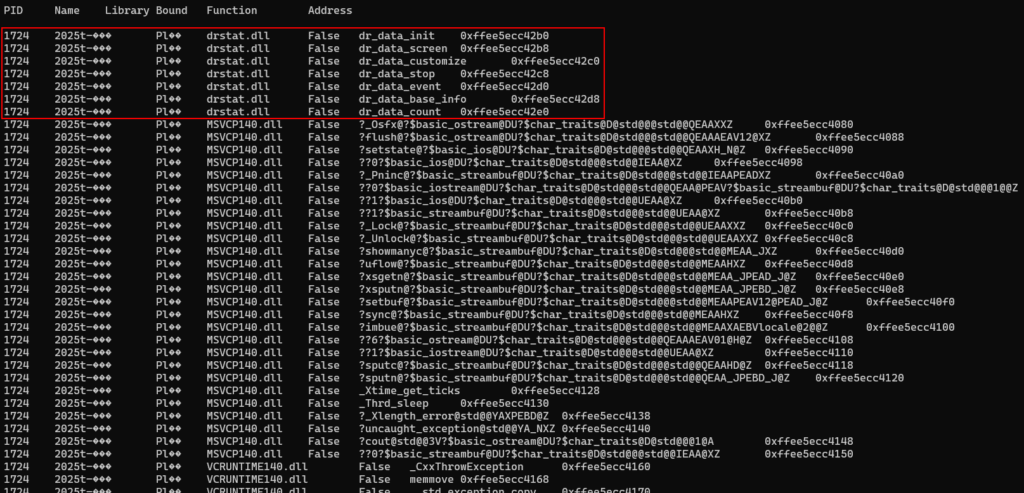
To validate our suspicion, we simply need to extract the drstat.dll DLL artifact to conduct reverse engineering to validate the artifact’s maliciousness.

When opening the PE extracted from the memory dump using Volatility, when checking the Exports (since it was a DLL) it is possible to observe that all Exports had the same address, except for the dr_data_stop Export.
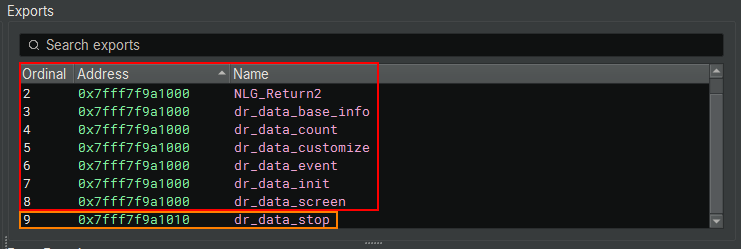
If we access every Export that points to the same address, we will find a dead function, which just returns 0.
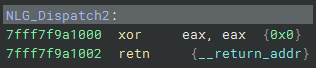
Below, you can see that the dr_data_stop function, specifically, contains malicious code identified in my latest research. In this example, we’re viewing the snippet of malicious code responsible for dynamically loading kernel32.dll and certain APIs required for shellcode decryption, allocation, and execution in memory.
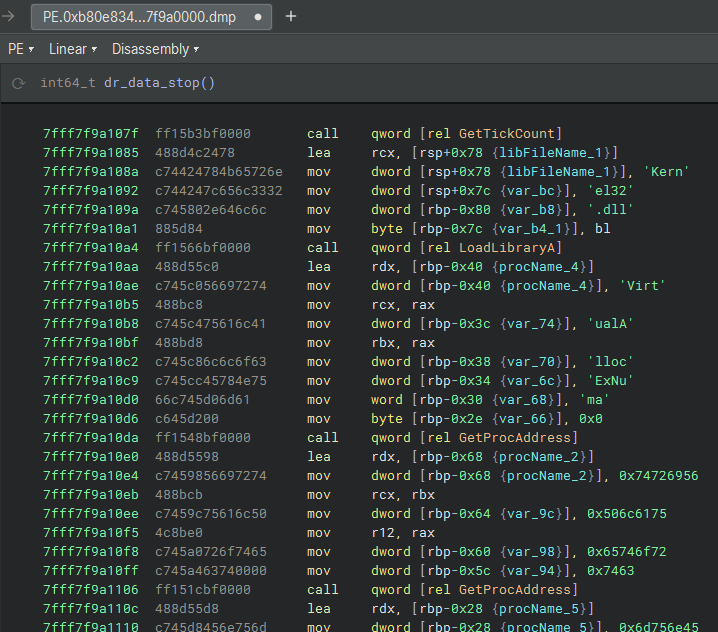
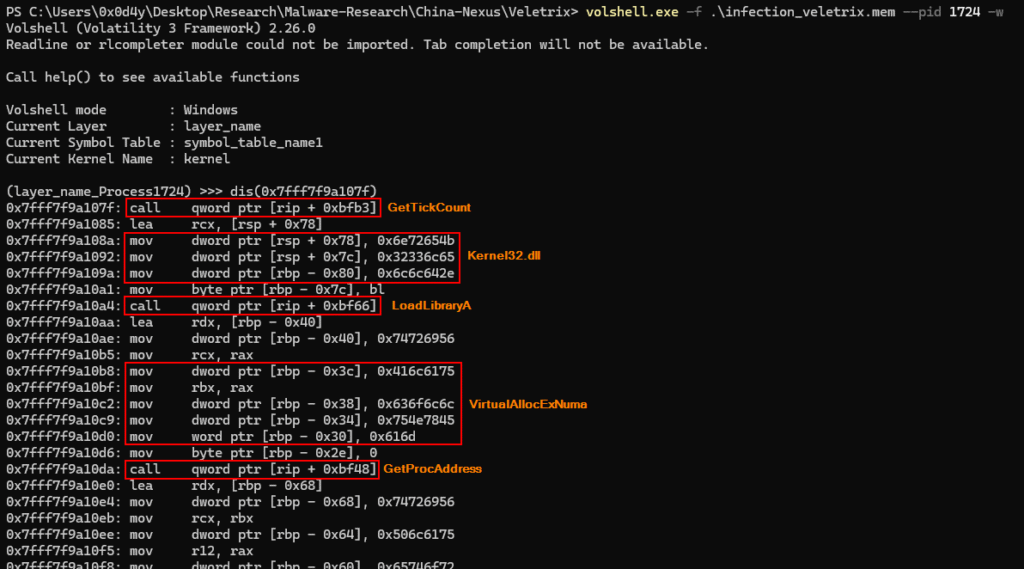
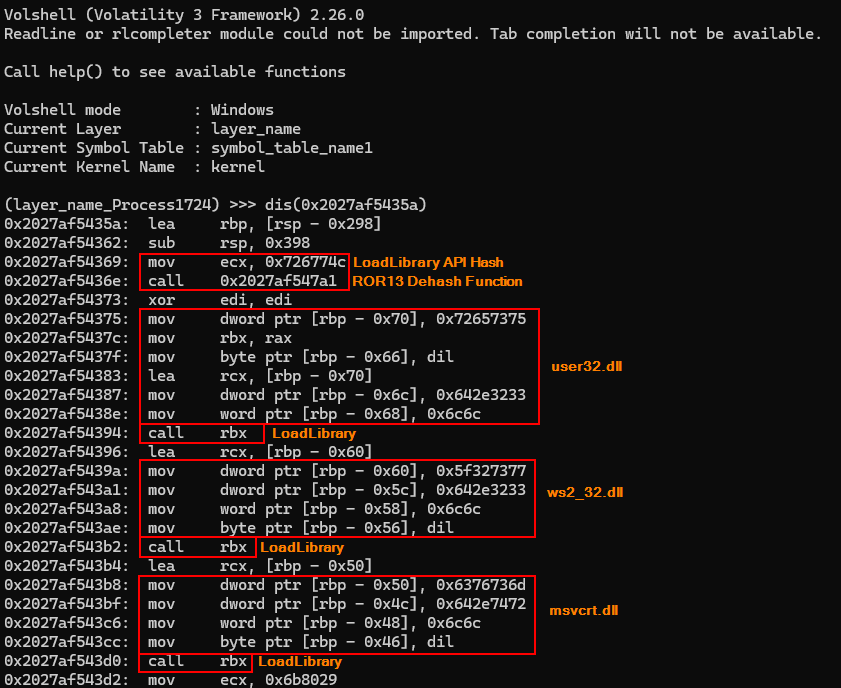
To validate the existence of this code in the infected system’s memory, we can use volshell.exe to print the Disassembly code from the previously identified address, and thus, we can observe the exact code described in the previous image using Binary Ninja.
Well, we already know that the drstat.dll DLL loaded via DLL-Sideloading is malicious, and that through the dr_data_stop function, the malware loads kernel32.dll and certain APIs to decrypt shellcode and execute it in memory. Therefore, now we need to detect the shellcode in memory, which is responsible for connecting to the previously identified C&C server.
To do this, we need to take a deeper look at VADs. VADs (Virtual Address Descriptors) are Windows data structures that describe regions of virtual memory allocated to each process, including permissions, protection type, and commit status. Therefore, if we only look for regions with Execute permission, we won’t get anywhere, as only the regions containing DLLs have such permissions. However, by looking at the number of pages reserved for use, that is, the number of Committed regions in a VAD, we can observe that a specific region contains a significant number with this characteristic, different from the remaining VADs for that process, serving as an anomaly indicator.
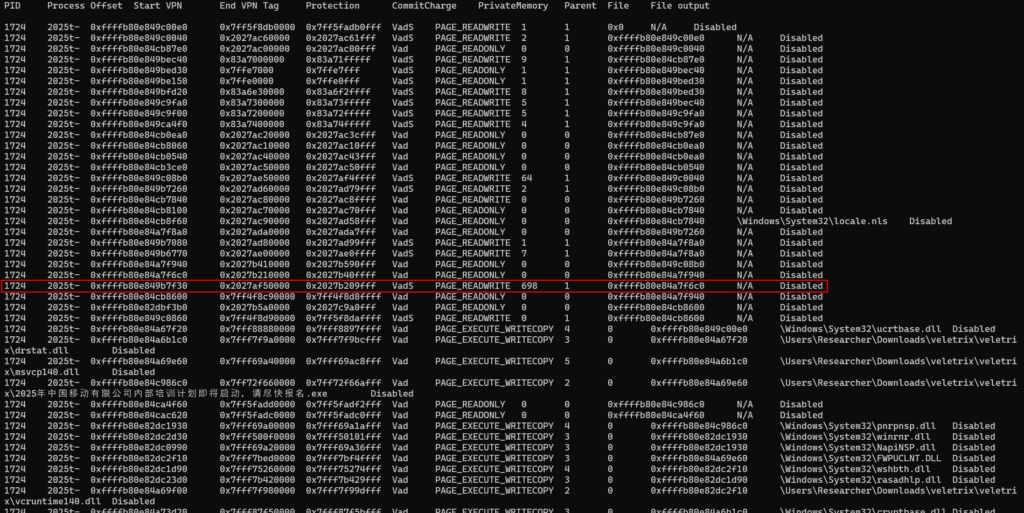
So let’s extract this VAD to statically analyze it through reverse engineering.

By opening the suspicious data block extracted from the memory dump, we can quickly identify the shellcode. Below, we can see a snippet of code that implements the LoadLibrary API’s hashing technique to dynamically load the DLLs user32.dll, ws2_32.dll, and others.
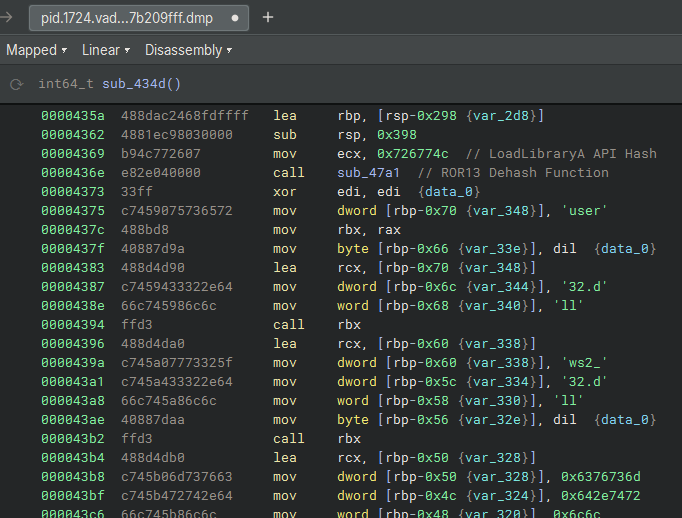
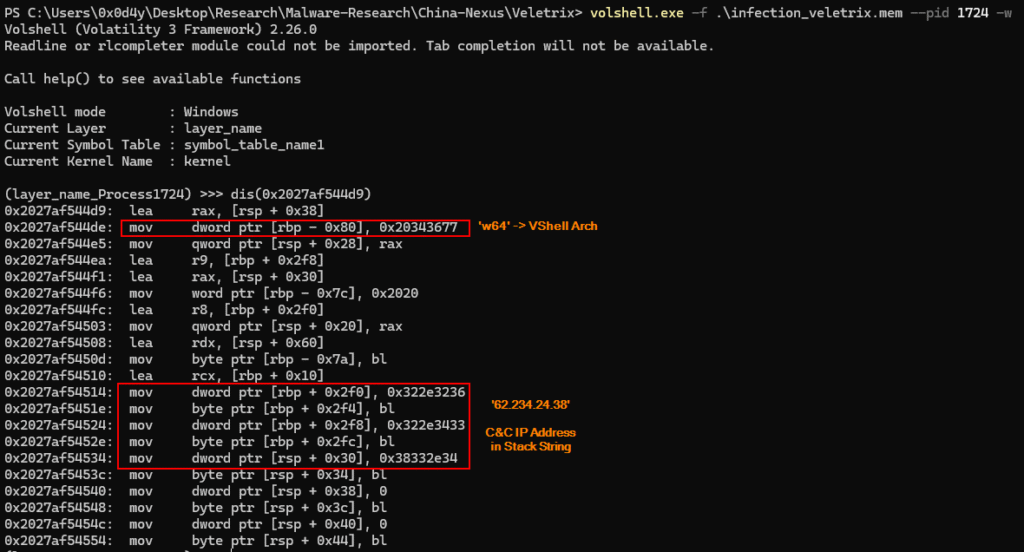
Also in this same code snippet, we can observe the IPv4 address identified previously, which is the address of the C&C server that will be contacted.
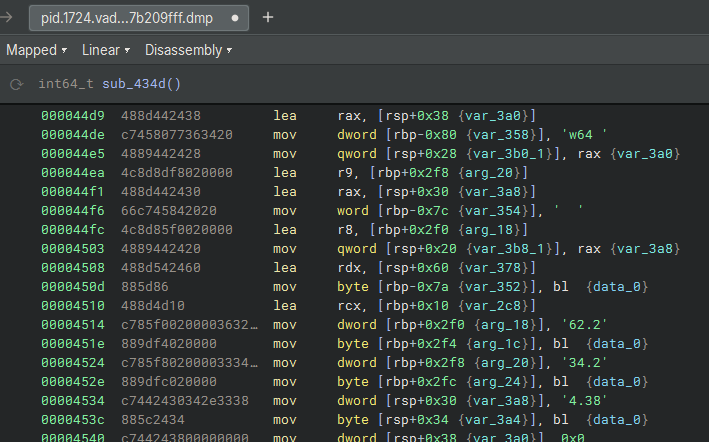
Also using Volshell, we can detect exactly the code snippets described in the images above, with the aim of validating their presence in the memory dump, as we can see in the sequence of images below.
Therefore, we can observe that through forensic analysis of a memory dump from an infected system (in this case, by Veletrix Loader), combined with reverse engineering of artifacts extracted directly from the memory dump, we can arrive at the same analysis result, however, through the perspective of a DFIR Analyst.
The Importance of Threat Intelligence
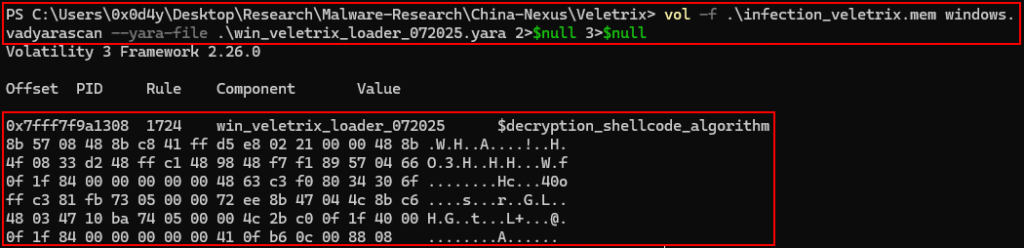
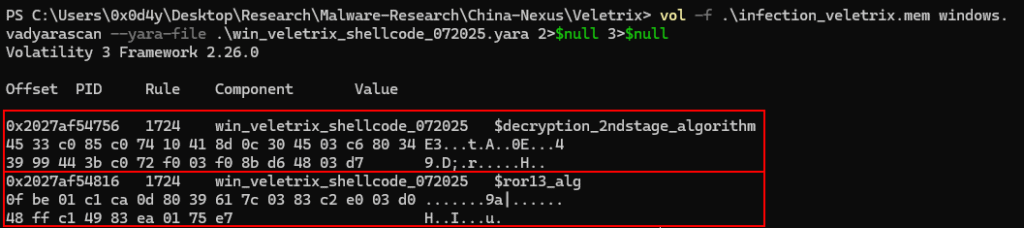
And this is a good case where quality threat intelligence takes on significant importance. In this analysis, I pretended not to have the Yara rules at my disposal, trying to reach the same conclusion I reached when I had the malware itself on hand to reverse engineer it.
Below, we can see how much the use of Yara rules would automate our time, but a DFIR Analyst does not always have this at their disposal, and therefore, the analyst is required to have expertise in identifying, analyzing and extracting malicious code, and from this analysis, extracting intelligence.
Final Conclusion
This deepening of the memory forensic analysis perspective allows us to understand the same threat, but from a different perspective that enriches the overall context surrounding this threat. I believe I will incorporate these analyses whenever possible in future researches.
With this perspective, in addition to identifying the patterns identified during reverse engineering, we are also able to extract unique patterns from this analysis, which can help in categorizing the Tactics, Techniques, and Procedures identified during the analysis, and thus enrich the intelligence produced about this campaign.
| Tactics | Technique | Details Observed in the Analysis |
|---|---|---|
| Initial Access | Spearphishing Attachment [T1566.001] | The Threat Actor delivers, through Spear Phishing, a ZIP file targeted at the Telecom company context, containing benign software from Wondershare, which, when executed by the user, executes the malicious DLL that was placed by the adversary, executing the DLL Side-Loading technique. |
| Execution | User Execution: Malicious File [T1204.002] | Upon receiving Spear Phishing, the victim is tricked into executing the payload delivered to them. |
| Defense Evasion | Embedded Payloads [T1027.009] | Inside the Malicious DLL, it contains an encrypted payload, which is the Veletrix Loader Shellcode. |
| Defense Evasion | Dynamic API Resolution [T1027.007] | Both the malicious DLL and Shellcode implement this technique to evade static detection of their capabilities. |
| Defense Evasion | Process Injection [T1055] | To be executed by the benign PE, the malicious DLL injects a Shellcode that will initiate communication with the C&C server. |
| Defense Evasion | Encrypted/Encoded File [T1027.013] | The Shellcode present in the malicious DLL is encrypted and obfuscated using the IPV4Fuscated technique. |
| Command and Control | Non-Standard Port [T1571] | Shellcode Communicates with the C&C Server via TCP Protocol on port TCP/9999. |
| Command and Control | Ingress Tool Transfer [T1105] | Shellcode connects to the C&C Server to download and execute in VShell memory |
I hope you, the reader, enjoyed this new perspective on Veletrix Loader research. Until next time!